Marguerites Cookbook

A cooking blog all about making vintage recipes from a cookbook we inherited from our grandmother

  • Home
  • Recipes
    • Main Dishes
    • Appetizers and Sides
    • Desserts
    • Breakfast
  • About
  • Contact

November 1, 2016 by: Shannon and Aaron

Perfect Pie Crust

pie crust header

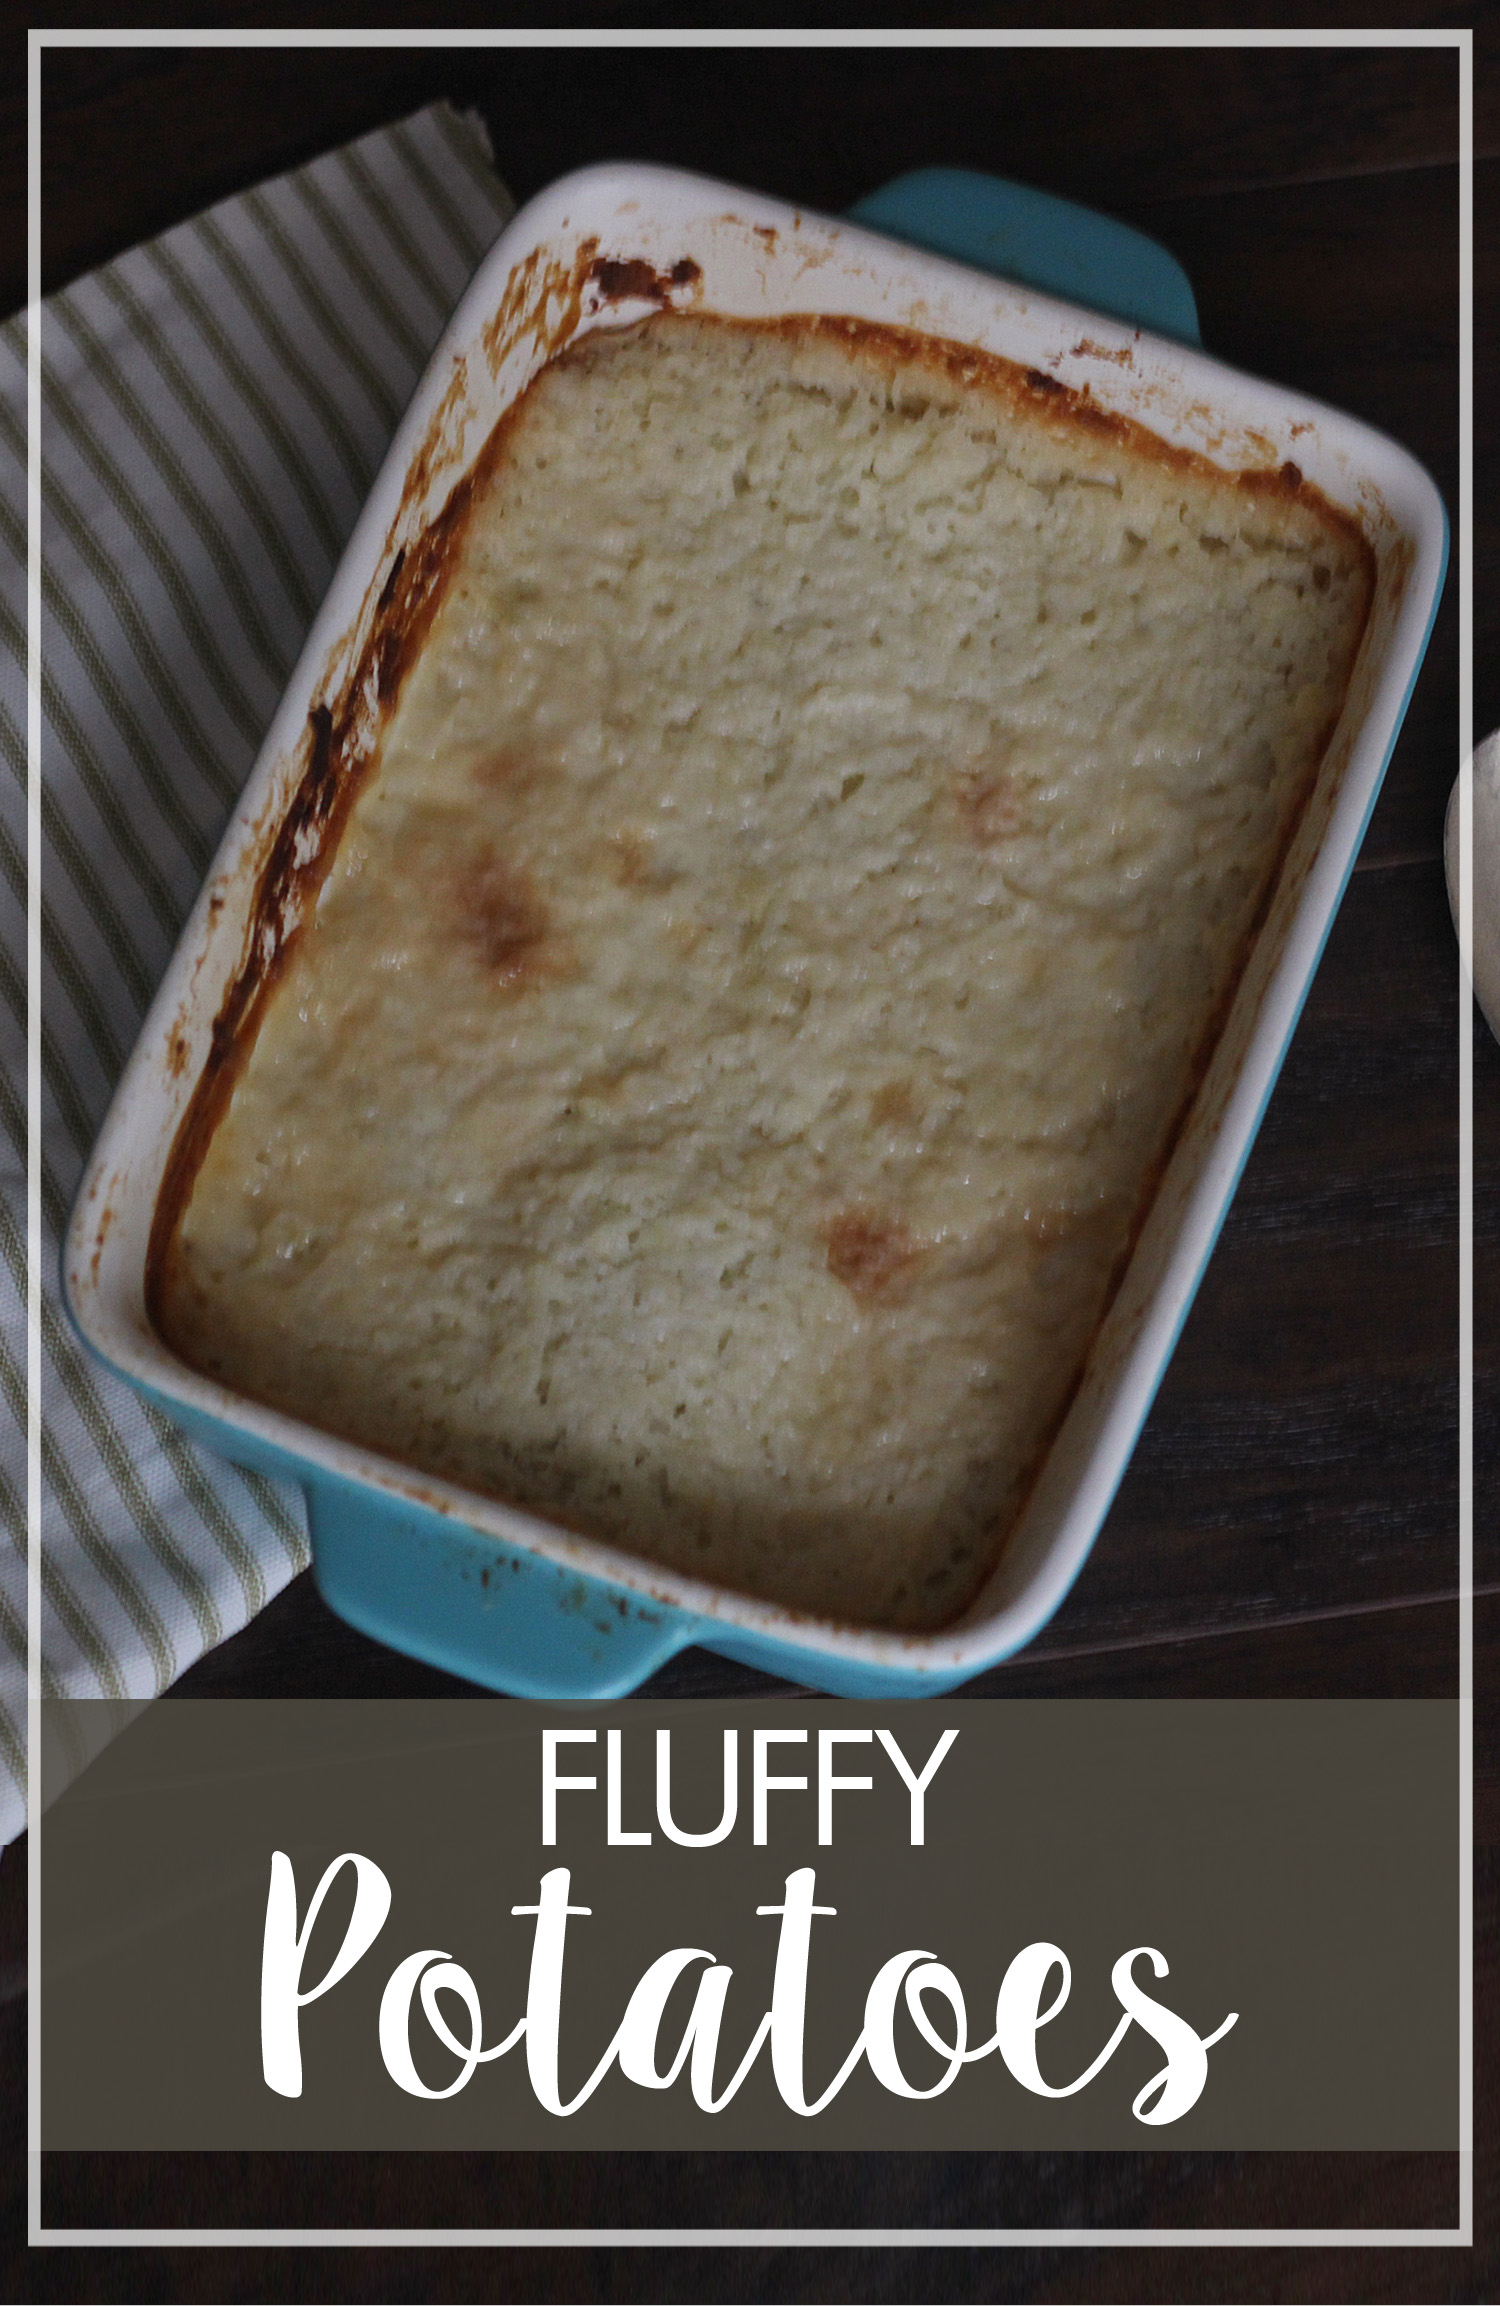
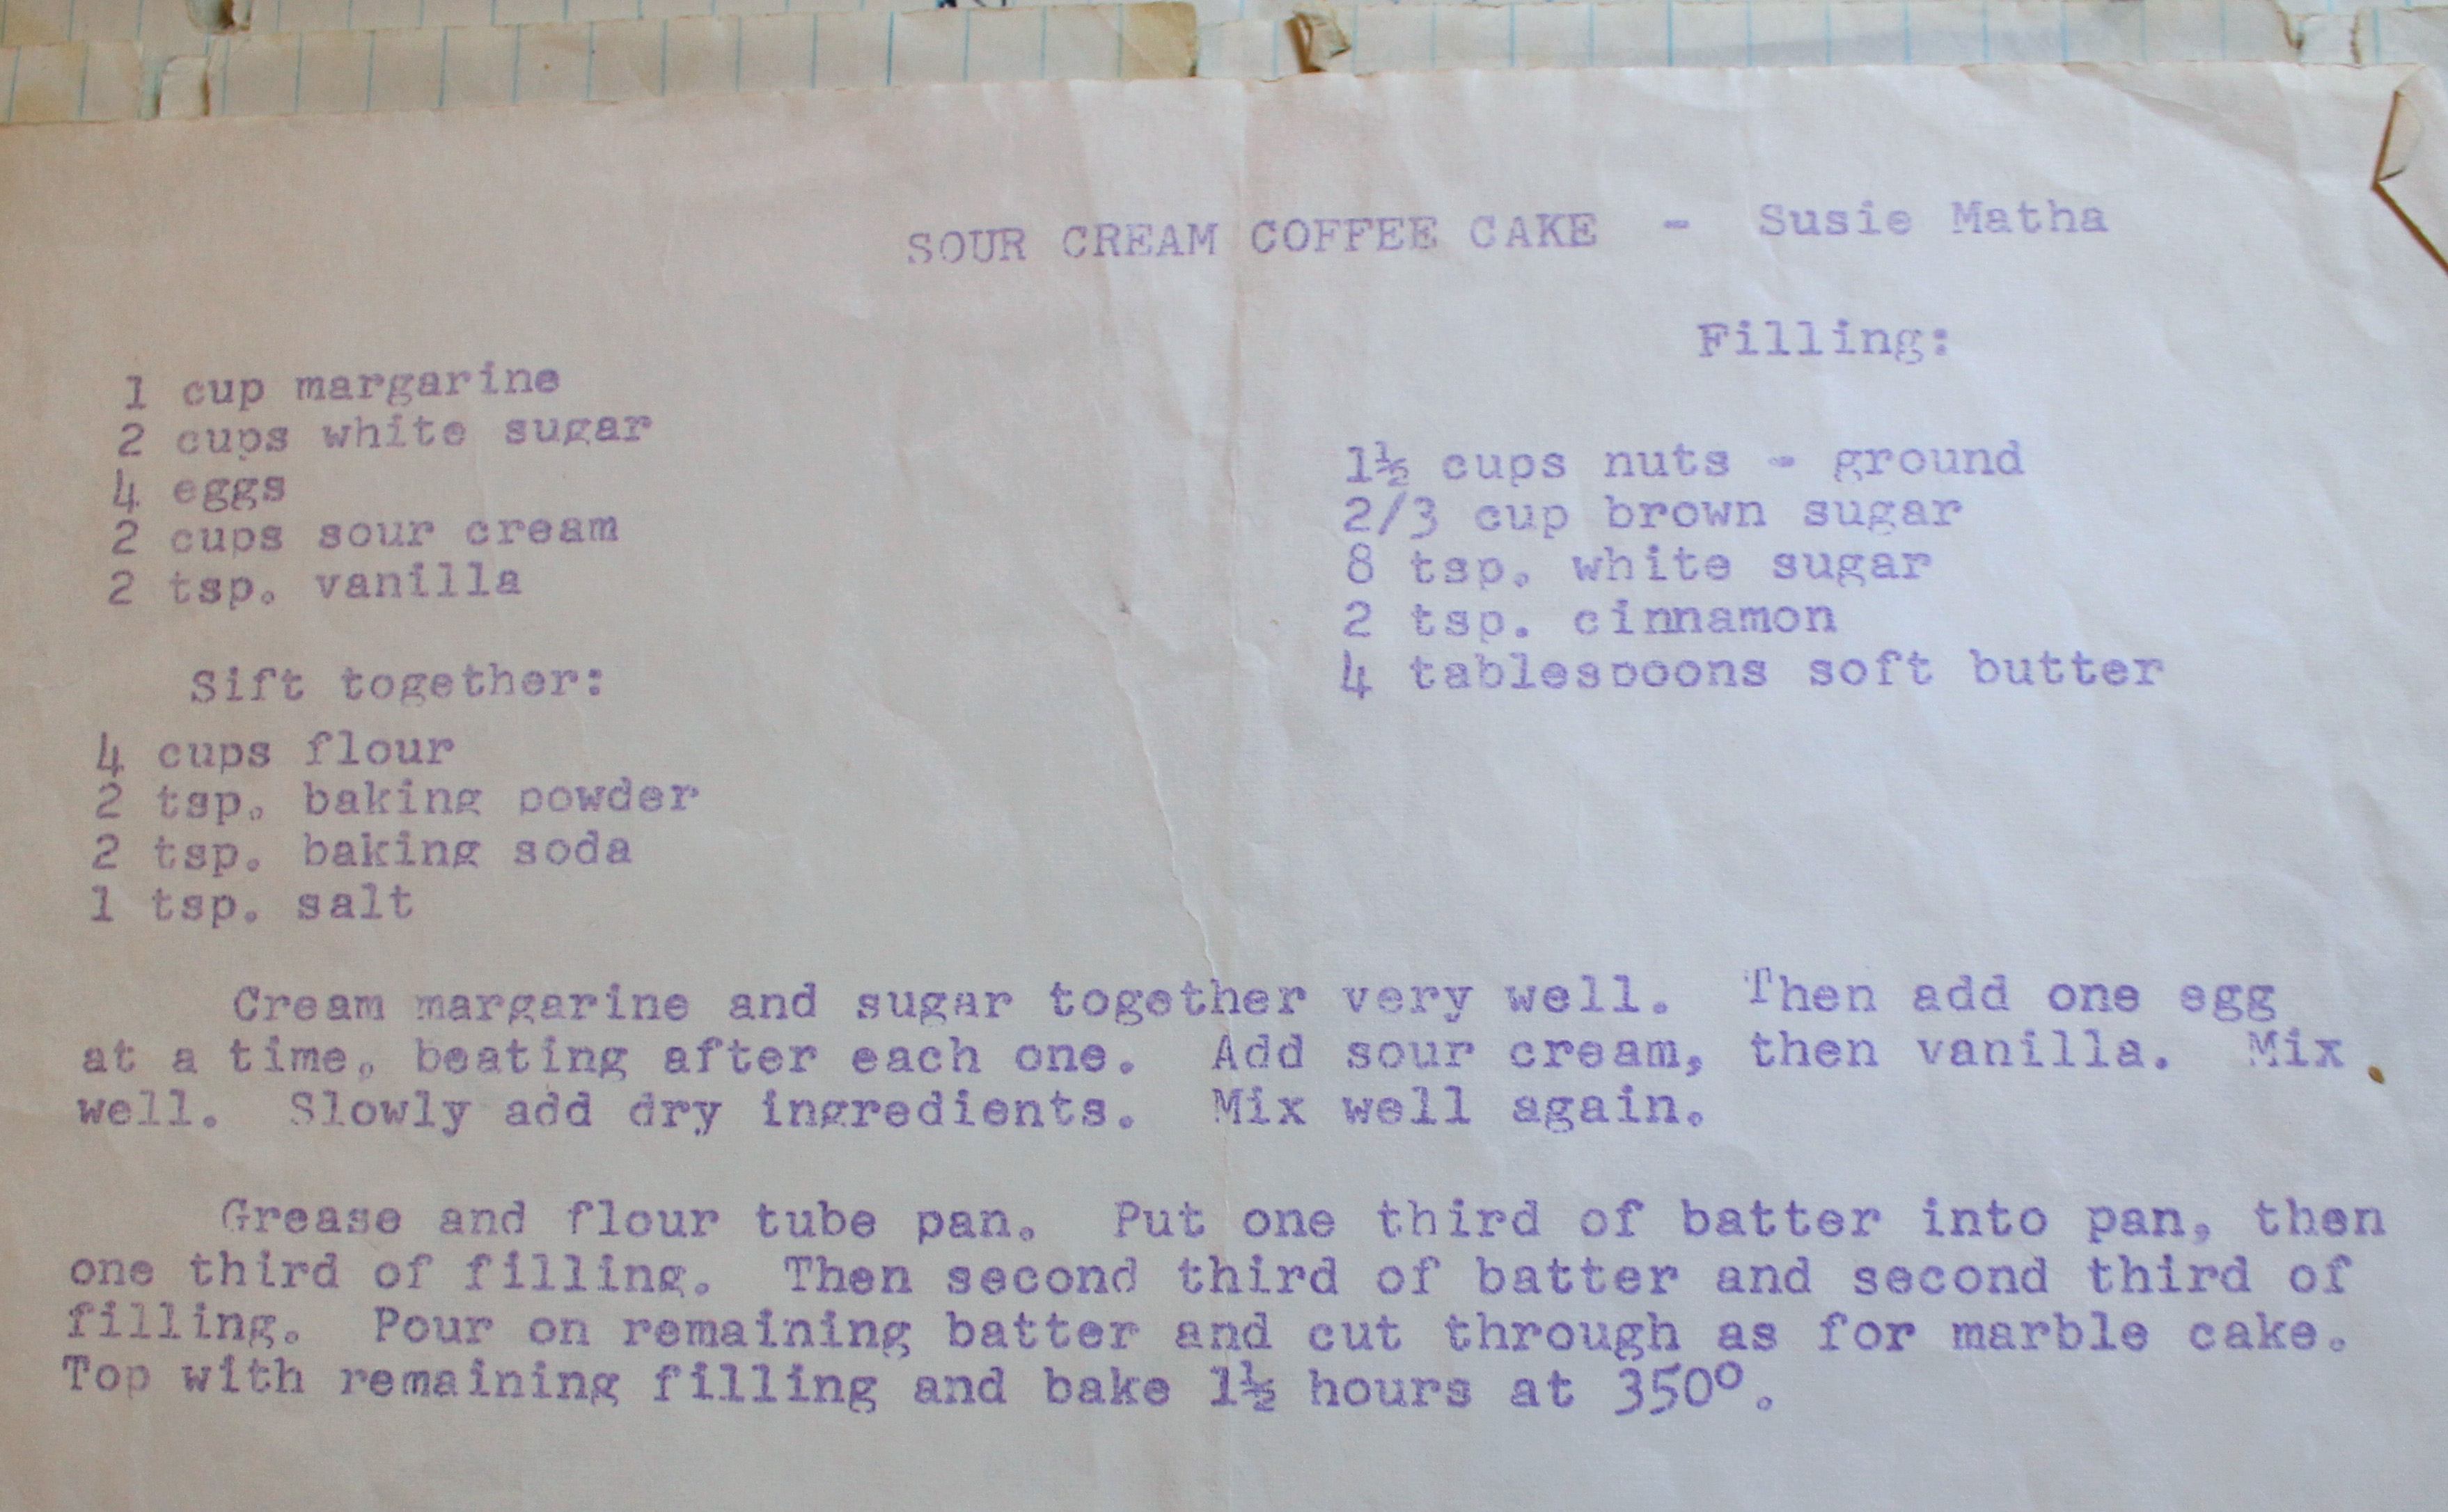
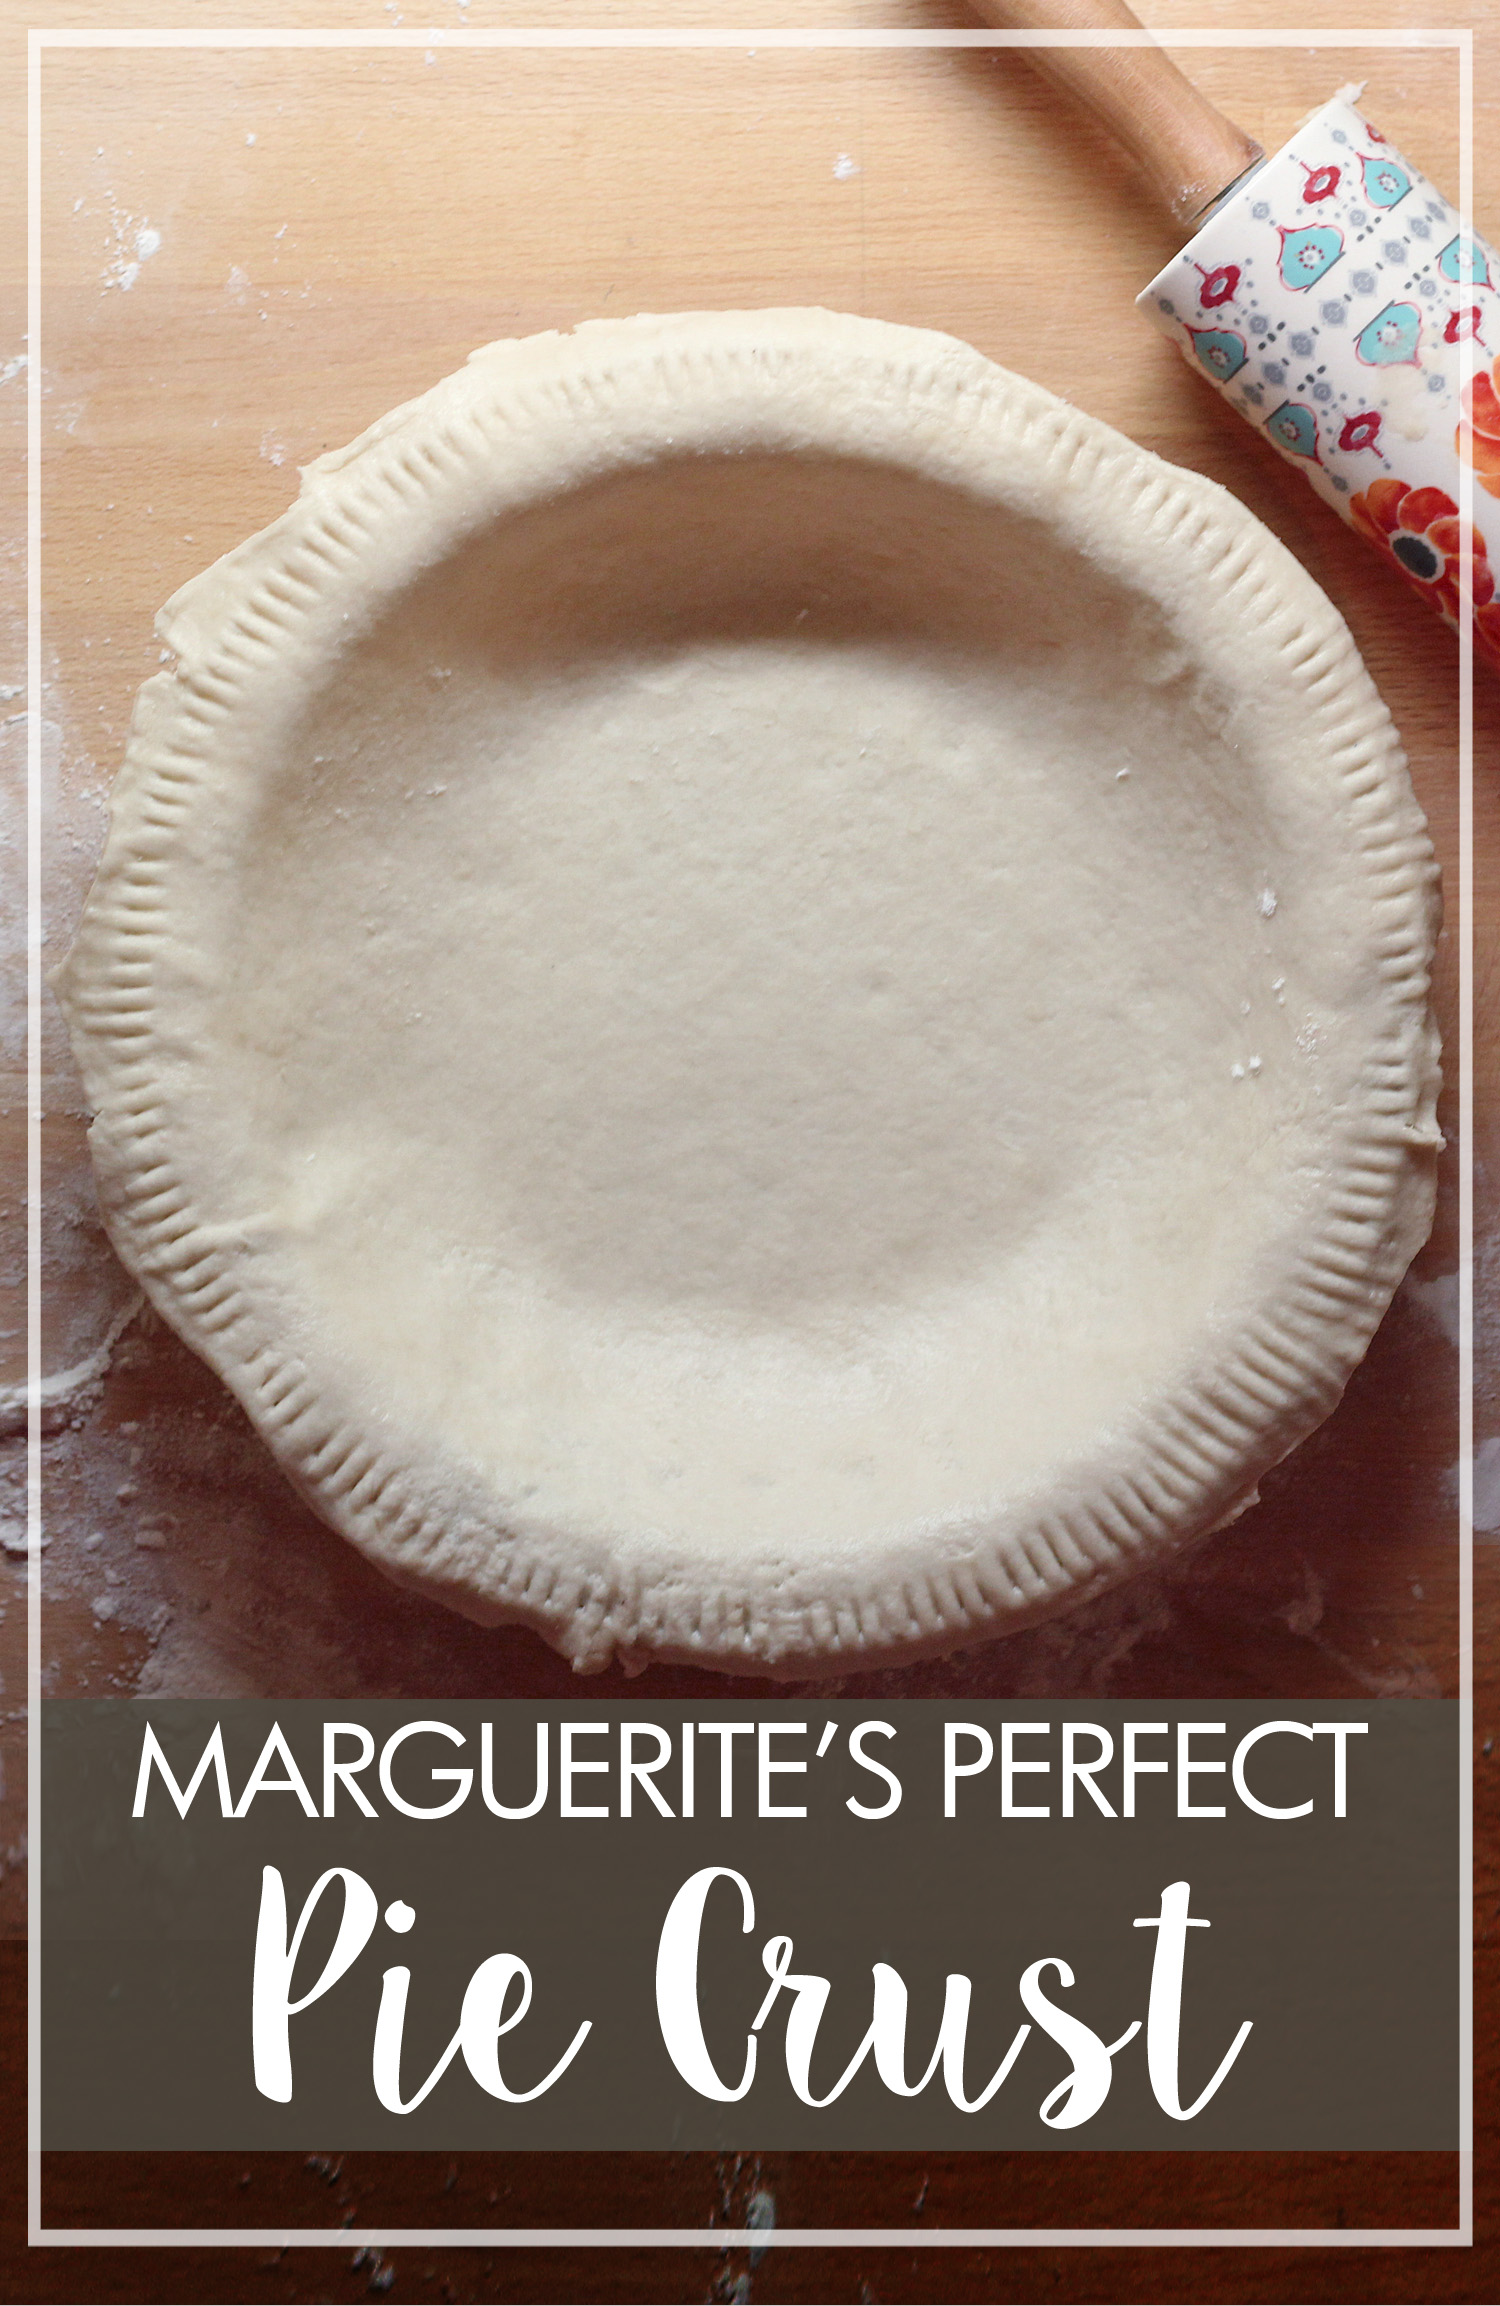
Happy Pie Month! To kick off this month of delicious desserts, we’re going to start with the basics. According to many people in our family, the best part of Marguerite’s pies were the crust. While there was not a handwritten recipe anywhere in the cookbook, Aaron’s mom was able to give us the low-down.

Perfect Pie Crust

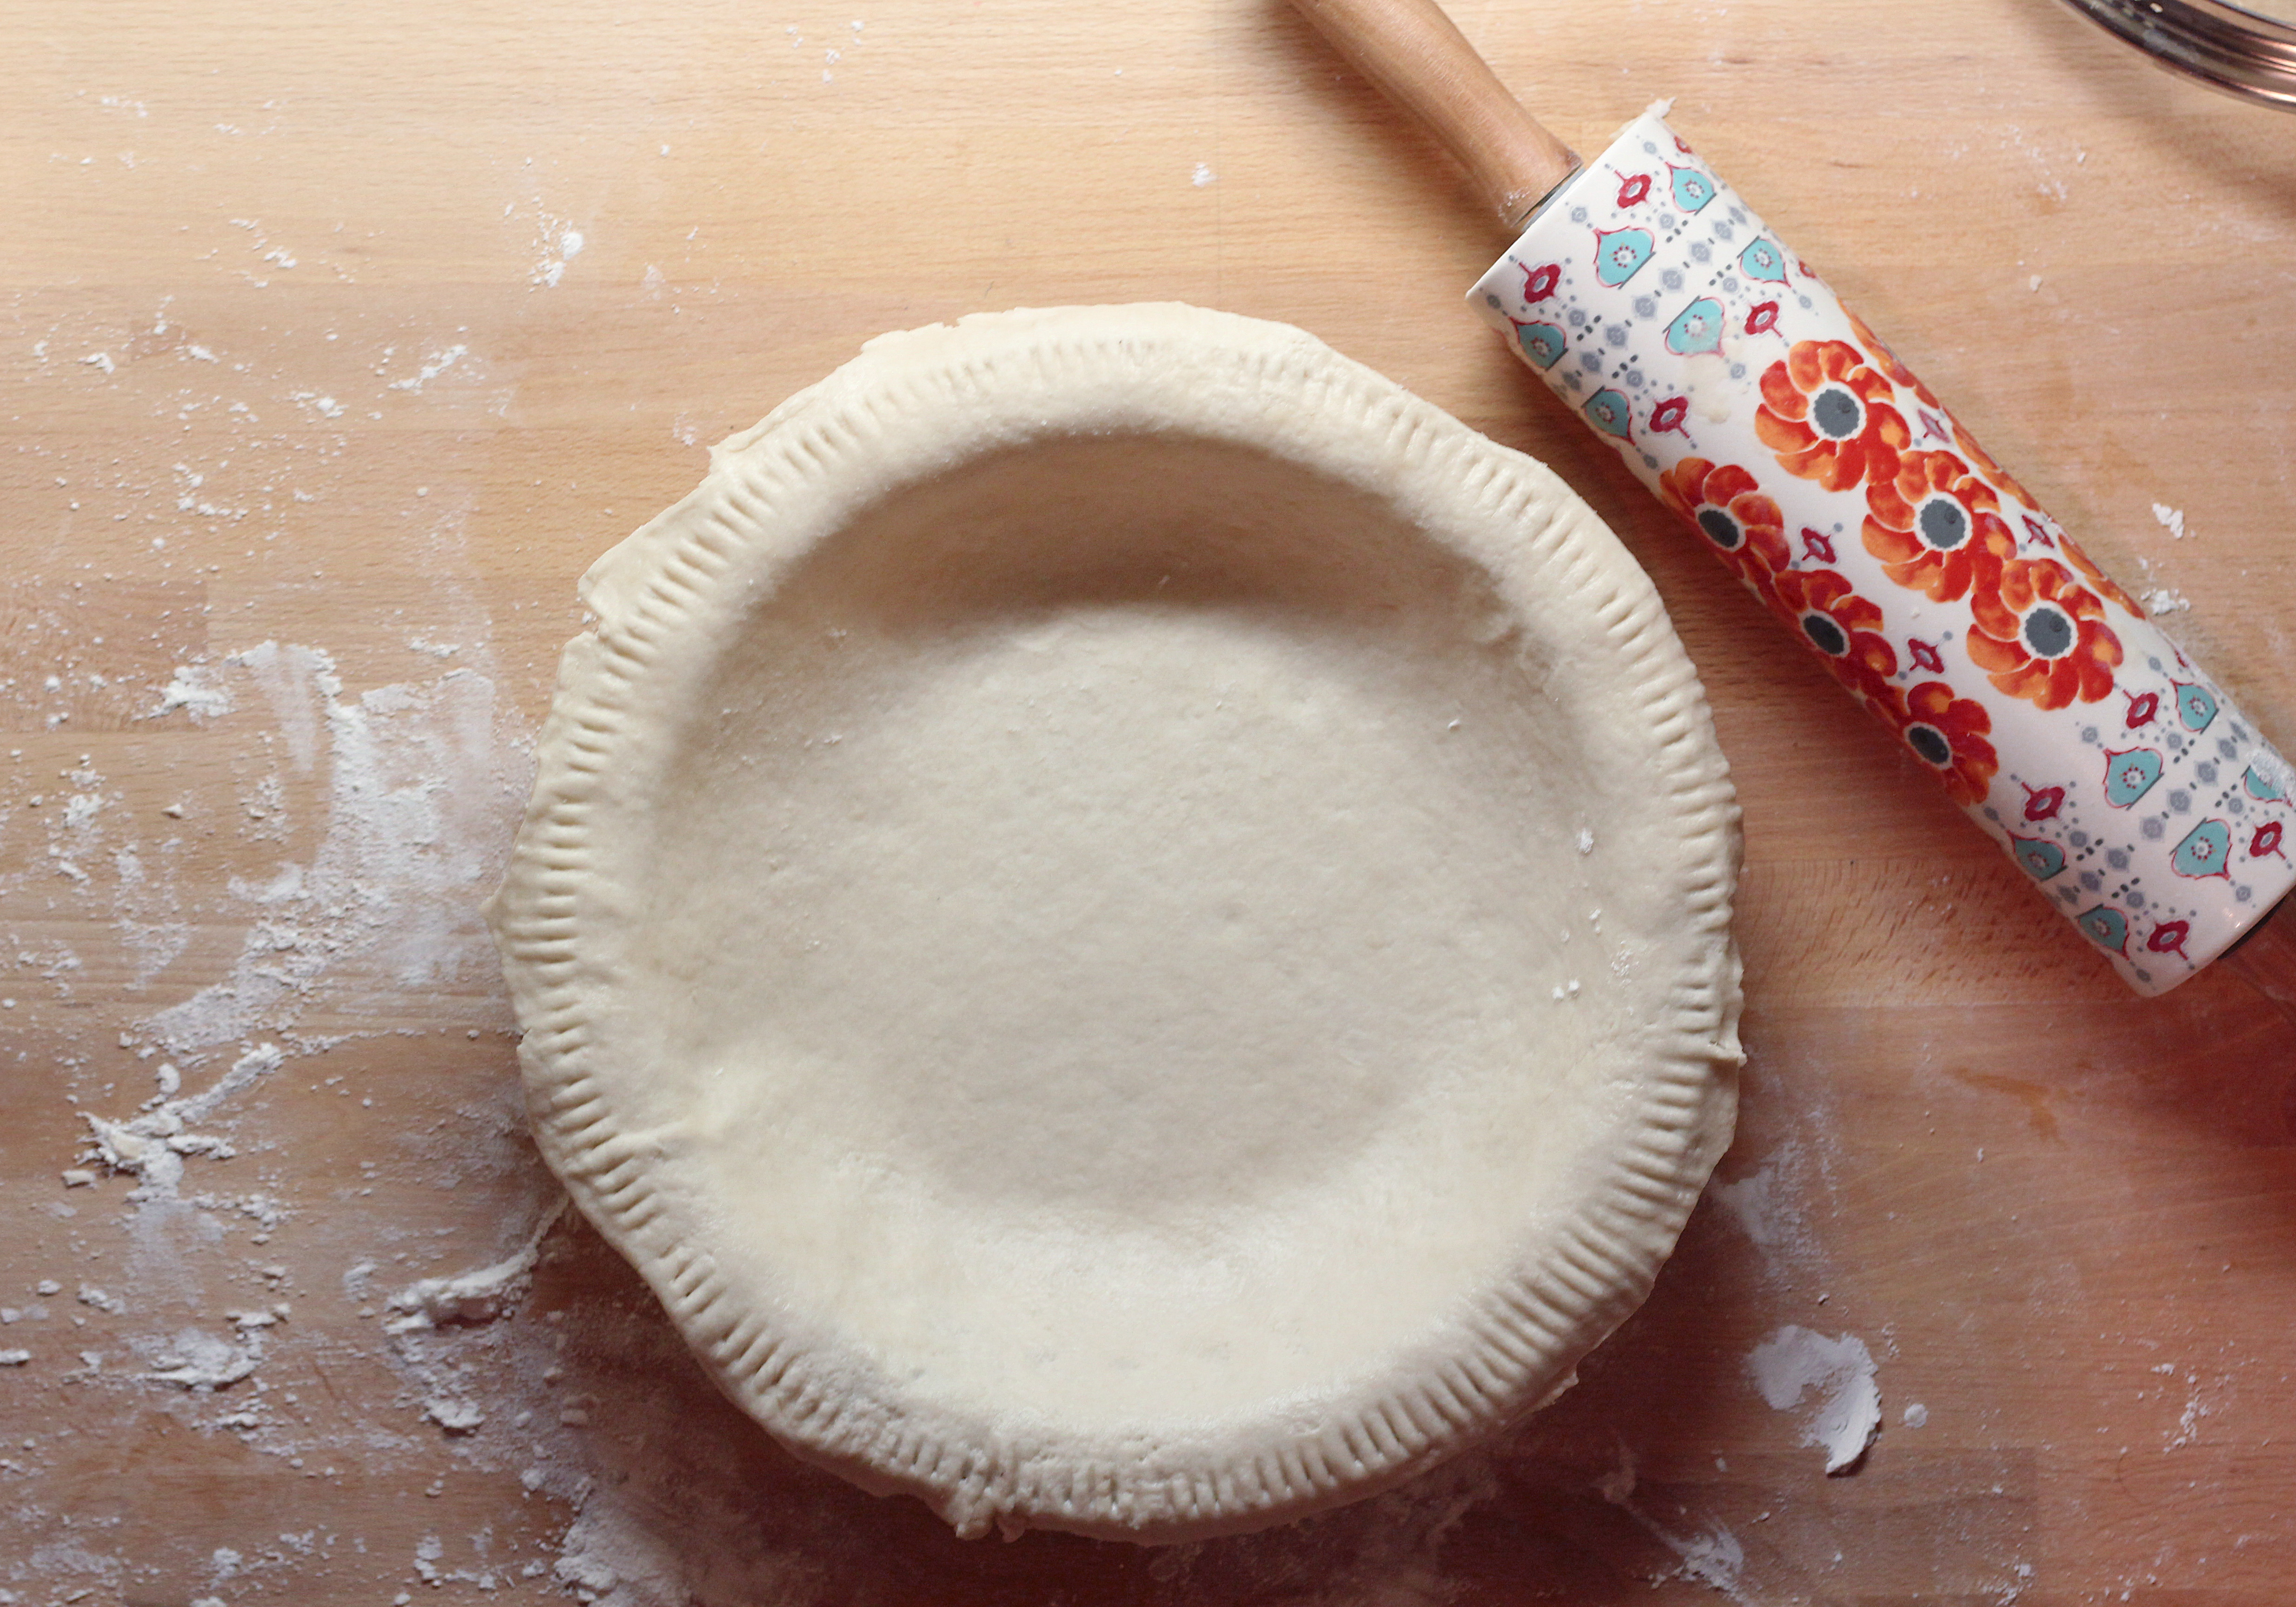
Marguerite used a basic Crisco pie crust recipe. Aaron’s mom, Mercedes, is a bit of an expert on this crust. She tried to make pies with Marguerite and similar to Marguerite’s many times. A difficult task, because Marguerite said the best crust was one that you didn’t handle too much. Mercedes confessed it was something she was never great at. We think we aren’t quite there yet either, but with the amount of pie’s we’ll be making on this blog, we are hopeful we can get there someday! We already covered it a while ago with our Cranberry Cherry Pie, but we think it’s worth giving it it’s own post.

Cranberry Cherry pie and slice

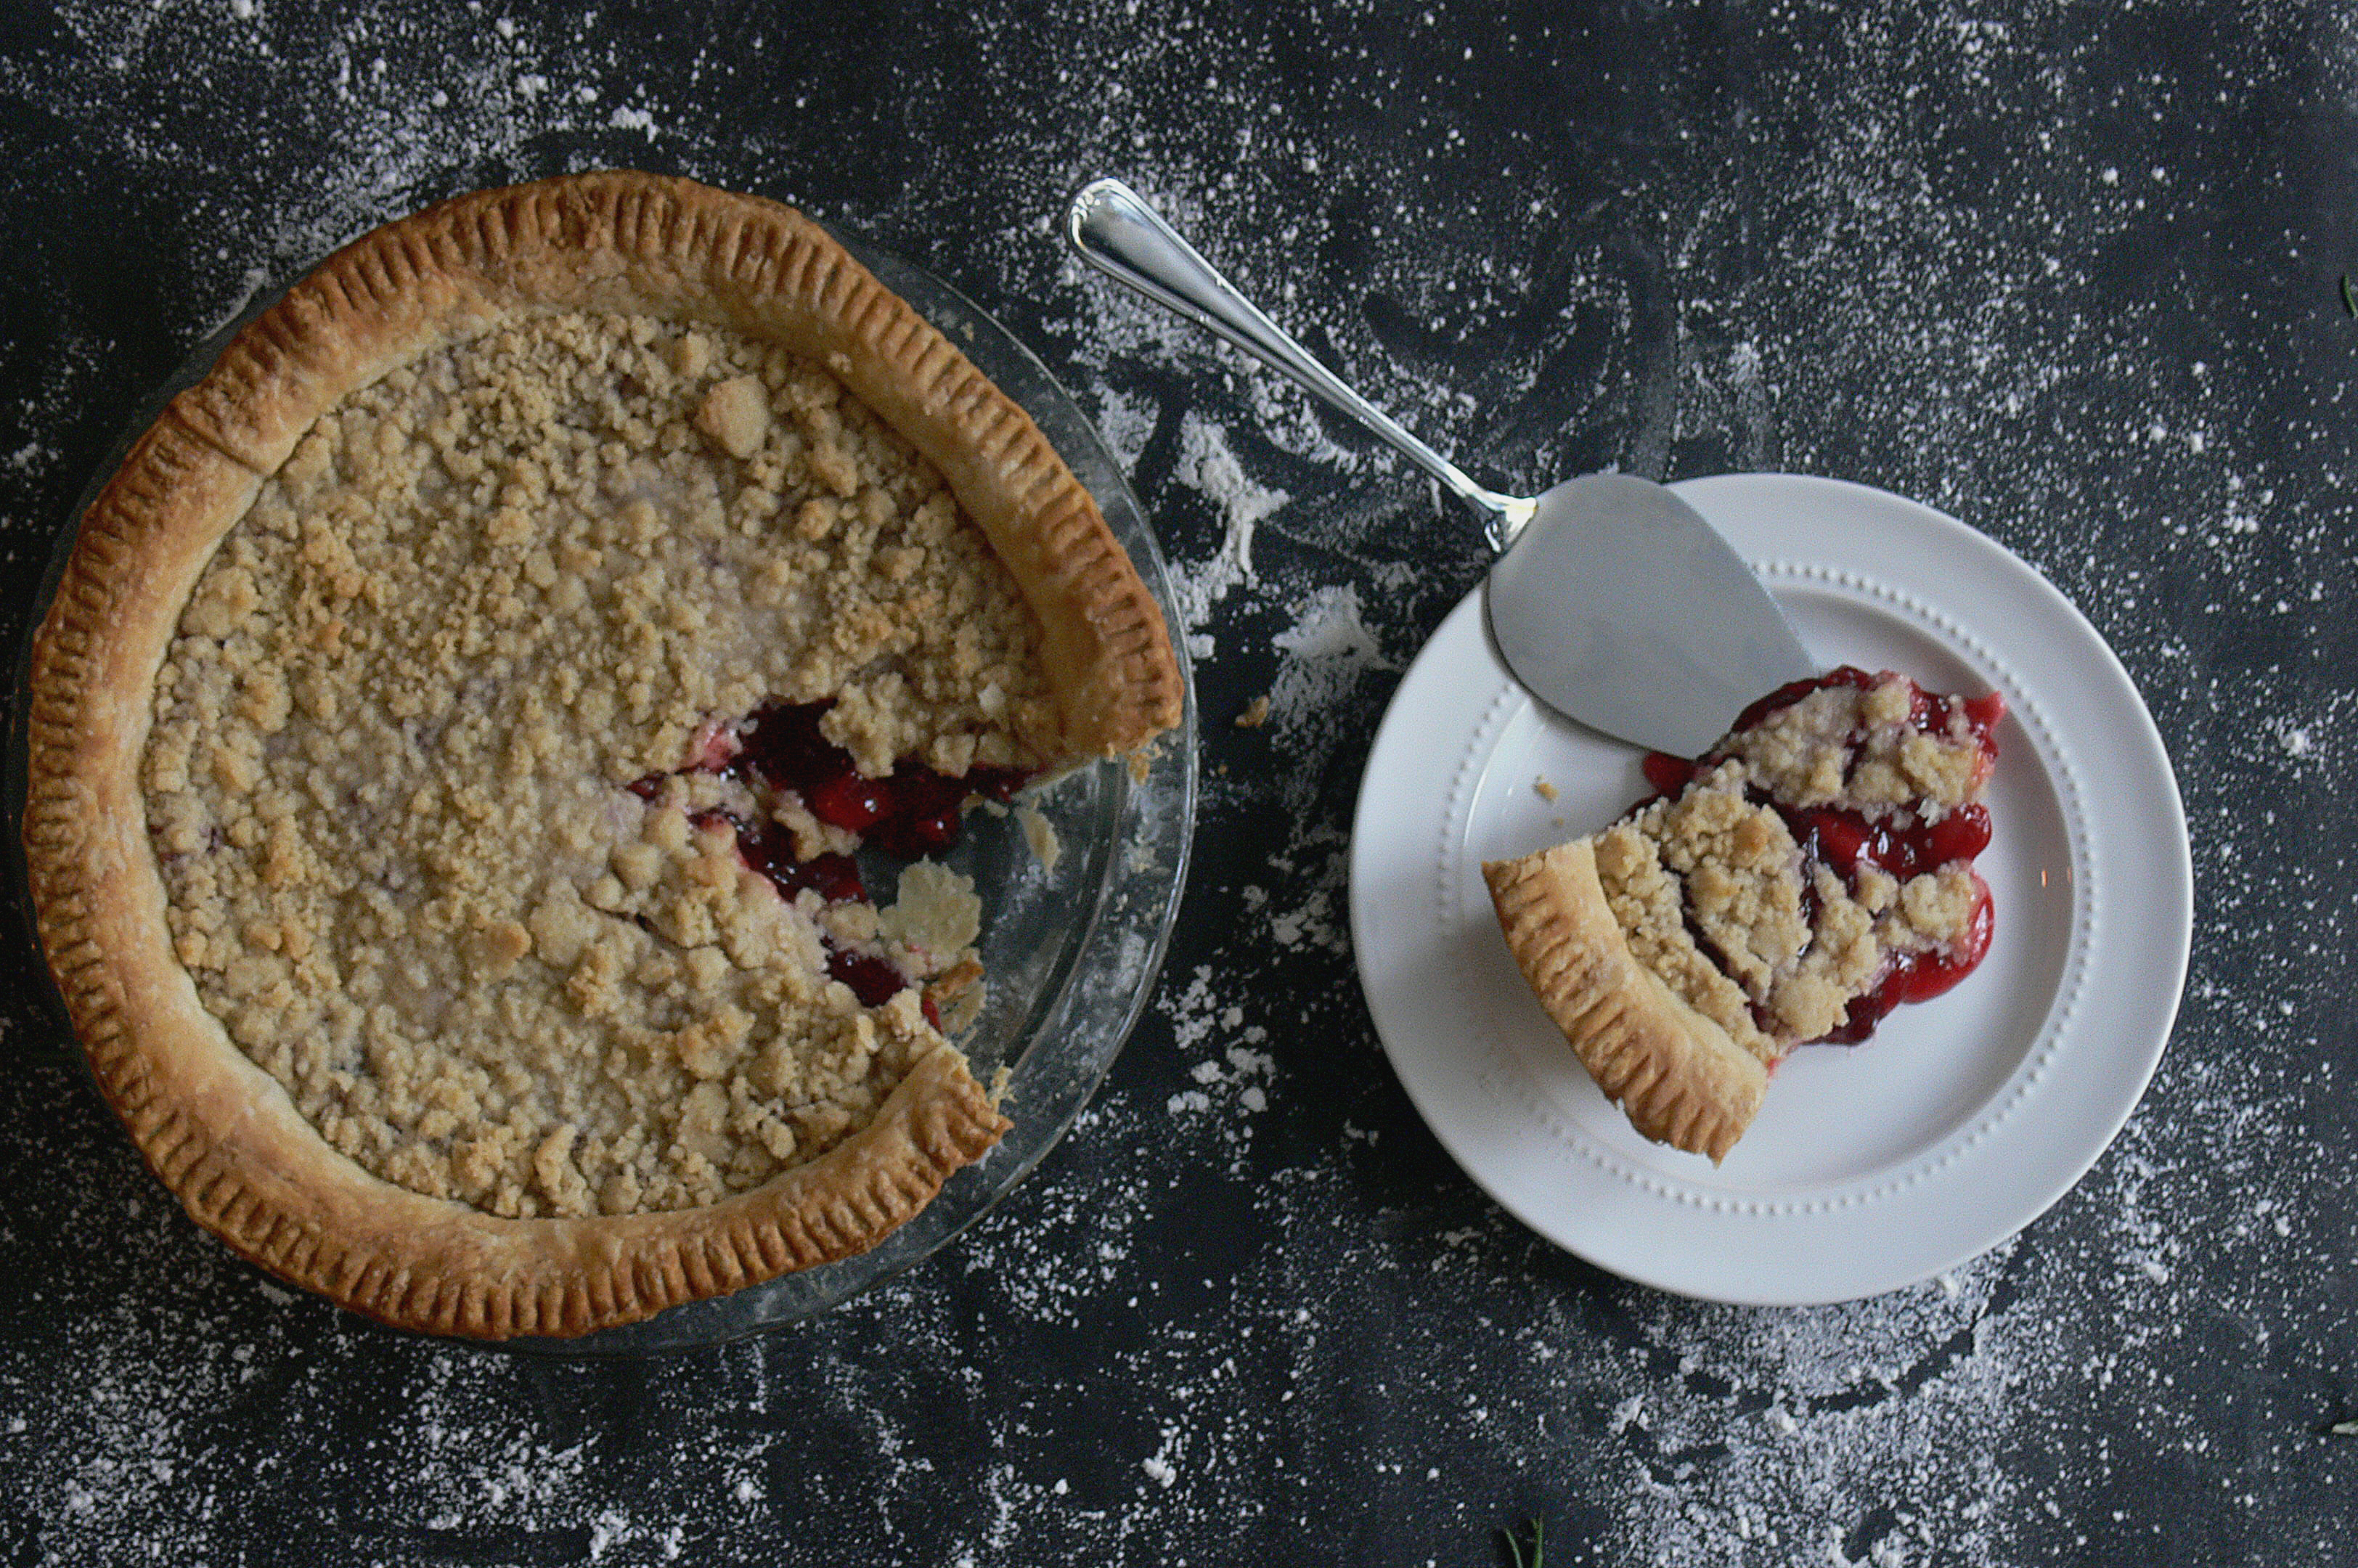
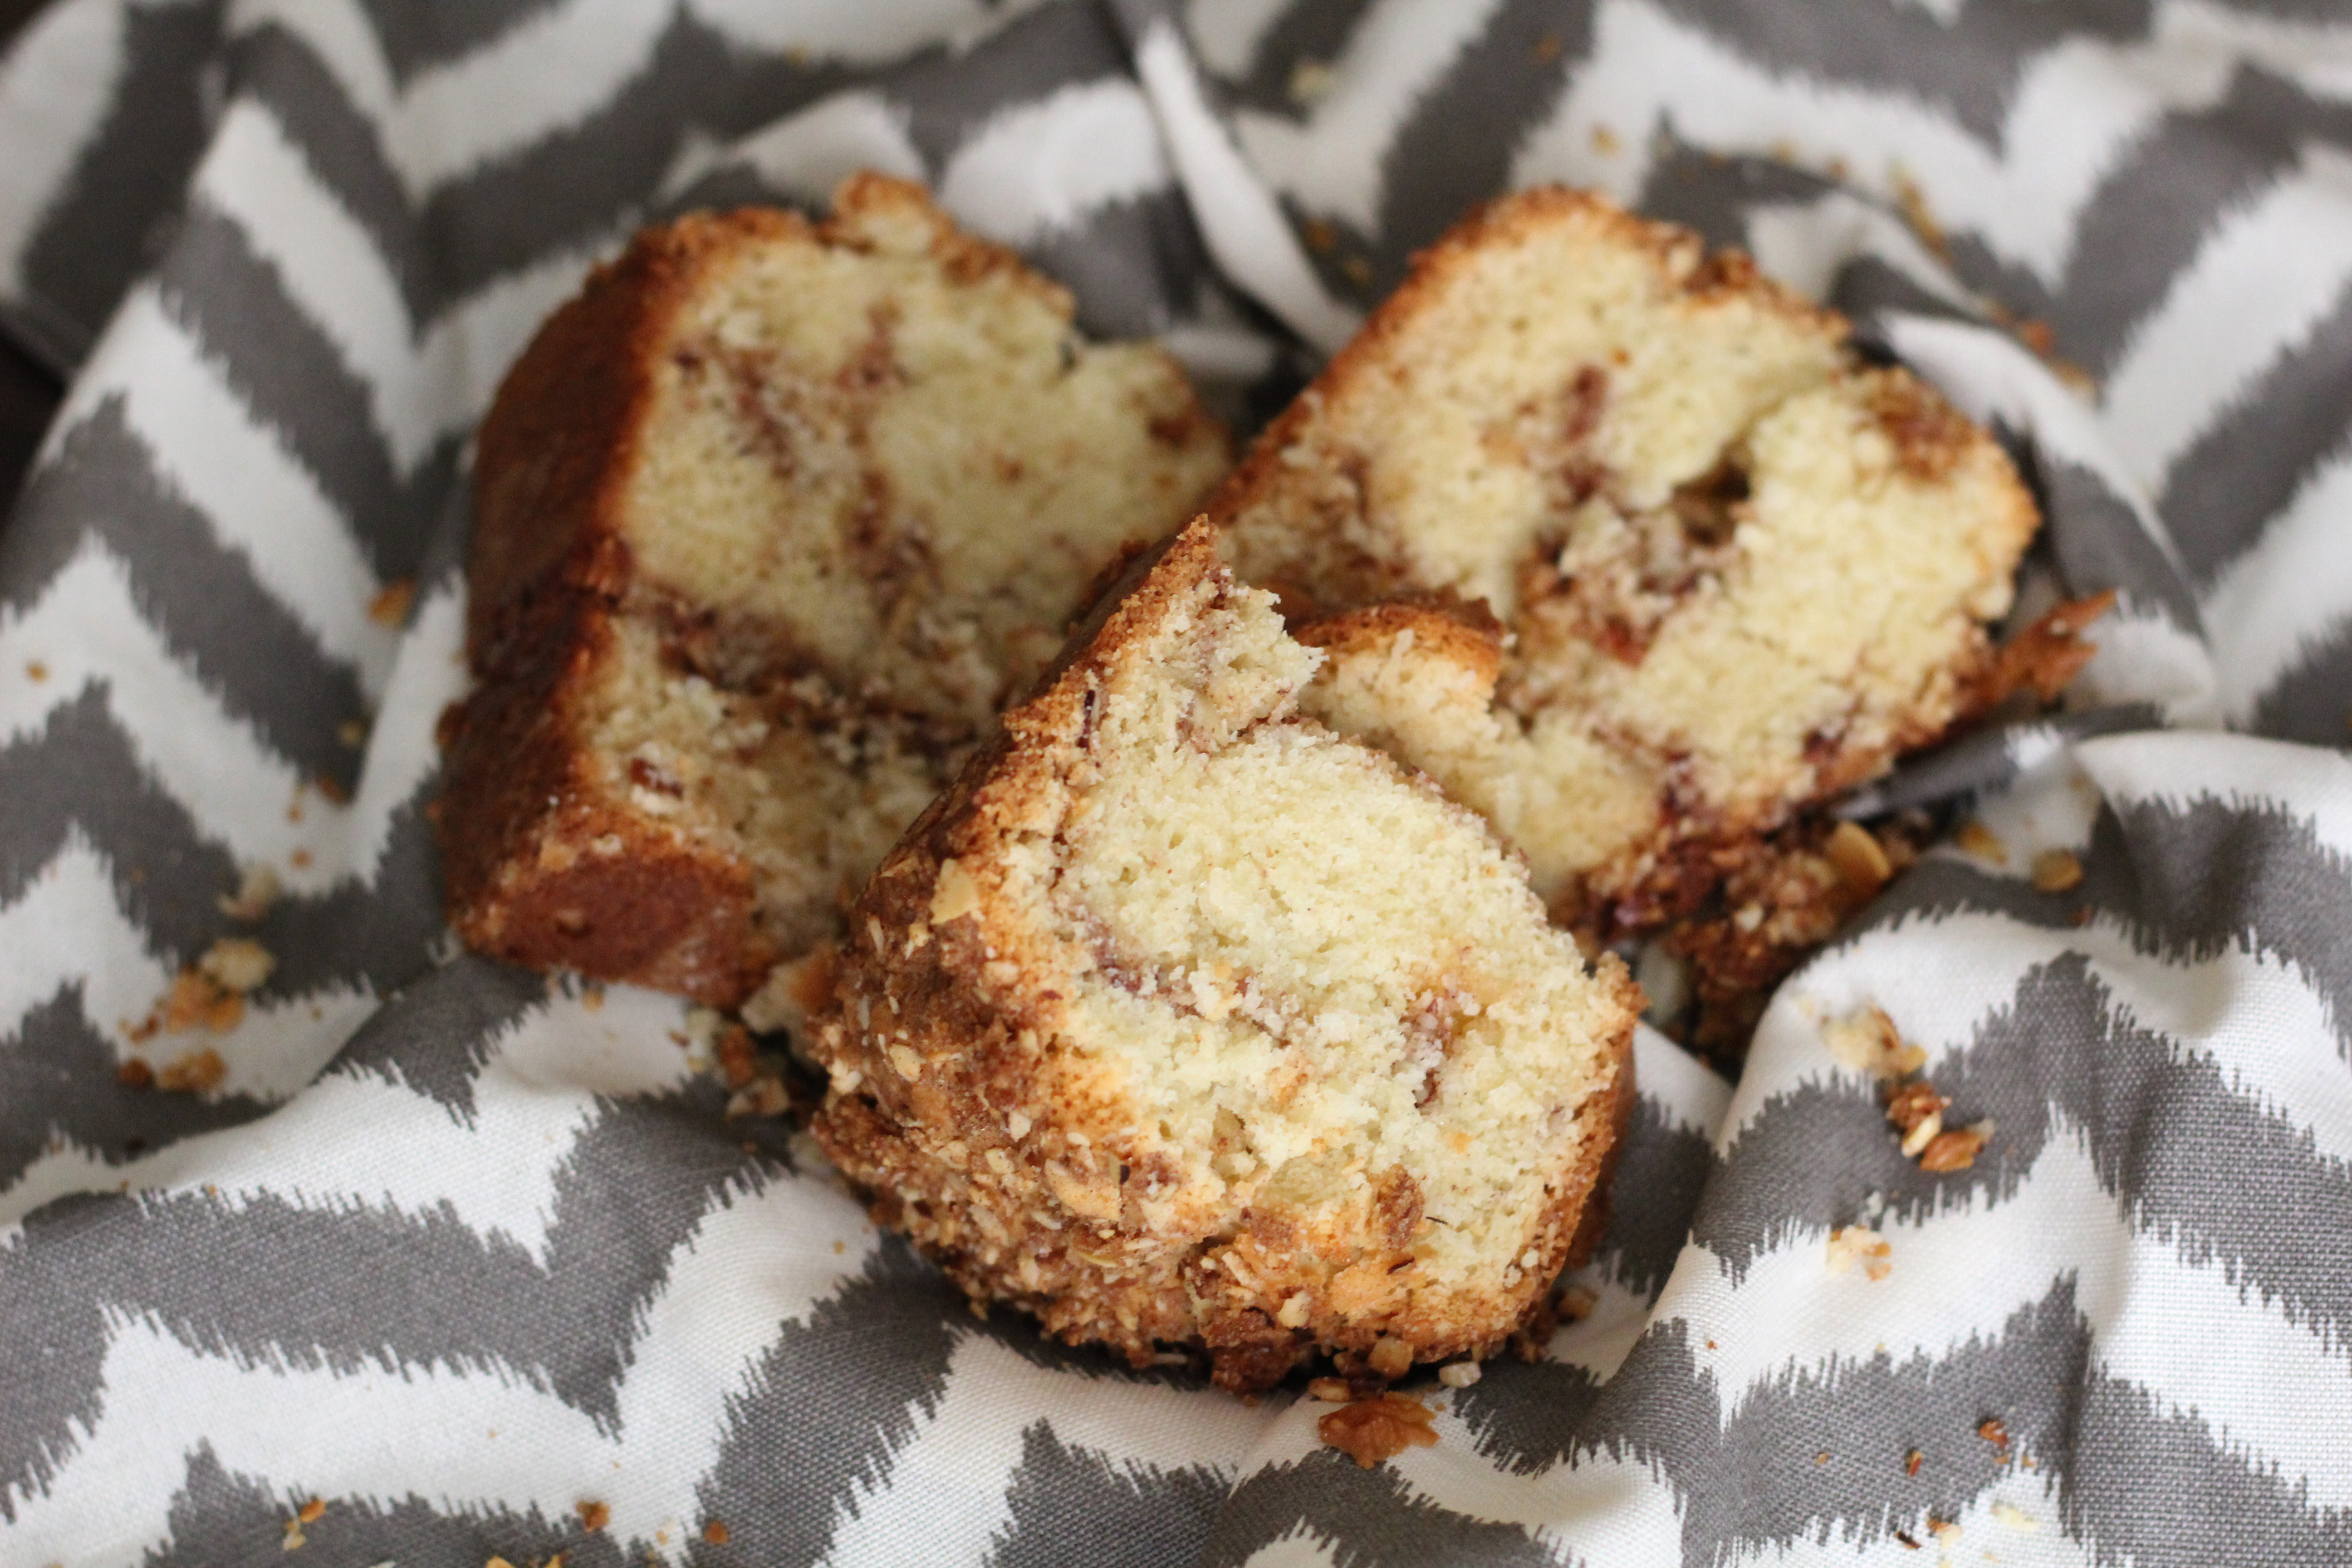
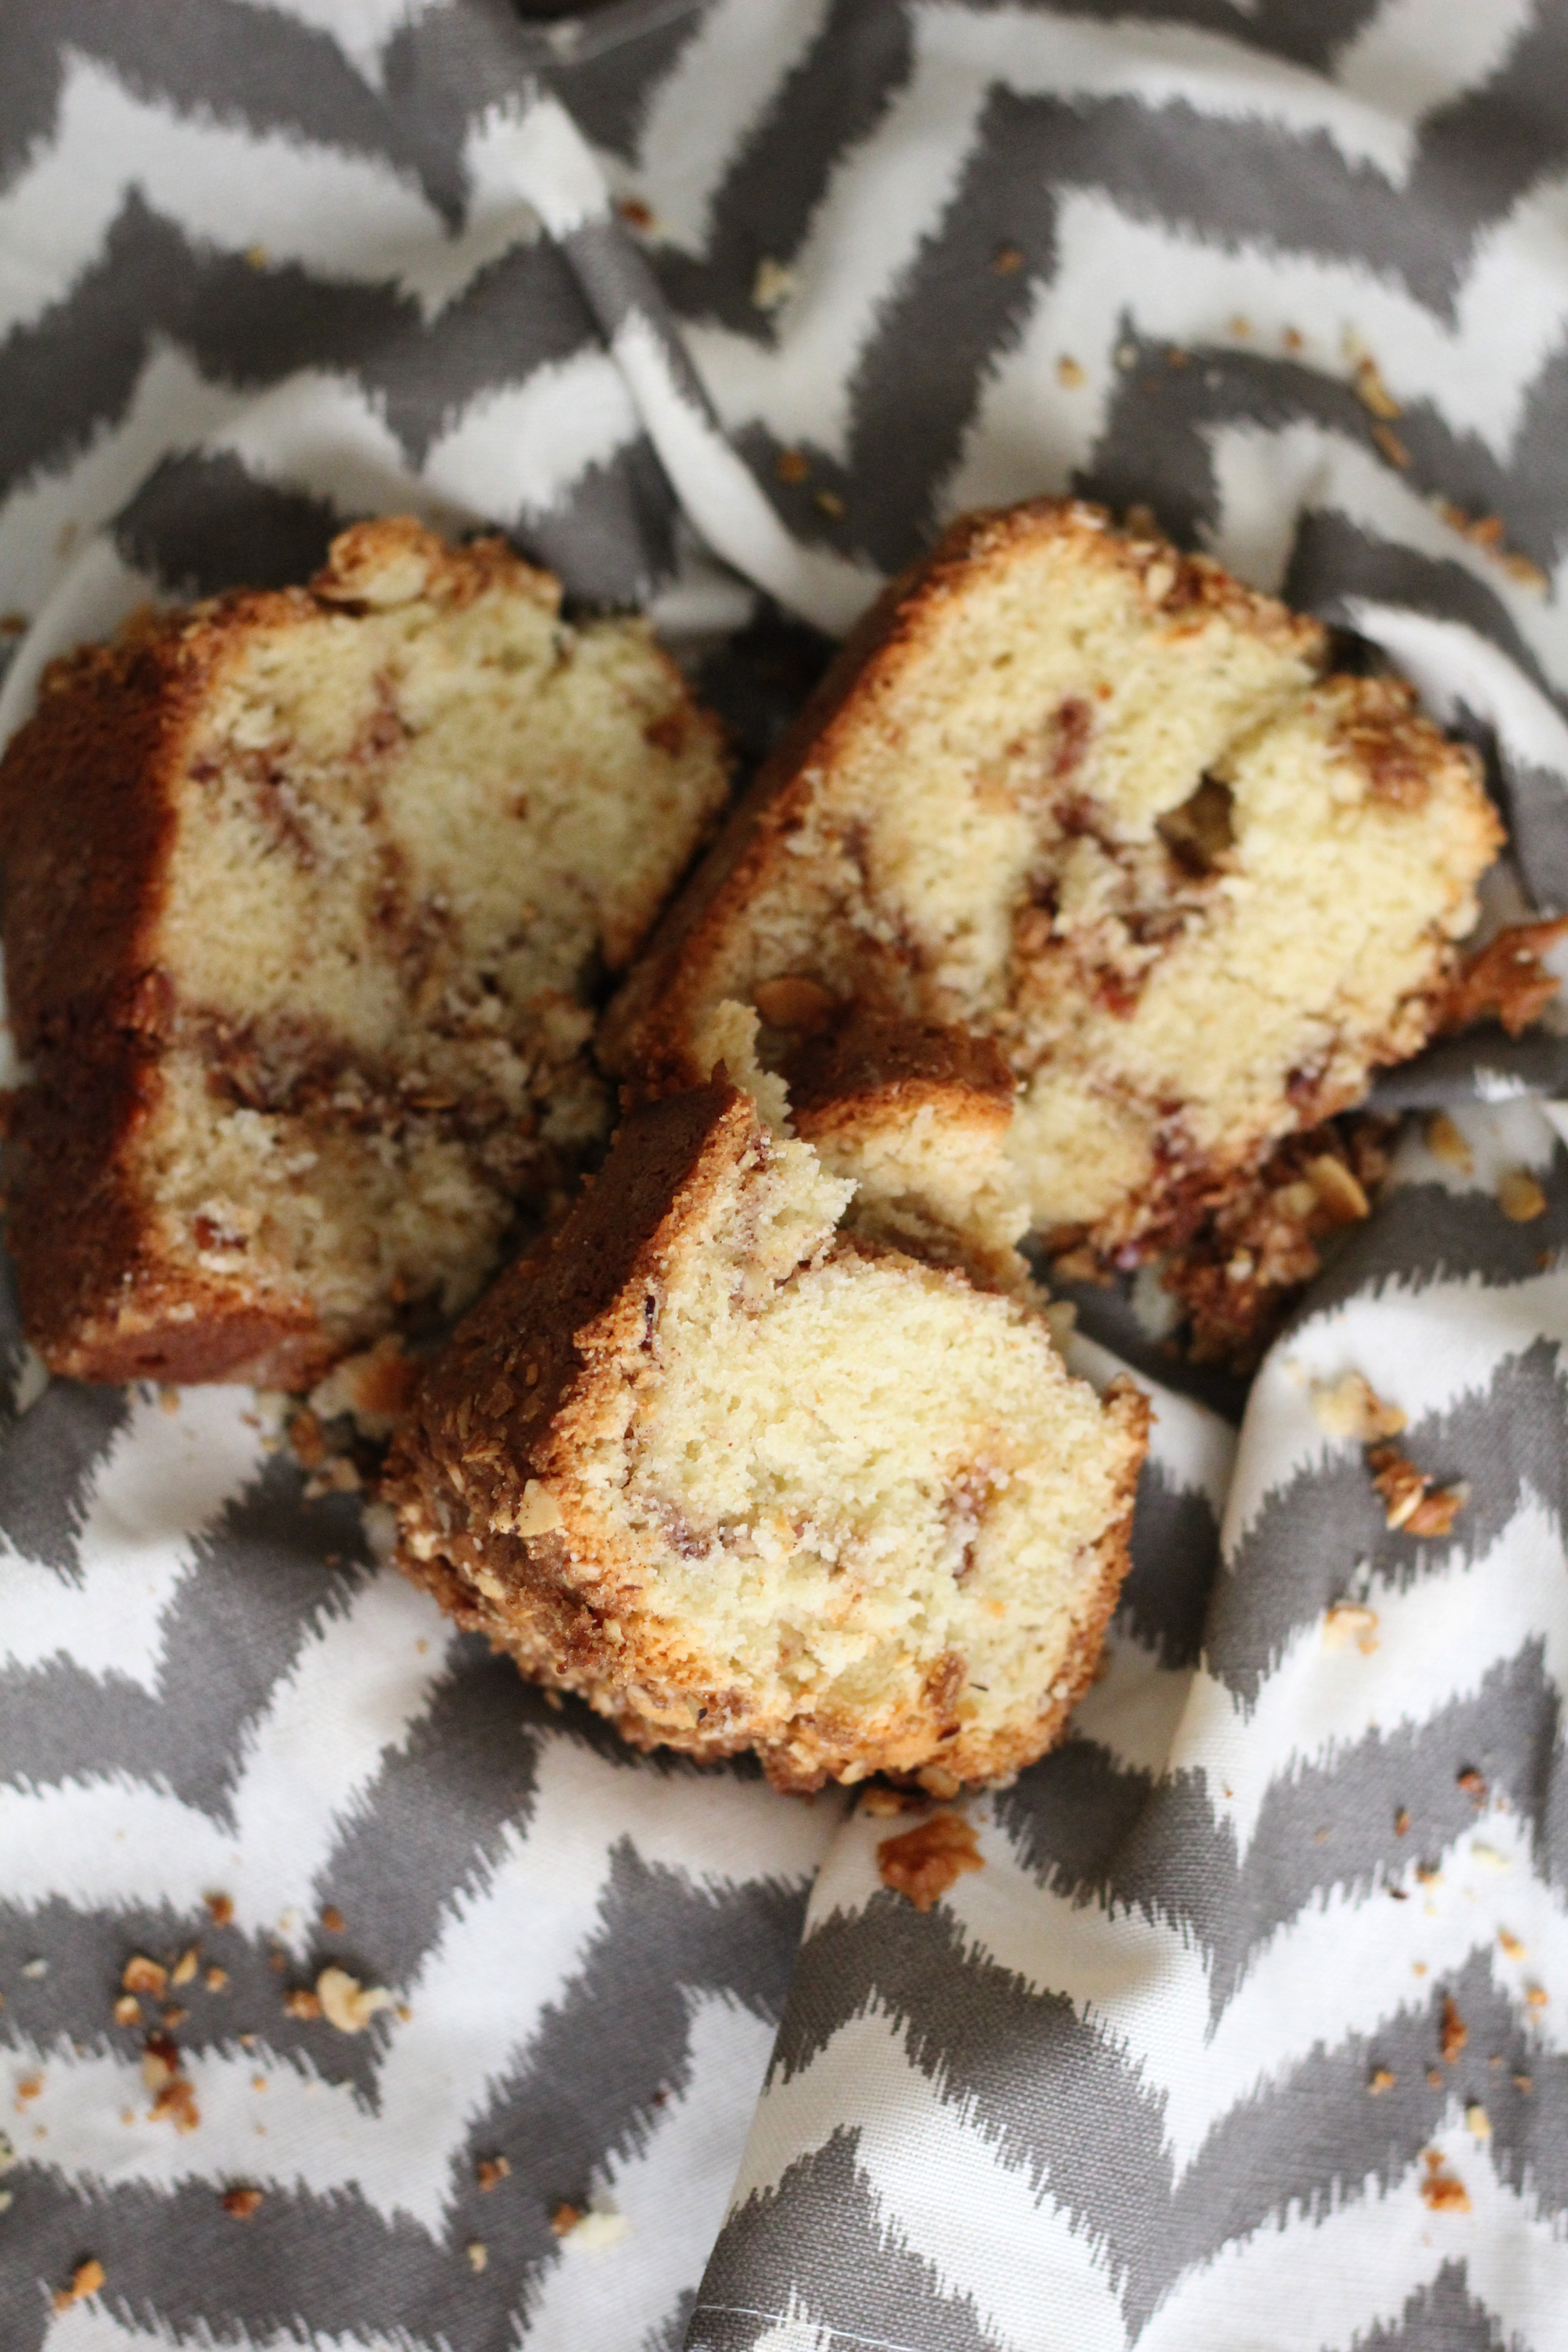
Aforementioned Cranberry Cherry Pie, made with this crust

Some of the pies in this month will not be made with Marguerite’s perfect pie crust. We’re trying to balance out some of the more “traditional pies” with some unique ones; many of which don’t involve a traditional crust. Just for ease, we’ll also be using a few pre-made pie crusts in place of this crust as well.

That being said, Marguerite’s perfect pie crust is something we enjoy making, because it is one of the things she made best that everyone remembers. So keep an eye out during Pie Month for this crust!

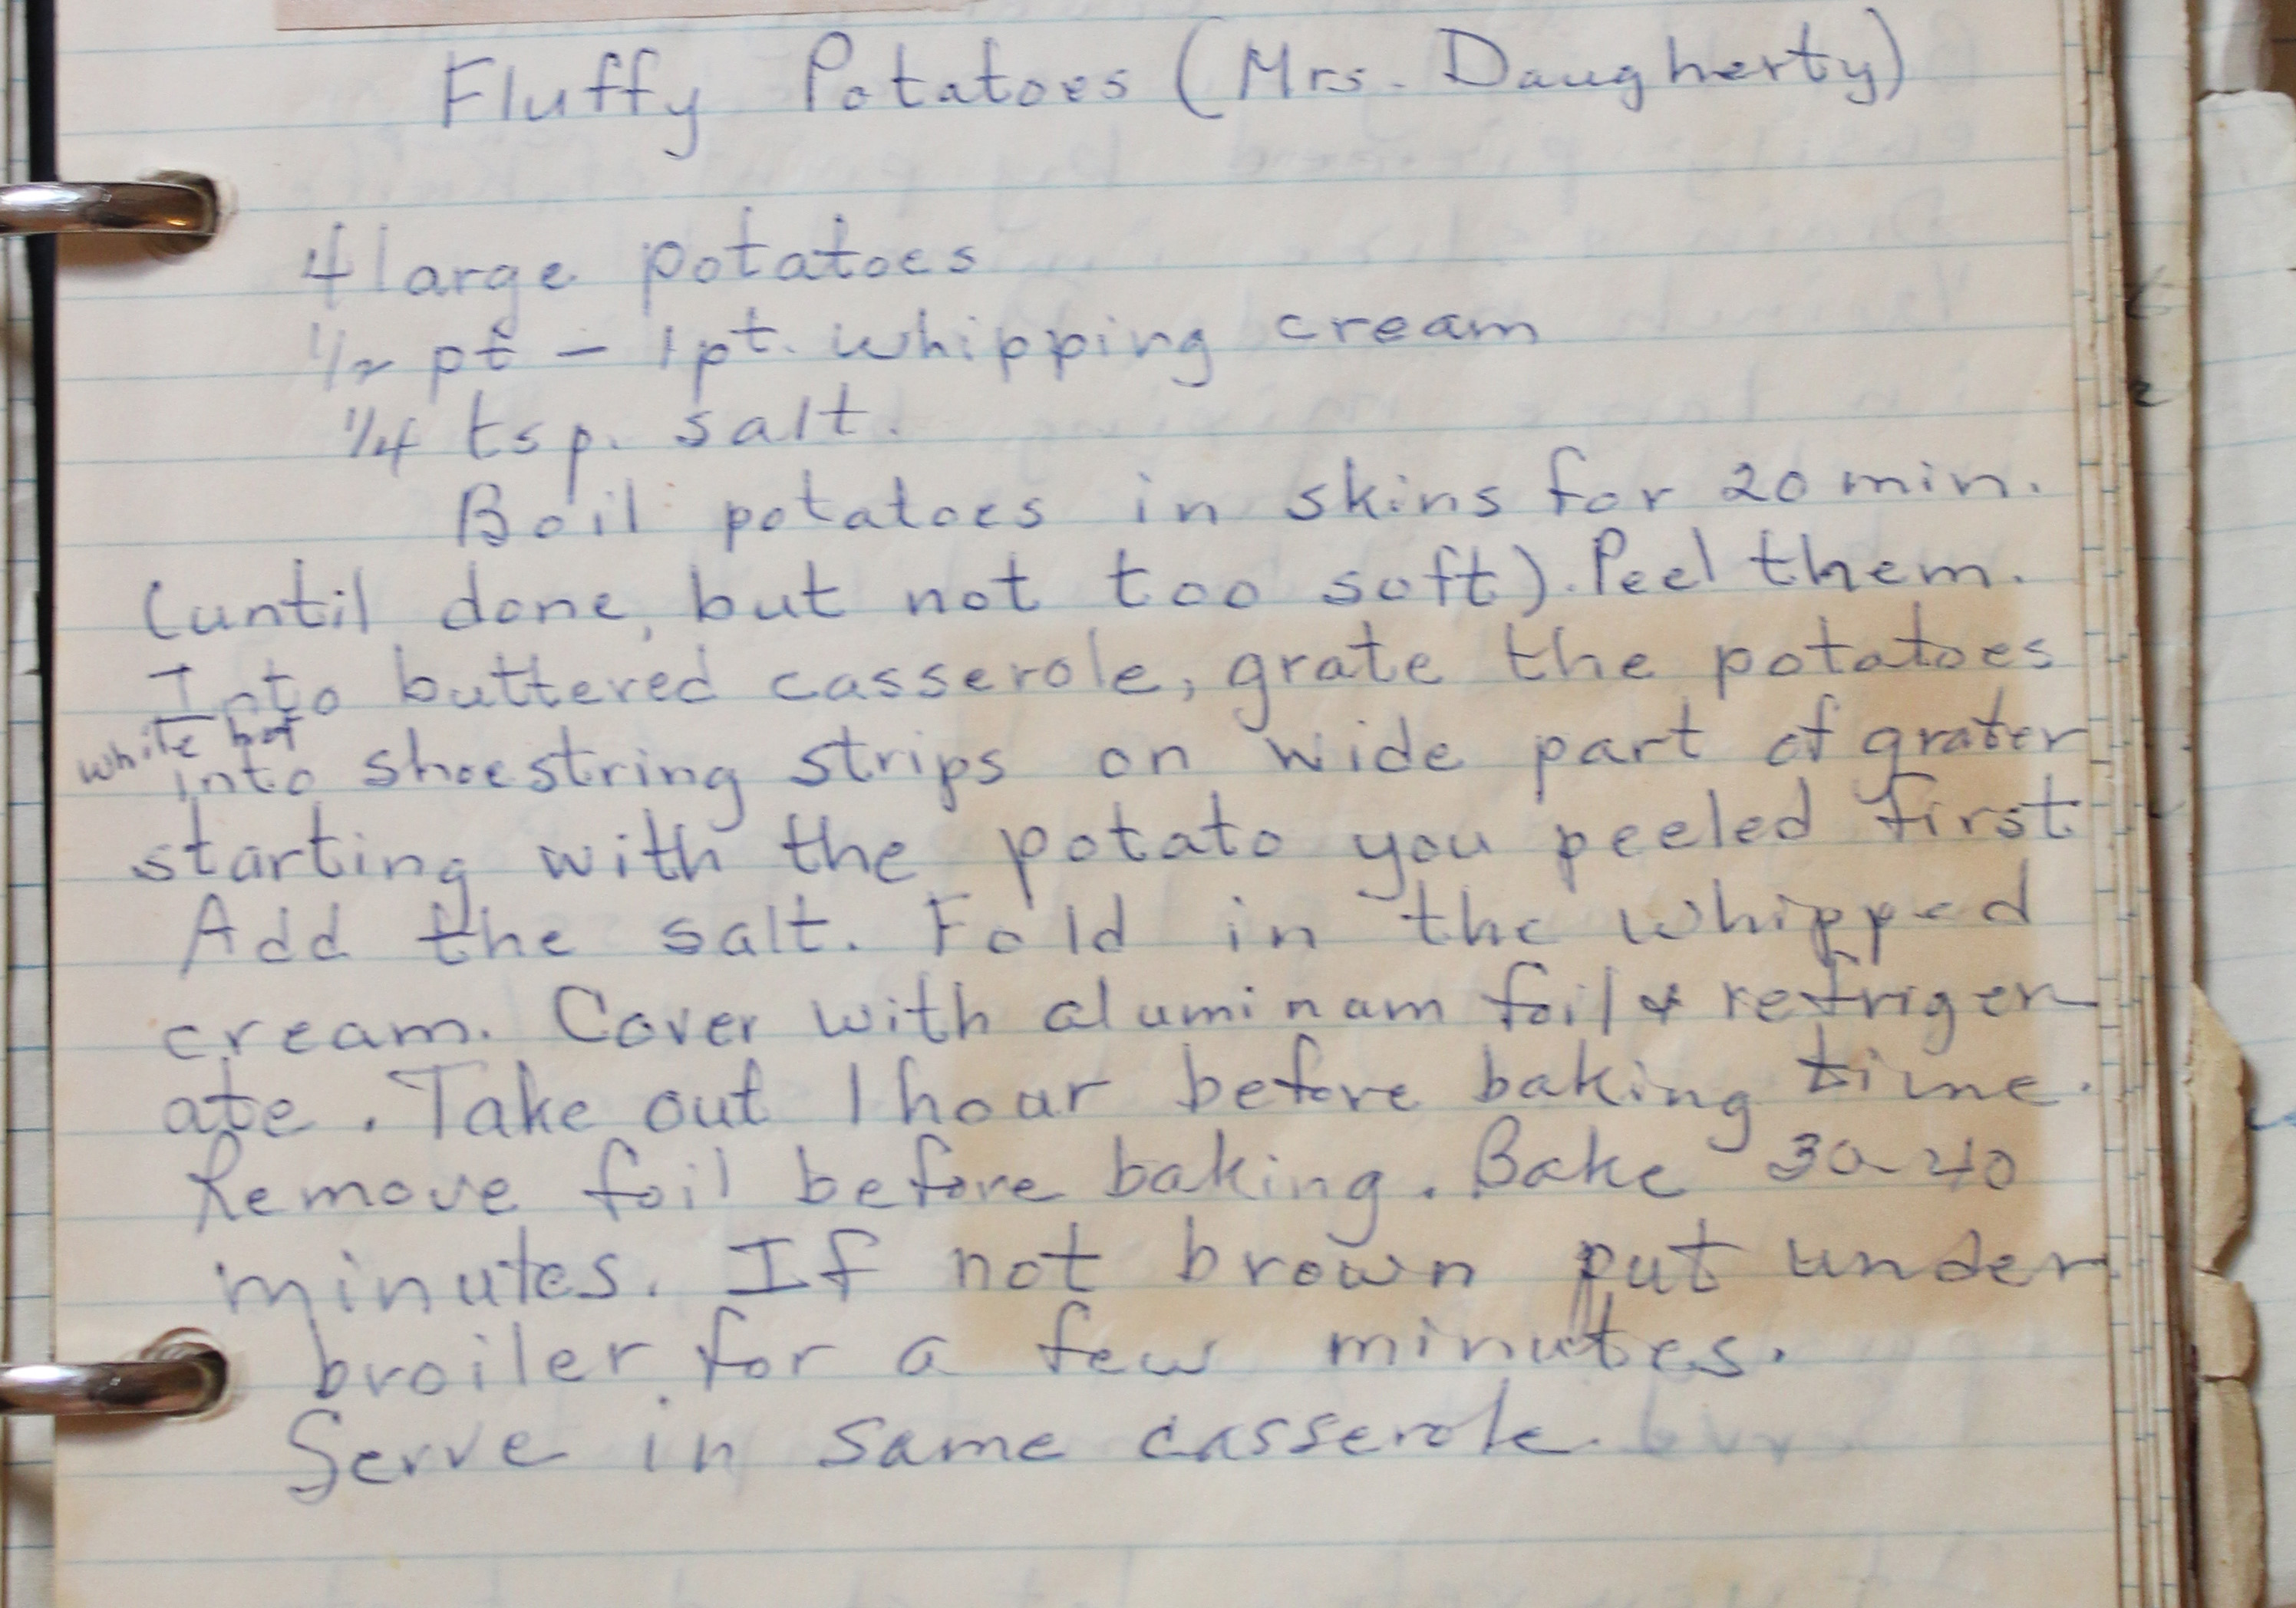
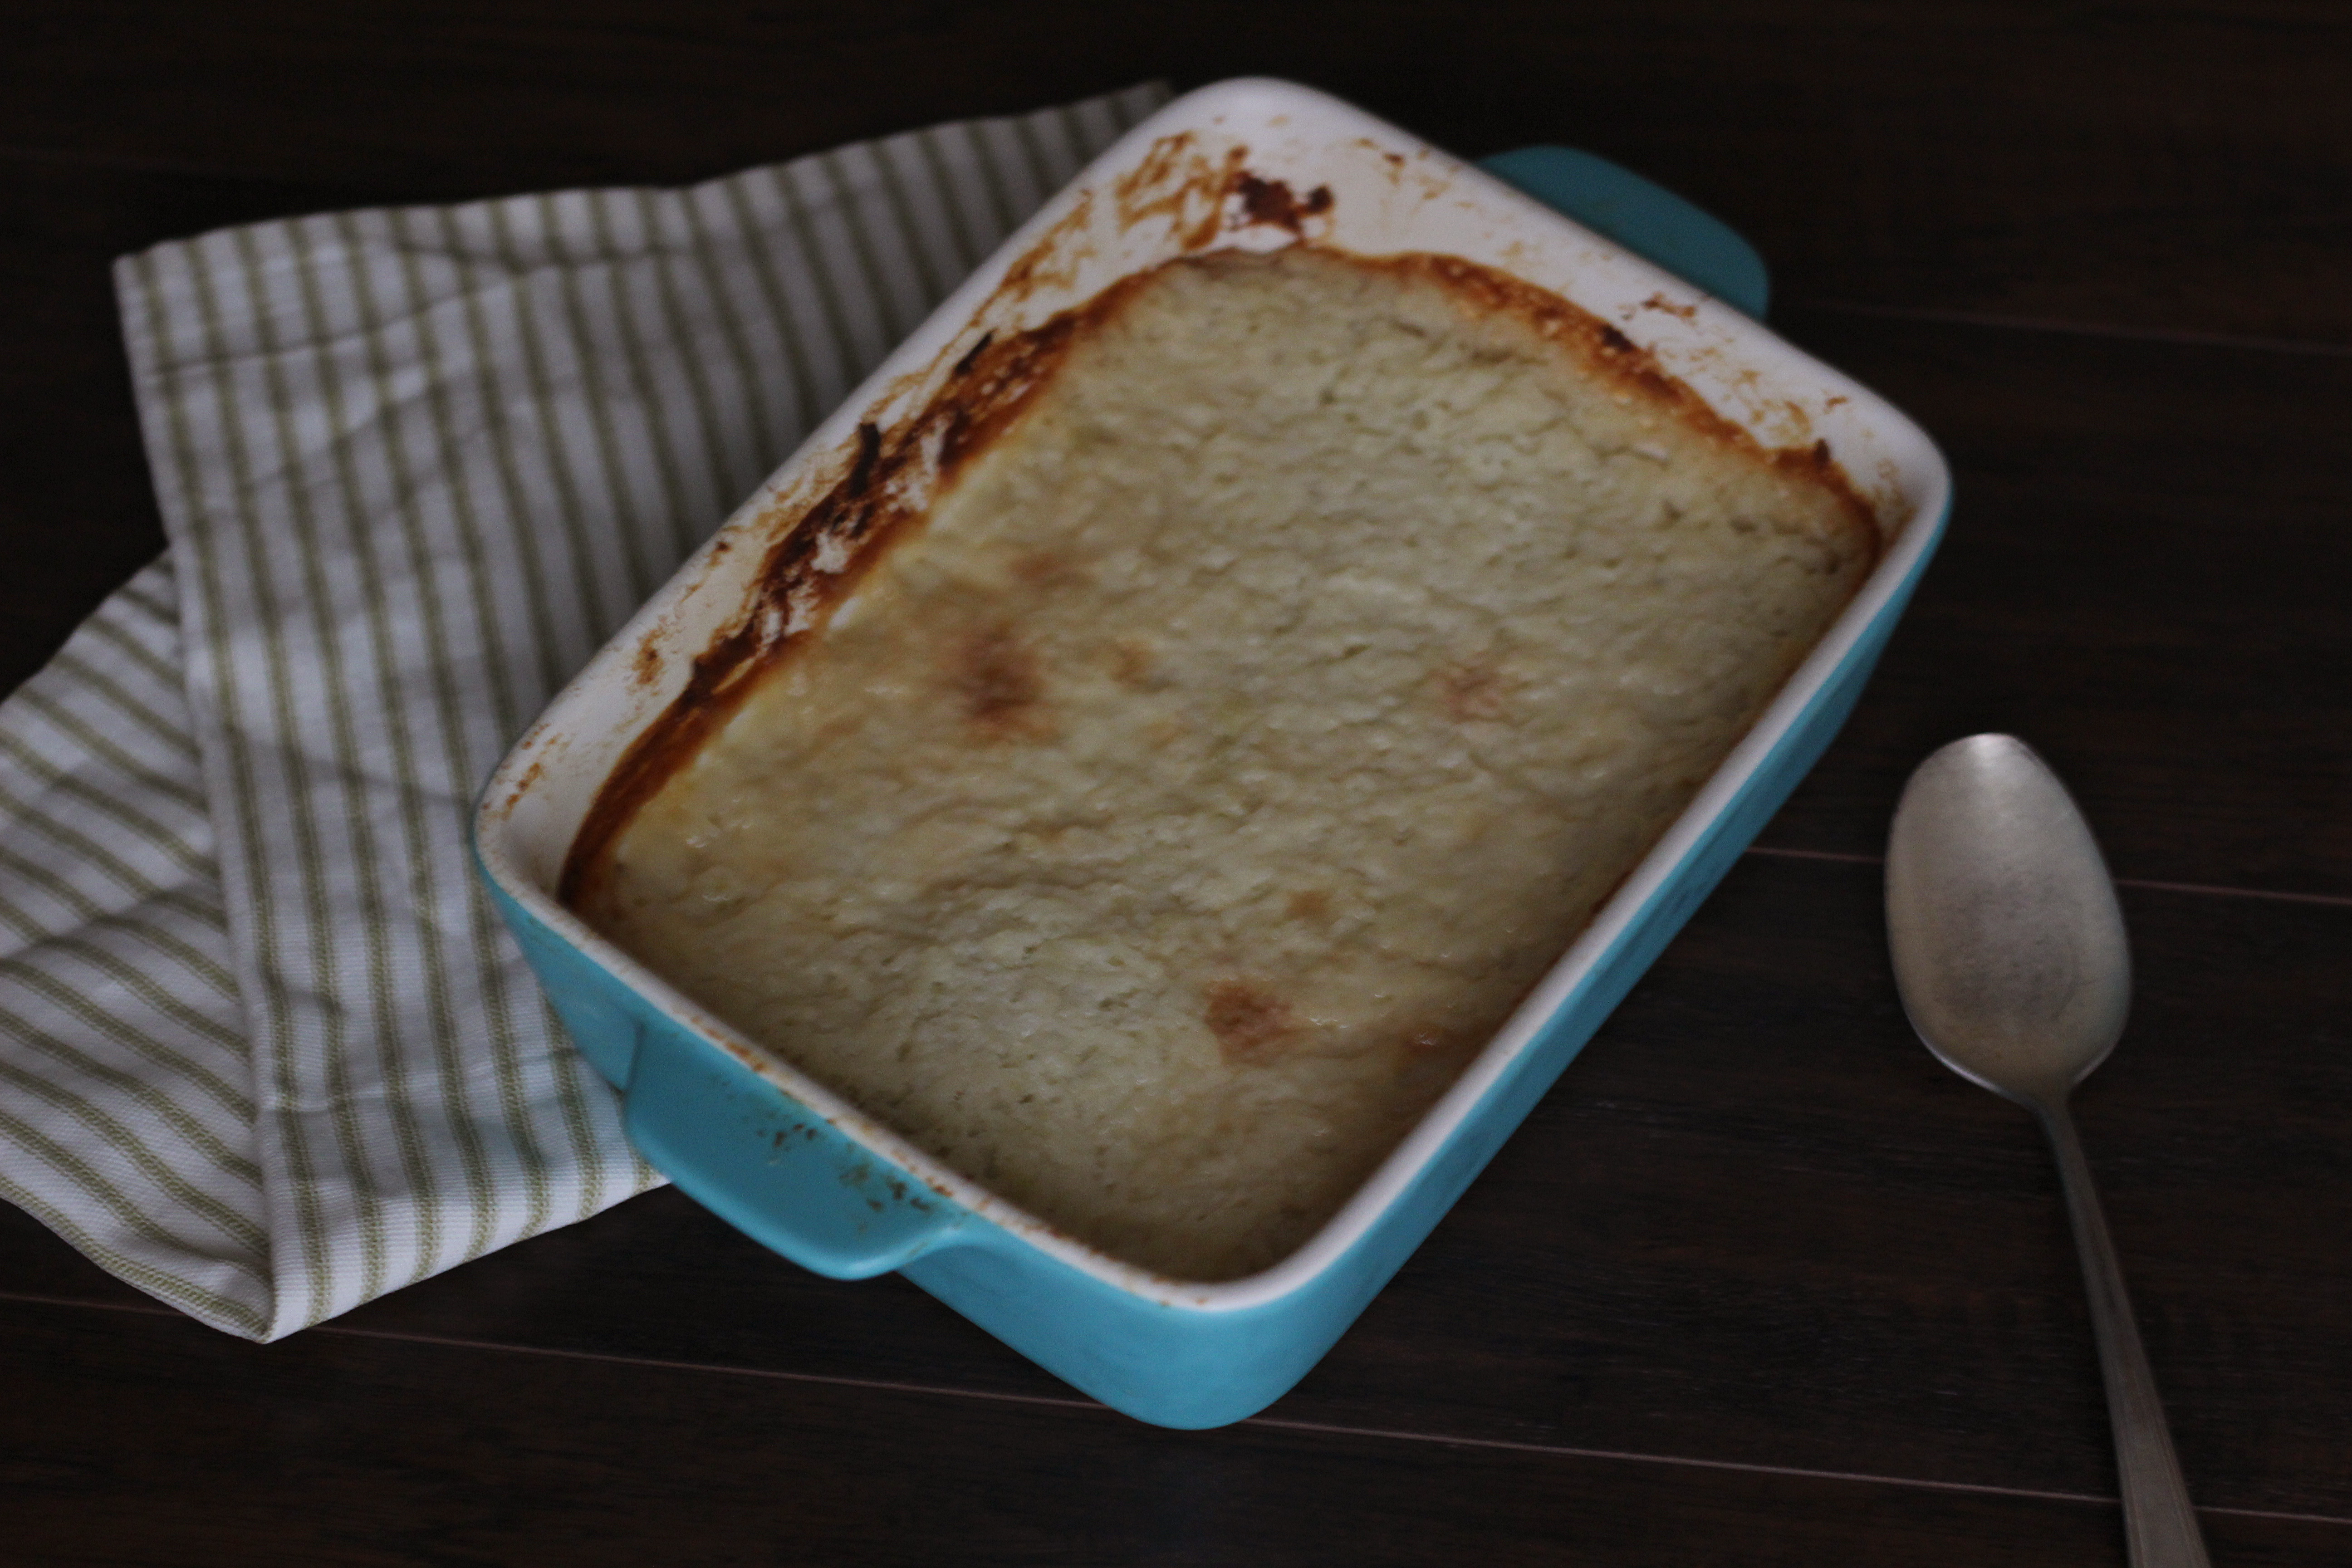
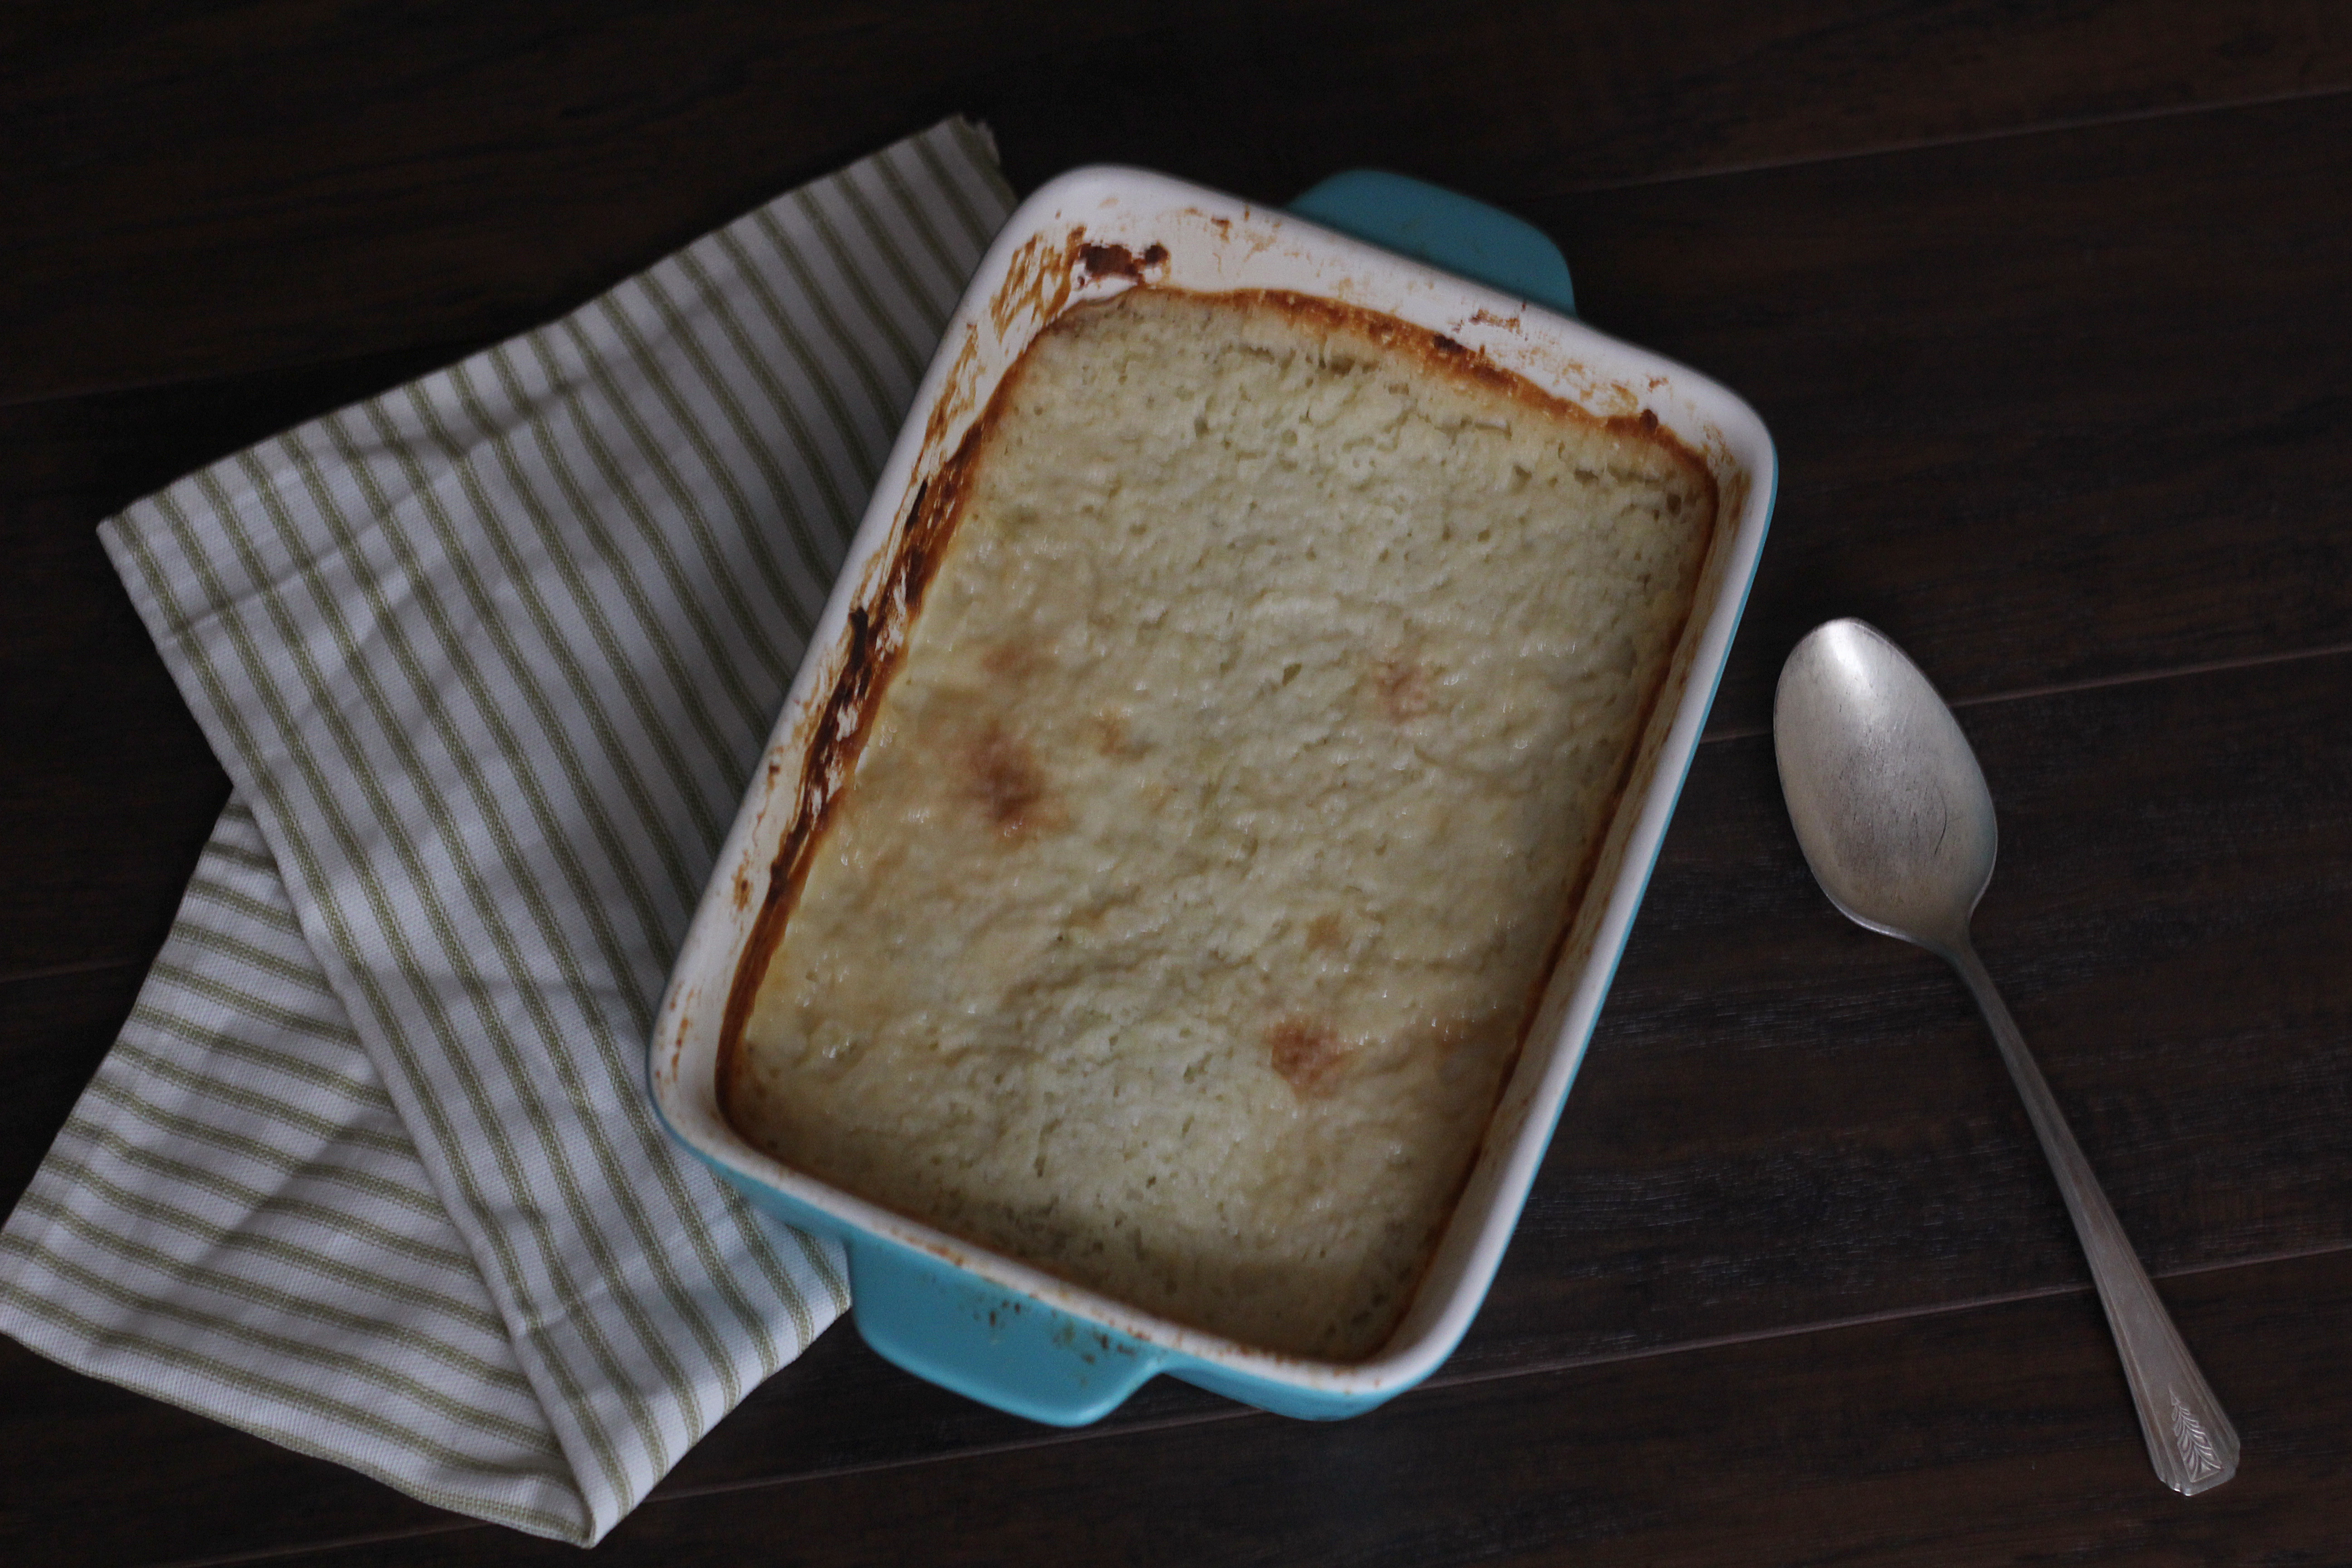
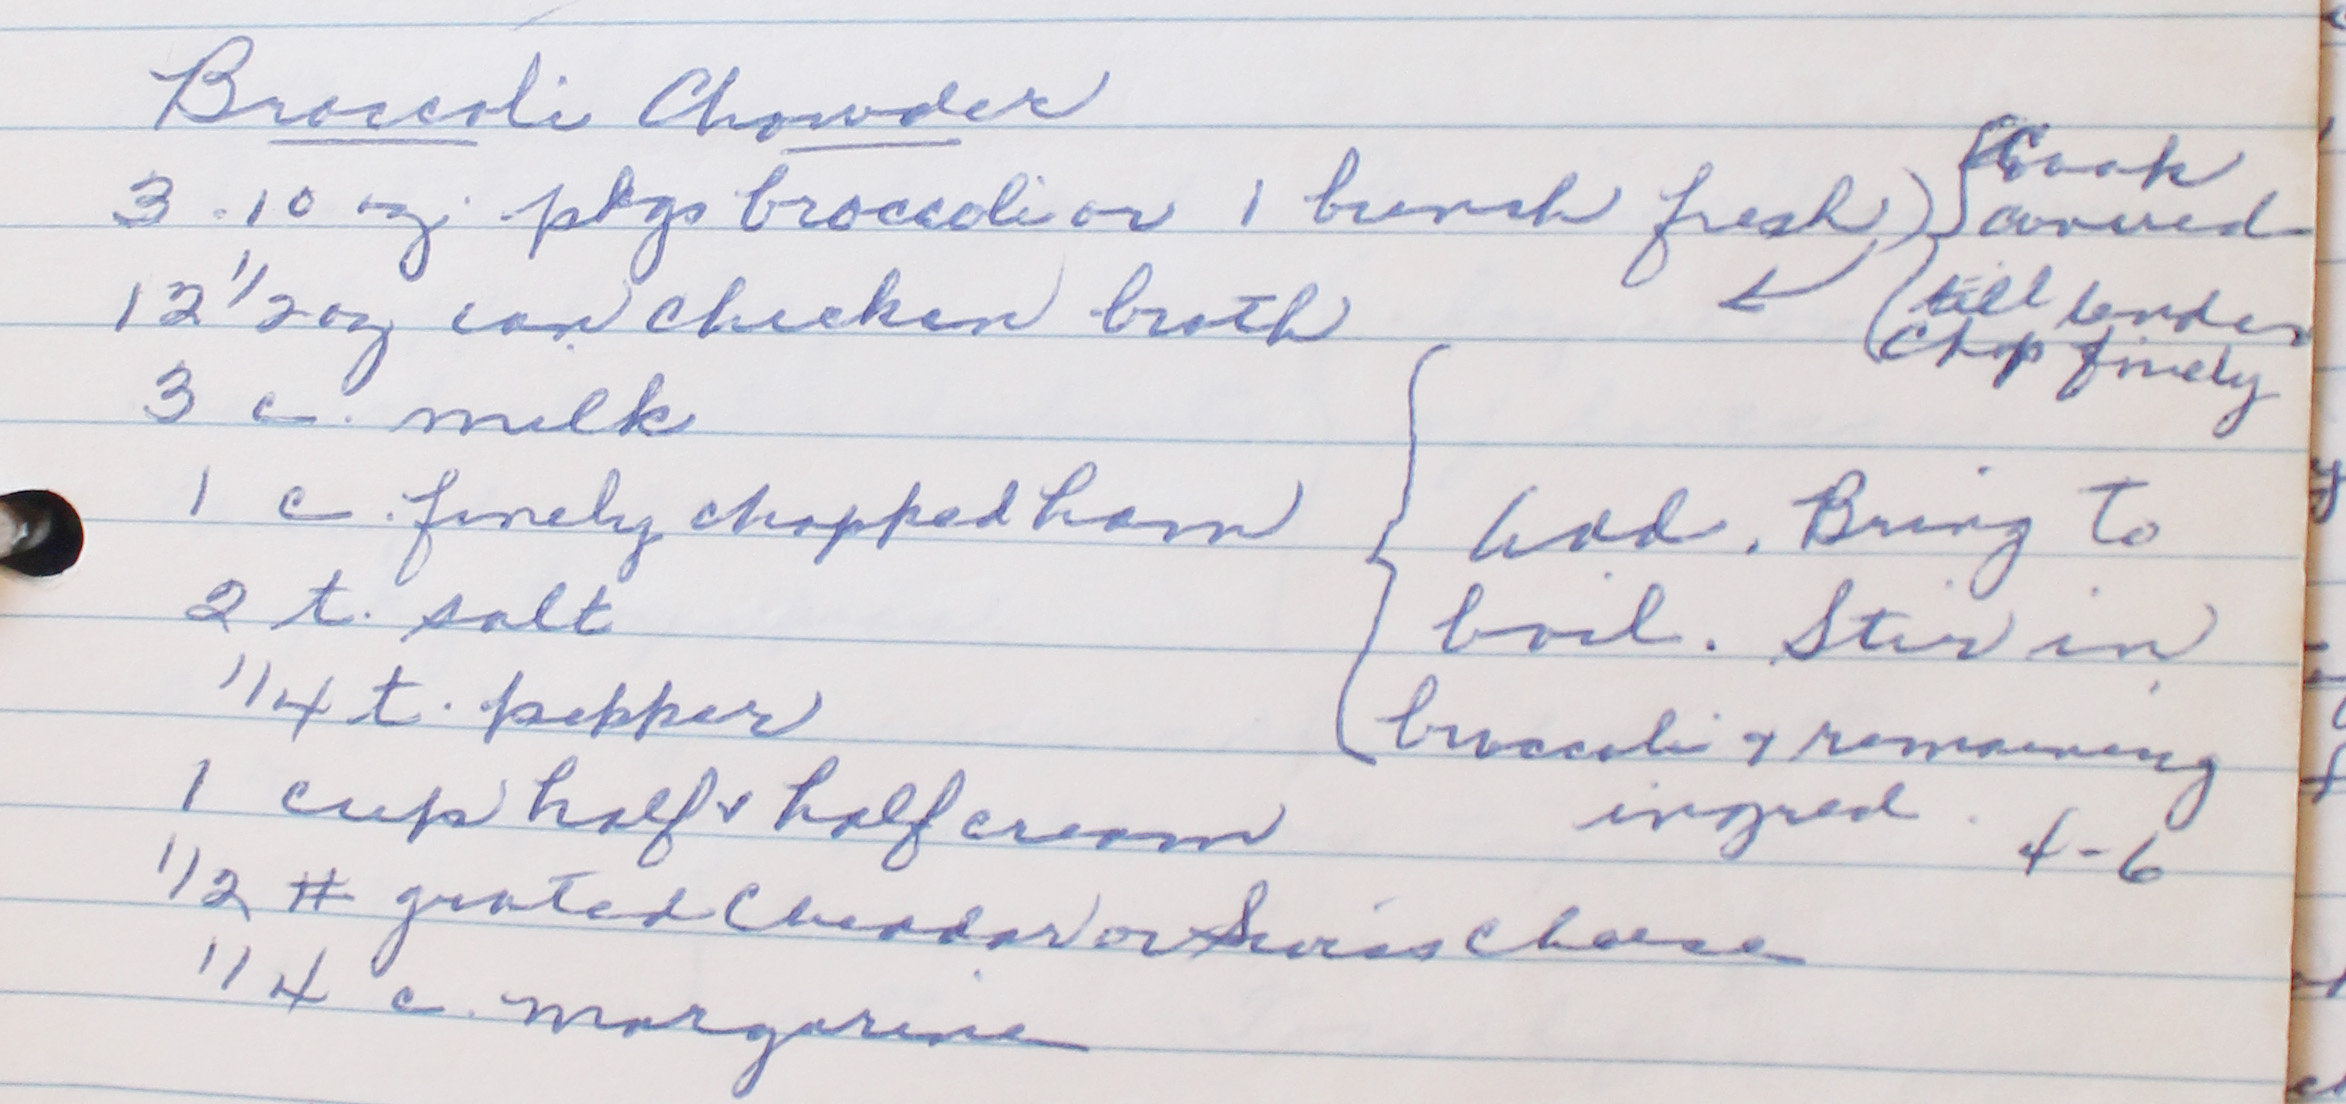
Check out the recipe below and enjoy Marguerite’s Cookbook’s Pie Month!
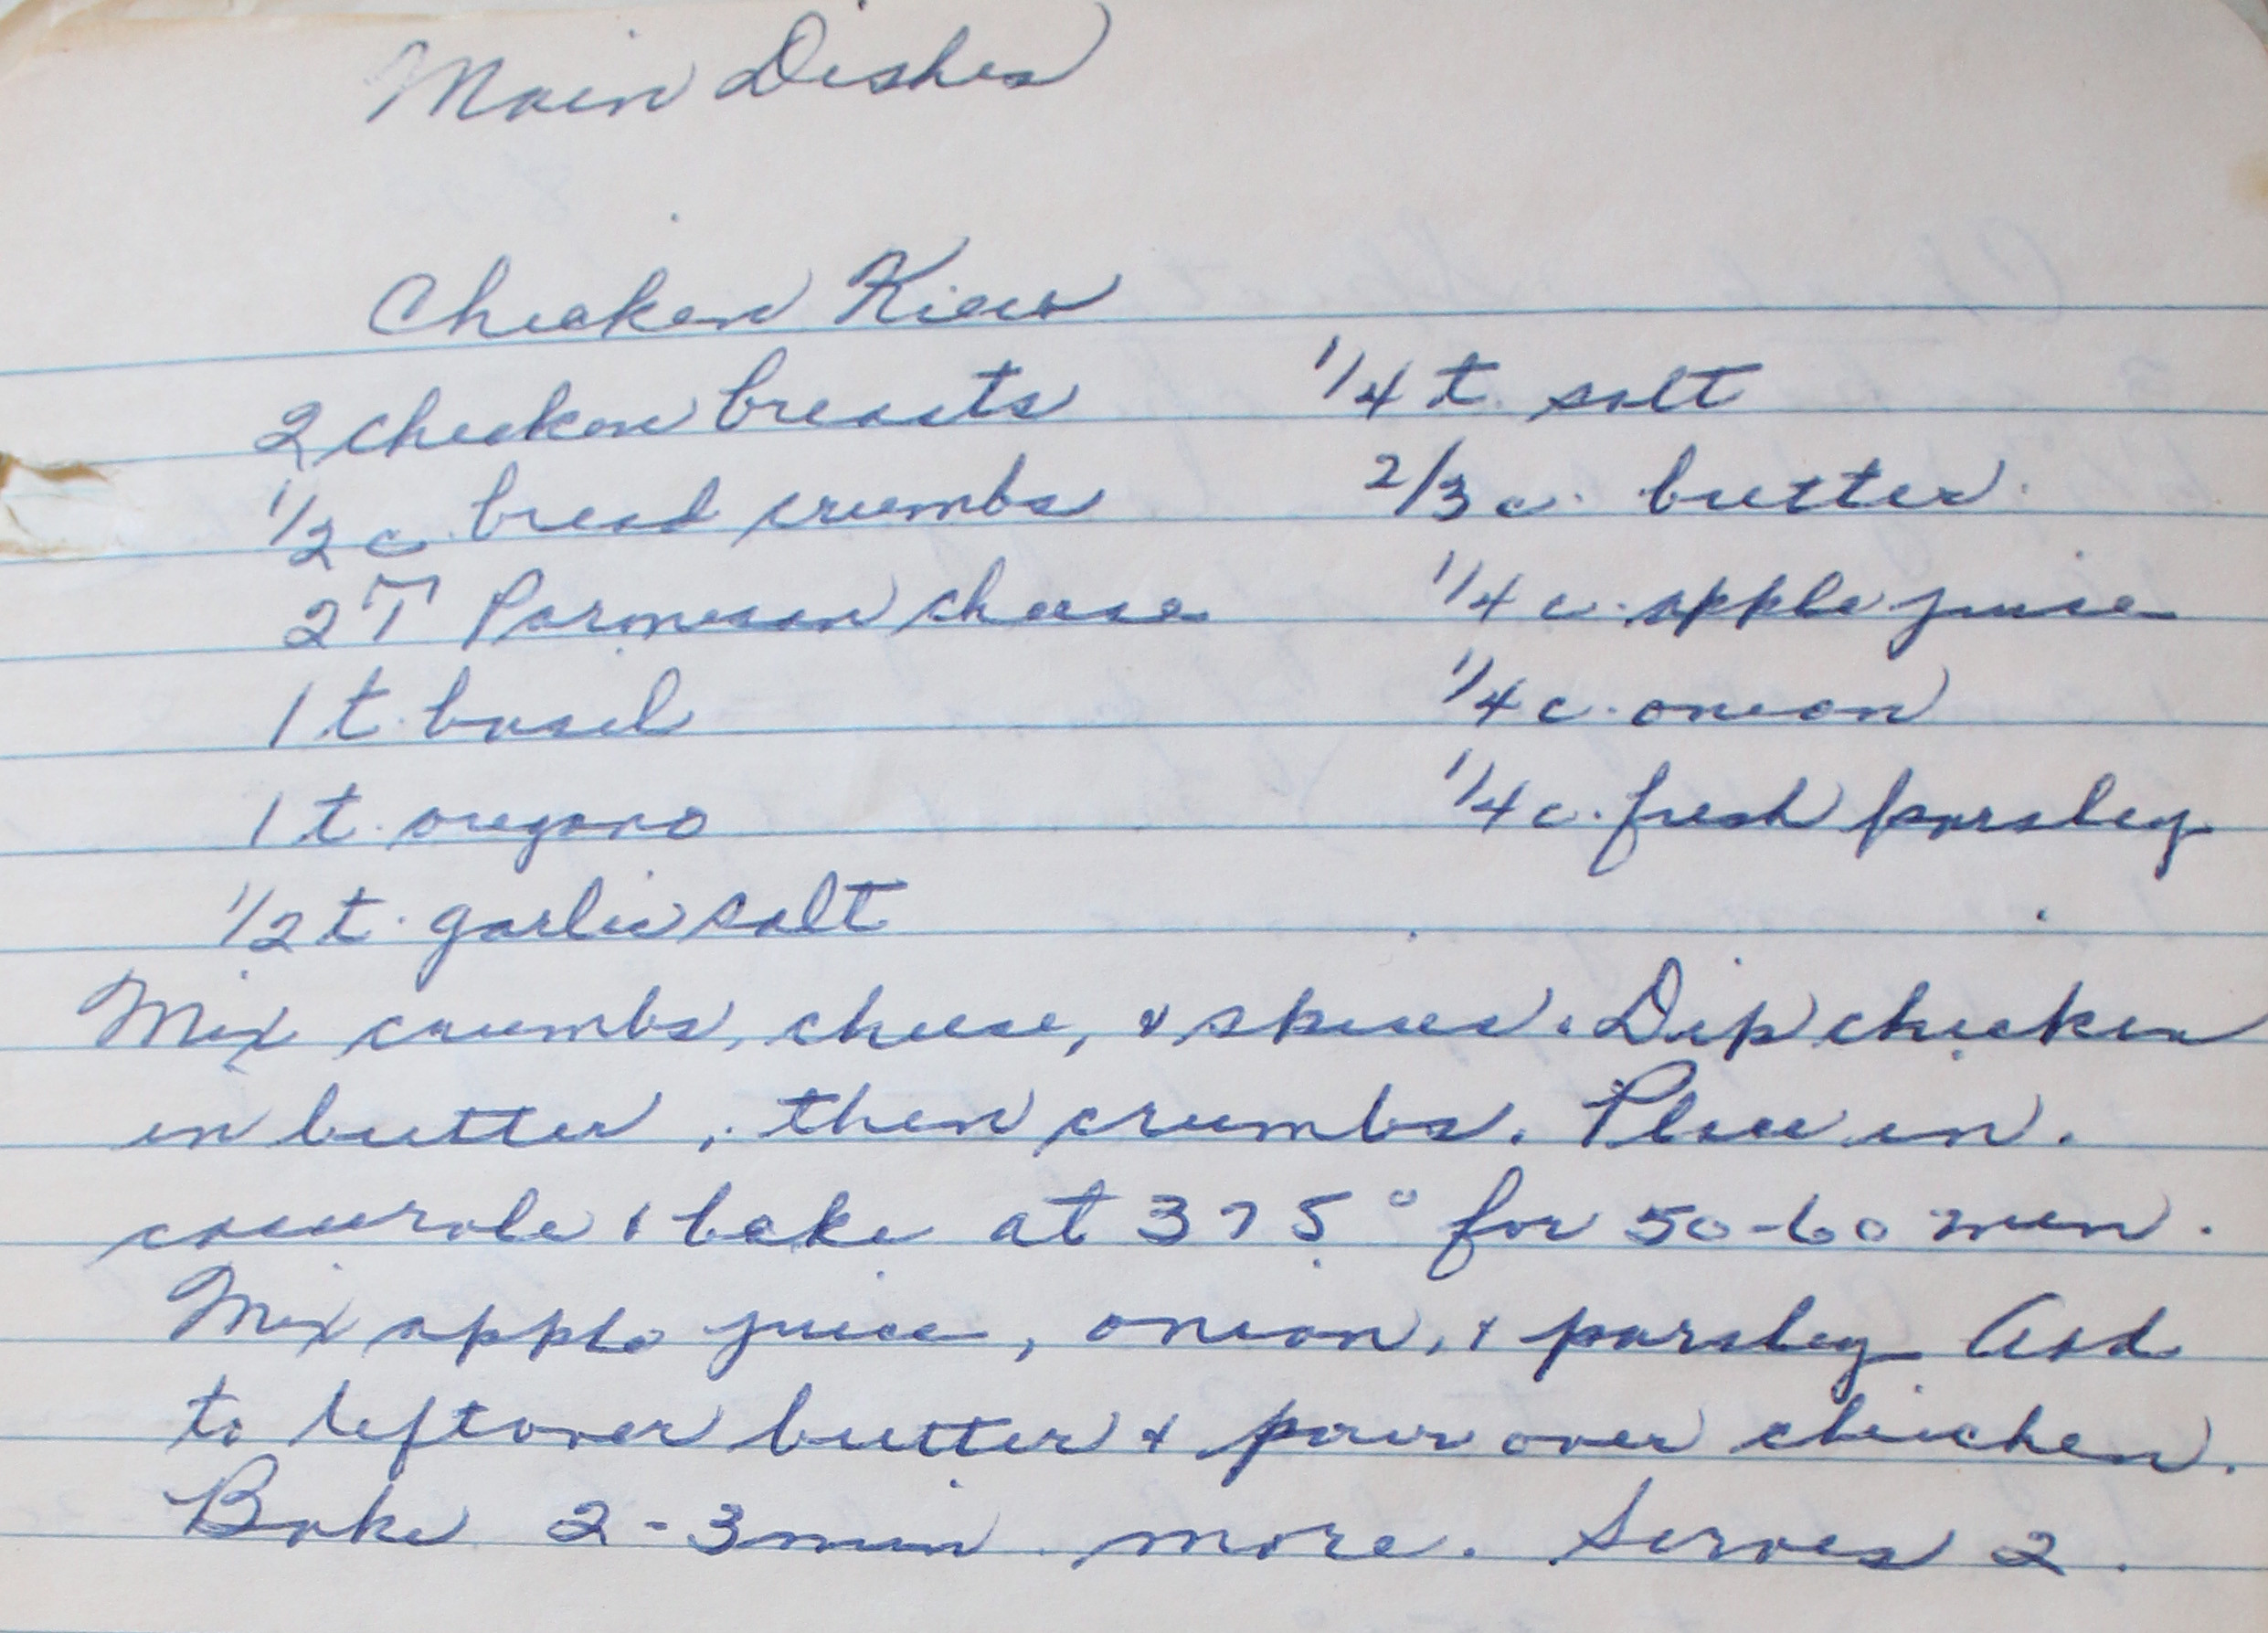
Perfect Pie Crust
Print Recipe
  • CourseDesserts
Servings Prep Time
1 pie crust 10 minutes
Passive Time
30 minutes
Servings Prep Time
1 pie crust 10 minutes
Passive Time
30 minutes
Perfect Pie Crust
Print Recipe
  • CourseDesserts
Servings Prep Time
1 pie crust 10 minutes
Passive Time
30 minutes
Servings Prep Time
1 pie crust 10 minutes
Passive Time
30 minutes
Ingredients
  • 1 1/3 cups flour
  • 1/2 tsp salt
  • 1/2 cup Crisco OR
  • 1/2 stick Crisco
  • 6-8 Tbsp ice cold water
Servings: pie crust
Instructions
  1. Blend flour and salt in large bowl. Cut shortening into flour mixture using pasty blender or fork. Stir in just enough water with fork until dough holds together.
  2. TIP Test dough for proper moistness by squeezing a marble-sized ball of dough in your hand. If it holds together firmly, do not any additional water. If the dough crumbles, add more water by the tablespoonful, until dough is moist enough to form a smooth ball when pressed together.
  3. Shape dough into a ball. Flatten ball into a 1/2 inch round disk.
  4. Chill for 30 minutes or up to two days.
  5. Roll dough from center outward into a circle 2 inches wider than pie plate on lightly floured surface. Transfer dough to pie plate.
Share this Recipe
 
Powered byWP Ultimate Recipe

October 22, 2016 by: Shannon and Aaron

Fluffy Potatoes

fluffypotatoesheader


As far as comfort foods go, especially for me, potatoes are some of the best! This fluffy potatoes recipe is a relatively simple one to make, although I didn’t think it was the best use of potatoes. Take a look at this recipe with us, and you can decide for yourself.

fluffy potatoes recipe

As you can see, this recipe came from one Mrs. Dougherty. She was a parent of six children, all of whom had Marguerite as their second grade teacher! Mrs. Dougherty worked hard with Marguerite to help all her children learn and succeed. She was a wonderful parent and a wonderful lady who became friends with Marguerite due to her dedication to her kids.

fluffy potatoes

While this recipe has an extremely short ingredient list, the preparation of these fluffy potatoes did have some issues. Aaron did not enjoy peeling and grating hot potatoes. (If you would like, you may insert a joke involving the game “hot potato.”) However, once the potatoes were peeled and grated, and the Cool Whip added, it was just time to wait.

Once the fluffy potatoes were cooked, they looked different than a normal potato recipe. They also tasted very different. For me, they were just way too sweet. I felt like it was almost a waste of perfectly good potatoes! Aaron did agree that the fluffy potatoes were too sweet, but not as much as I did. He felt that he could have enjoyed them by just lessening the amount of Cool Whip or whipping heavy cream instead.

fluffy potatoes

If you want a sweet and simple potato recipe for your family, give this fluffy potatoes recipe a try.

Fluffy Potatoes
Print Recipe
  • CourseAppetizers and Sides
Servings Prep Time
4-6 40 minutes
Cook Time Passive Time
40 minutes 5 hours
Servings Prep Time
4-6 40 minutes
Cook Time Passive Time
40 minutes 5 hours
Fluffy Potatoes
Print Recipe
  • CourseAppetizers and Sides
Servings Prep Time
4-6 40 minutes
Cook Time Passive Time
40 minutes 5 hours
Servings Prep Time
4-6 40 minutes
Cook Time Passive Time
40 minutes 5 hours
Ingredients
  • 2 large Potatoes
  • 1 pint Cool Whip
  • 1/4 tsp salt
Servings:
Instructions
  1. Boil potatoes in skins for 20 minutes (until done but not too soft.) Peel.
  2. Butter a casserole dish. While hot, grate the potatoes into shoestring strips on the wide part of the grater. Start with the potato you peeled first.
  3. Add the salt.
  4. Fold in the Cool Whip.
  5. Cover with aluminum foil and refrigerate overnight, or at least four hours.
  6. Take out one hour before baking. Remove foil before baking.
  7. Bake 30-40 minutes - until lightly browned.
Share this Recipe
 
Powered byWP Ultimate Recipe

October 15, 2016 by: Shannon and Aaron

Broccoli Chowder Soup

chowdersoupheader

What’s better in cool fall weather than a nice warm bowl of soup? I’d say not many things are. Considering the fact that both of us came down with the flu this past week, soup was a much needed thing. This broccoli chowder soup is a delicious creamy treat to keep you warm this fall. If you liked our broccoli cheese soup, then you will really like this broccoli chowder soup!

Here’s what Marguerite had to say:

broccoli chowder soup recipe

You may notice that Marguerite calls for either three packages of frozen broccoli or one head of fresh broccoli. Aaron had a bit of trouble reading this recipe, and at first thought he was supposed to cook both frozen and fresh broccoli. He could try and blame it on the diminishing use of cursive writing these days, but it just wasn’t his day. After fixing that issue, this soup turned out great.

Broccoli Chowder Soup

Aaron was proud of his time management during this recipe, chopping ingredients efficiently while other ingredients cooked in the pot. That was, until he let the broth, milk, and ham boil over. He caught it quickly enough and turned the heat down before he burnt the milk. After he added the remaining ingredients, this broccoli chowder soup took shape right away.


Chowder Soup

I don’t particularly care for creamy soups, so I only had a few spoonfuls. It was very appetizing and just like a broccoli chowder soup should taste, just not my thing. Aaron really enjoyed it, and commented that he liked it more even more than the aforementioned broccoli cheese soup. Marguerite did us a favor and put both recipes on the same page, which made comparing them to each other easier. He thinks the chowder was better due to the increased milk/cream, decreased chicken broth, and how it was cooked up. The extra cheese didn’t hurt either.


Broccoli Chowder

This broccoli chowder soup will definitely warm Aaron’s stomach this fall. If you need a tasty soup to warm you up this season, Marguerite’s broccoli chowder soup can hit the spot.

Broccoli Chowder Soup
Print Recipe
  • CourseAppetizers and Sides
Servings
6
Cook Time
30 minutes
Servings
6
Cook Time
30 minutes
Broccoli Chowder Soup
Print Recipe
  • CourseAppetizers and Sides
Servings
6
Cook Time
30 minutes
Servings
6
Cook Time
30 minutes
Ingredients
  • 1 head fresh broccoli
  • 1 can chicken broth
  • 3 cups milk
  • 1 cup ham finely chopped
  • 2 tsp salt
  • 1/4 tsp pepper
  • 1 cup half & half
  • 1/2 lb grated cheese
  • 1/4 cup butter
Servings:
Instructions
  1. Cook broccoli in chicken broth until broccoli is tender.
  2. While broccoli is cooking, chop the ham.
  3. Once broccoli is tender, remove broccoli with a slotted spoon.
  4. Add milk, ham, salt, and pepper to chicken broth and bring to a boil. While these ingredients heat up, finely chop the broccoli.
  5. Once boiling, add broccoli, along with half & half, cheese, and butter.
  6. Stir together over low heat until all ingredients are incorporated.
Share this Recipe
 
Powered byWP Ultimate Recipe

October 8, 2016 by: Shannon and Aaron

Zucchini Torte

Zucchini Torte Header

It’s fall, and one of the most popular ingredients in fall cooking is zucchini. This is the time that zucchini are in season, and Marguerite took advantage of that with quite a few zucchini recipes. We planned on making this recipe back in August, but skipped it due to moving. However, the recipe that was supposed to be on the blog this week turned into such a failure we had to switch it up.  Don’t worry, though, we will share all of our recipe fails with you sometime around Christmas!

Until then, here is what Marguerite had to say about this zucchini torte recipe:

Zucchini Torte Recipe

As you can see, this recipe has an interesting set of ingredients. So, as with a lot of our recipes, Aaron asked his mom for some clarification. She said a torte can either be like a cake or like a quiche in her experience. She also suggested which pan we should cook the zucchini torte in since Marguerite did not specify.

Zucchini Torte

Making this zucchini torte was simple and straightforward. Cubing the zucchini was obviously a bit time consuming but mixing all the ingredients took no time at all. I do not like zucchini very much, so I did not even want to try this zucchini torte. I did think that it looked nice, and might appeal to someone who likes zucchini. Aaron did try it, because one of us had to, and he will eat almost anything. He did not enjoy this zucchini torte. It tasted strongly of zucchini, and not of much else. He also felt it didn’t taste enough like a cake or a quiche.

Zucchini Torte

Aaron said to me, “if I had extra zucchini around, I’d put it in some bread before this any day.” But if you like zucchini, this torte is probably for you. We hope you enjoy Marguerite’s zucchini torte!

Zucchini Torte
Print Recipe
Servings Prep Time
10 20 minutes
Cook Time
40 minutes
Servings Prep Time
10 20 minutes
Cook Time
40 minutes
Zucchini Torte
Print Recipe
Servings Prep Time
10 20 minutes
Cook Time
40 minutes
Servings Prep Time
10 20 minutes
Cook Time
40 minutes
Ingredients
  • 4 cups zucchini cubed
  • 1 cup Bisquick
  • 1 Tbsp minced onion
  • 1 tsp salt
  • 1/2 tsp oregano
  • 3/4 cup shredded cheese
  • 3 eggs
  • 1/2 cup oil
Servings:
Instructions
  1. Preheat oven to 350 degrees.
  2. Chop zucchini into cubes.
  3. Mix together zucchini, Bisquick, onion, salt, oregano, and cheese.
  4. Pour into pan.
  5. Beat eggs and oil together and add to dry mixture until zucchini is covered.
  6. Bake uncovered at 350 for 40 minutes.
Share this Recipe
 
Powered byWP Ultimate Recipe

October 1, 2016 by: Shannon and Aaron

Pumpkin Bread

pumpkinbreadheader Happy Autumn everyone! As the weather cools down around us and the leaves begin to change, that brings to mind one of the most popular fall flavors. Pumpkin. The most famous pumpkin recipe is probably pumpkin pie, but we’ve got that coming for you a bit closer to Thanksgiving.  Today we have a delicious pumpkin bread that really ushers in the fall season.

Here’s what Marguerite had to say:


This recipe is actually from another of Marguerite’s teaching colleagues and friends from her many years of teaching, Kathy Hoffman. You may notice it appears one thing is missing from this recipe. While making it, Aaron wasn’t sure the flour was mistakenly forgotten, but it was obvious once all the other ingredients were mixed together that this wasn’t going to turn into bread without flour.

Pumpkin Bread Loaf

After that, this pumpkin bread recipe was very simple to make. It was actually on the same page in the book as our zucchini bread recipe, and is very similar as far as ingredients and prep. I do not like pumpkin flavored things, but I found this pumpkin bread to be delicious! It tasted like autumn. That is, the spices masked the pumpkin flavor enough that I was able to enjoy this. I had too many pieces!

Pumpkin Bread

Aaron also loved how this pumpkin bread tasted more like spices than pumpkin. He also loved the color once it was baked, as well as the smell of the bread baking. He was so excited after tasting it, that he went right back into the kitchen and made another loaf with the remaining pumpkin we had! This was mostly because he knows his coworkers will eat it all up and there will be none left for us! We hope you enjoy this pumpkin bread recipe this fall with us.

Pumpkin Bread Recipe

Pumpkin Bread
Print Recipe
  • CourseAppetizers and Sides, Desserts
Prep Time
15 minutes
Cook Time
45 minutes
Prep Time
15 minutes
Cook Time
45 minutes
Pumpkin Bread
Print Recipe
  • CourseAppetizers and Sides, Desserts
Prep Time
15 minutes
Cook Time
45 minutes
Prep Time
15 minutes
Cook Time
45 minutes
Ingredients
  • 1 1/2 cups white sugar
  • 1 1/2 cups flour
  • 1 tsp baking powder
  • 1 tsp baking soda
  • 3/4 tsp salt
  • 1/2 tsp cloves
  • 1/2 tsp cinnamon
  • 1/2 tsp nutmeg
  • 2 eggs
  • 1/2 cup salad oil
  • 1/2 cup water
  • 1 cup pumpkin
Servings:
Instructions
  1. Preheat oven to 350 degrees.
  2. Mix all ingredients together.
  3. Grease one pan for a large loaf or two pans for two smaller loafs.
  4. Bake approximately 45 minutes to 1 hour.
Share this Recipe
 
Powered byWP Ultimate Recipe

September 24, 2016 by: Shannon and Aaron

Coffee Cake

coffee cake header

Coffee cake is one of those desserts that can be made in so many different ways and with many different flavors. This is just a basic coffee cake recipe given to Marguerite by another of her teaching colleagues, Susie Matha. Sometimes, plain and simple recipes are the way to go.


Here is what Susie had to say:

sour-cream-coffee-cake-recipe

First things first, Aaron was confused that this recipe was called sour cream coffee cake and he was confused that the recipe did, in fact, contain sour cream. He did not realize that sour cream can be a common ingredient in baked goods. He also didn’t realize how much work could go in to preparing a baked good to be made. We both felt that it took a bit too long of a time to put together, between the combining of ingredients, the grinding of nuts, and the layering of batter and filling in the pan. But it was sooooooo delicious.

sour cream coffee cake

It was soft and spongy like a well made cake should be, plus the cinnamon, sugar, and nuts (we used almonds), made a delicious filling. We made sure to grease and flour the pan before pouring the batter, which was great help in removing the pieces of cake after baking.


The aroma of this cake filled our apartment for like two hours. By the time we cut into it, we we’re impatient and hungry. Cutting the coffee cake a little too soon caused it to be too soft and to crumble as we tried to take it out. Once cooled the cake was easy to cut and plate to eat. Was it ever delicious! I wasn’t crazy about how brown the sides and bottom got, and that may be due to over baking it, or even due to the type of tube pan we used. But I did enjoy the insides of the coffee cake. Aaron enjoyed it greatly as well. He, of course, enjoyed several pieces along with coffee.

coffee cake

Thankfully for both of us, Aaron took the extra to share with his coworkers. They also really enjoyed it and upon cleaning out the container it was in, told Aaron he could “take it home and fill it with more coffee cake!” I think we would consider that a great success.

Coffee Cake
Print Recipe
  • CourseDesserts
Servings Prep Time
1 cake 40 minutes
Cook Time
90 minutes
Servings Prep Time
1 cake 40 minutes
Cook Time
90 minutes
Coffee Cake
Print Recipe
  • CourseDesserts
Servings Prep Time
1 cake 40 minutes
Cook Time
90 minutes
Servings Prep Time
1 cake 40 minutes
Cook Time
90 minutes
Ingredients
Batter
  • 1 cup butter
  • 2 cups sugar
  • 4 eggs
  • 2 cups sour cream
  • 2 tsp vanilla
  • 4 cups flour
  • 2 tsp baking soda
  • 2 tsp baking powder
  • 1 tsp salt
Filling
  • 1 1/2 cups ground nuts
  • 2/3 cups brown sugar
  • 8 tsp white sugar
  • 2 tsp cinnamon
  • 4 Tbsp butter softened
Servings: cake
Instructions
  1. Preheat oven to 350 degrees.
  2. Cream butter and sugar together very well.
  3. Add one egg at a time, beating after each one.
  4. Add sour cream, then vanilla.
  5. Mix well.
  6. Sift together dry ingredients, then slowly add dry ingredients to wet ingredients. Mix well again.
  7. Combine filling ingredients.
  8. Grease and flour tube pan. Put one third of batter into pan, then one third of filling. Then second third of batter and second third of filling. Pour on remaining batter and cut through as for marble cake. Top with remaining filling and bake one and a half hours at 350.
Share this Recipe
 
Powered byWP Ultimate Recipe

September 17, 2016 by: Shannon and Aaron

Inside-Out Chicken Kiev

chickenkievheader

There’s no question that the most numerous type of recipe in Marguerite’s cookbook is desserts, and we’ll get back to another one of those next week! But first, a recipe that is most likely the second popular in the book—a chicken recipe. This inside-out chicken kiev was a delicious twist on a classic!

Here’s what Marguerite had to say:

Chicken Kiev Recipe

You may notice a few differences between Marguerite’s recipe and our version below. The main difference is the title. We knew that a typical chicken kiev usually has the butter and spices stuffed and cooked on the inside, which was not a part of Marguerite’s recipe. So we decided to rename this recipe ‘inside-out chicken kiev.’ Aaron was almost as excited about the catchy new name as he was about the dish itself!

insideoutchickenkiev

Some other changes we made included minimizing the cook time from Marguerite’s and substituting dried ingredients for fresh ones. We make some type of chicken recipe about once a week and usually only cook it for up to 30 minutes. So when we read how long Marguerite wanted us to cook this recipe, we thought: That’s crazy! And so Aaron’s mother fielded yet another recipe-related phone call from us. We seriously call her 3-4 times while making these. Seriously. She agreed with Marguerite on the cooking time, but the thought of overly dry chicken still made us cringe. We’re glad we went with our guts and cut the cook time. Sorry Marguerite and Mercedes!

inside out chicken kiev

This inside-out chicken kiev smelled great while it was cooking, which made waiting for dinner time to eat it torture! I really liked this chicken recipe. I’ve liked almost all of the things we’ve been making lately, actually. The combination of the spices on the chicken made it incredibly flavorful. A whole bunch of butter slathered on it doesn’t hurt either. As Marguerite’s mother always said “If it calls for one stick of butter, then two will make it twice as good!” Okay, Paula Deen. Aaron also liked this inside-out chicken kiev. But, as I’ve mentioned before, he likes everything.

inside out chickenkiev

We hope you try this simple recipe with your family. We think you’ll enjoy this inside-out chicken kiev as much as we did!

Inside-Out Chicken Kiev
Print Recipe
  • CourseMain Dish
Servings Prep Time
2 10 minutes
Cook Time
30 minutes
Servings Prep Time
2 10 minutes
Cook Time
30 minutes
Inside-Out Chicken Kiev
Print Recipe
  • CourseMain Dish
Servings Prep Time
2 10 minutes
Cook Time
30 minutes
Servings Prep Time
2 10 minutes
Cook Time
30 minutes
Ingredients
  • 2 chicken breasts
  • 1/2 cups bread crumbs
  • 2 Tbsp Parmesan cheese
  • 1 tsp basil
  • 1 tsp oregano
  • 1/2 tsp garlic salt
  • 1/4 tsp salt
  • 2/3 cups butter
  • 1/4 cups apple juice
  • 1 Tbsp dried minced onion
  • 2 Tbsp dried parsley
Servings:
Instructions
  1. Preheat oven to 350 degrees.
  2. Melt butter in shallow dish.
  3. Mix bread crumbs, cheese, and spices (salt, garlic salt, oregano, and basil.)
  4. Dip chicken in butter, then crumb mixture.
  5. Place in casserole dish and bake at 350 for 30 minutes.
  6. Mix apple juice, onion, and parsley.
  7. Add to leftover butter.
  8. When 30 minute cook time has passed, pour apple juice mixture over chicken and bake 2 to 3 minutes more.
Share this Recipe
 
Powered byWP Ultimate Recipe

September 3, 2016 by: Shannon and Aaron

Veal and Peppers

VealandPeppersHeader

Welcome back to Marguerite’s Cookbook! Or should I say welcome us back? Due to a few planned trips and unplanned moving into a new apartment, our kitchen was packed for up for quite a few weeks and we just couldn’t cook. But now we’re back! This week we have a delicious veal and peppers recipe that is a nice hearty meal to enjoy without the heartiness of high calories.

Here’s what Marguerite had to say:

VealandPeppersRecipe

As you can see, this recipe is all meat and veggies and a very small amount of calories.  Hooray, clean eating! It’s a nice balance to all the desserts in the cookbook.

VealandPeppers

As you may or may not be able to tell, the meat above is not veal. If you remember from our last veal recipe, we had trouble finding veal. Well, we had trouble again. But this time we decided to go in a little different direction. We got some choice beef, as well as some pork cutlets. It has been said that pork cutlets often resemble veal in some situations. We didn’t really know how we felt about that, but we decided to give it a try.

Porkandpeppers

Not as pretty a dish, especially when you are expecting that dark look of browned steak. Now on to taste . . .

We both agreed that both versions (beef and pork) of the veal and peppers were cooked a little too long. So with that in mind, we suggest cooking the meat covered for less than the 3o minutes Marguerite suggests. For such simple ingredients, this dish had plenty of flavor. Aaron felt that the peppers and onions that were cooked with the steak in the cast iron skillet were much better than the other vegetables. That is not surprising considering the differing quality of our cookware.

VealandPeppers

Overall, this veal and peppers recipe might be my favorite so far! It’s a great clean and simple option that is easy to make. We’re always trying to eat healthier and this is a great go to for clean eating.

VealPeppers


Veal and Peppers
Print Recipe
  • CourseMain Dish
Servings Prep Time
4 20 minutes
Cook Time
30-40 minutes
Servings Prep Time
4 20 minutes
Cook Time
30-40 minutes
Veal and Peppers
Print Recipe
  • CourseMain Dish
Servings Prep Time
4 20 minutes
Cook Time
30-40 minutes
Servings Prep Time
4 20 minutes
Cook Time
30-40 minutes
Ingredients
  • 1 lb veal cubed
  • 4 medium green peppers
  • 1 medium onion
  • 2 Tbs vegetable oil
  • 2 cups canned tomatoes
  • 1/2 tsp salt
  • pepper
  • 6 Tbs dry white wine
Servings:
Instructions
  1. Chop up onions and peppers. Put 1 T of vegetable oil in skillet and cook veggies until tender. Remove from pan and set aside.
  2. Add 1 T of vegetable oil and cubed veal. Cook until slightly browned.
  3. Add tomatoes, salt, pepper, and wine. Cover and cook over low heat for 20-30 minutes.
Share this Recipe
 
Powered byWP Ultimate Recipe

July 2, 2016 by: Shannon and Aaron

Fourth of July Thumbprint Cookies

Thumbprint Cookies

Happy Fourth of July Weekend! We hope you’re having a safe and fun one. We happen to be hanging out with our family in Pittsburgh all weekend and maybe sharing a few of these delicious thumbprint cookies with them. Or keeping them all to ourselves…

This recipe happened to be a Christmas staple of Marguerite’s, but there are only so many desserts we can share with you in December. So, we adapted the decor of these thumbprint cookies to be a little more seasonally appropriate.

Thumbprint Cookies Recipe

Aaron and I decided to make the thumbprint cookies with nuts on the outside like Marguerite described, as well as a way we were more familiar with: substituting the nuts for sprinkles (or “jimmies” as we Pittsburghers call them.)

Thumbprint Cookies Prep

We made these cookies twice, both times about 6 with nuts and 8 with sprinkles. The first time we made them, they were so dry! They crumbled in our hands and were not pleasant to eat. The second time, we cut back by about two tablespoons on flour and we used only softened butter instead of a butter/Crisco combo (noted below.) This would have been much better if one of us (we’re not sure whom) hadn’t bumped the oven during the thumbprinting step! Somehow it got turned up to 425 and our cookies had burned bottoms when we removed them. The third time is the charm I suppose?

Thumbprint Cookies with nuts

The nut version of the cookies were good. I’m not a huge fan of nuts, but the sugar off-set them nicely. I wish we had put an almond in the center of the nut cookies, but I was sort of on a roll with the piping bag…

Thumbprint Cookies

The sprinkle versions were amazing! Aaron, his cousin Kiersten, and myself all have fond memories of our childhood in a Pittsburgh grocery store called Giant Eagle. Whenever your parents dragged you in with them, you could always count on the friendly people behind the bakery and deli counters to give your adorable self a free slice of American cheese and a free thumbprint cookie, just for being a cute kid. This recipe definitely got me nostalgic for those days, especially with the substitution of sprinkles for nuts.

Thumbprint Cookies

Not only are thumbprint cookies a classic, but they’re so adaptable for any time of the year. Halloween? Black and orange sprinkles! Valentines day? Pink and red icing! The possibilities are endless.

Thumbprint Cookies

Tell us, are you making anything fun for the holiday weekend?

Fourth of July Thumbprint Cookies
Print Recipe
  • CourseDesserts
Servings Prep Time
1-2 dozen 15 minutes
Cook Time
10-12 minutes
Servings Prep Time
1-2 dozen 15 minutes
Cook Time
10-12 minutes
Fourth of July Thumbprint Cookies
Print Recipe
  • CourseDesserts
Servings Prep Time
1-2 dozen 15 minutes
Cook Time
10-12 minutes
Servings Prep Time
1-2 dozen 15 minutes
Cook Time
10-12 minutes
Ingredients
  • 1/2 cup butter softened
  • 1/4 cup brown sugar
  • 1/2 tsp vanilla
  • 1 cup flour use less if cookies seem dry
  • 1/4 tsp salt
  • 1 egg yolk
  • 1 egg white
  • 3/4 cup chopped nuts or sprinkles
Servings: dozen
Instructions
  1. Mix butter, brown sugar, vanilla, and egg yolk thoroughly.
  2. Sift flour and salt together and stir in. Stir in a little at a time to ensure cookies don't get too dry.
  3. Roll into one inch balls.
  4. Dip in slightly beaten egg white. Roll in finely chopped nuts.
  5. Place about one inch apart on an ungreased cookie sheet. Bake at 375 for five minutes. Remove from oven.
  6. Quickly place thumb gently on top of each cookie. Return to oven and bake 5-8 more minutes. Cool.
  7. Place in thumbprints a bit of candied fruit, jelly, or tinted powdered sugar icing.
Share this Recipe
 
Powered byWP Ultimate Recipe

June 25, 2016 by: Shannon and Aaron

Swiss Steak

Swiss Steak

This recipe is the first of extra special recipes in Marguerite’s Cookbook where the recipe will call for a certain piece of cooking equipment and we will be privileged enough to use Marguerite’s personal cookware that was handed down to us! The cast iron skillet used in this recipe was a fixture in Marguerite’s kitchen for decades, and now can be one in ours as well.

Swiss Steak

As you will see in Marguerite’s instructions, this was another diet recipe. She even lists the calories per serving, although I have no idea if any of it is true! Here is what Marguerite had to say:

Swiss Steak Recipe

Looking through this recipe, there were a few things new to us again. While we were used to trimming fat off of meat before cooking it, neither of us had then cooked the fat down and used it as a greasing agent and to brown the meat a bit before cooking! Also, Marguerite’s shortened form of directions for herself added to the confusion at the start. This swiss steak looked delicious from the beginning and we were looking forward to it even more because it was a departure from our normal cuisine of pastas and baked chicken.

Swiss Steak

See, doesn’t that look great? Aaron was sure to heed Marguerite’s warning and went back to the stove many times during the two hours the steak cooked to make sure too much liquid didn’t evaporate. That didn’t even seem to remotely resemble an issue. We do think even though we only cooked it for two hours, it turned out a little dry. As Aaron has heard and learned from his family, every stove and oven cooks the same recipe differently! We used rather thin steaks though. Our tiny, old apartment stove doesn’t help, either.

Swiss Steak

If you couldn’t already tell, we both really enjoyed this swiss steak recipe. Even with the extra step of cooking down the fat from the meat, this is a simple recipe that I really think Aaron and I will want to use again and again!

Swiss Steak
Print Recipe
  • CourseMain Dish
Servings Prep Time
4 10 minutes
Cook Time
2 hours
Servings Prep Time
4 10 minutes
Cook Time
2 hours
Swiss Steak
Print Recipe
  • CourseMain Dish
Servings Prep Time
4 10 minutes
Cook Time
2 hours
Servings Prep Time
4 10 minutes
Cook Time
2 hours
Ingredients
  • 1 1/2 lbs steak
  • salt and pepper
  • 1 lb can of tomatoes
  • 1 medium onion sliced
  • 1/2 cup celery chopped
  • 1/4 tsp garlic salt
  • 3/4 tsp salt
  • pepper
Servings:
Instructions
  1. Remove fat. Cook fat in heavy skillet. Discard chunks.
  2. Season steak in a little salt and pepper. Brown lightly in fat. Pour off fat.
  3. Add remaining ingredients.
  4. Cover and cook over low heat 2 to 2 1/2 hours or until fork tender. Add water during cooking if too much liquid evaporates.
Share this Recipe
 
Powered byWP Ultimate Recipe
  • « Previous Page
  • 1
  • 2
  • 3
  • Next Page »

Hey There!

We're Aaron and Shannon, the cooks behind Marguerite’s Cookbook. We are a husband and wife cooking/blogging team who love food, fun, and family.

Give us a follow

Twitter

Sign up for our monthly newsletter and receive exclusive content from us in your inbox once a month.

  • Policies
  • Contact

© 2025 · Fun Genesis WordPress Theme by, Pretty Darn Cute Design