Marguerites Cookbook

A cooking blog all about making vintage recipes from a cookbook we inherited from our grandmother

  • Home
  • Recipes
    • Main Dishes
    • Appetizers and Sides
    • Desserts
    • Breakfast
  • About
  • Contact

December 28, 2016 by: Shannon and Aaron

One Pan Ham and Cheese

cheese ham header

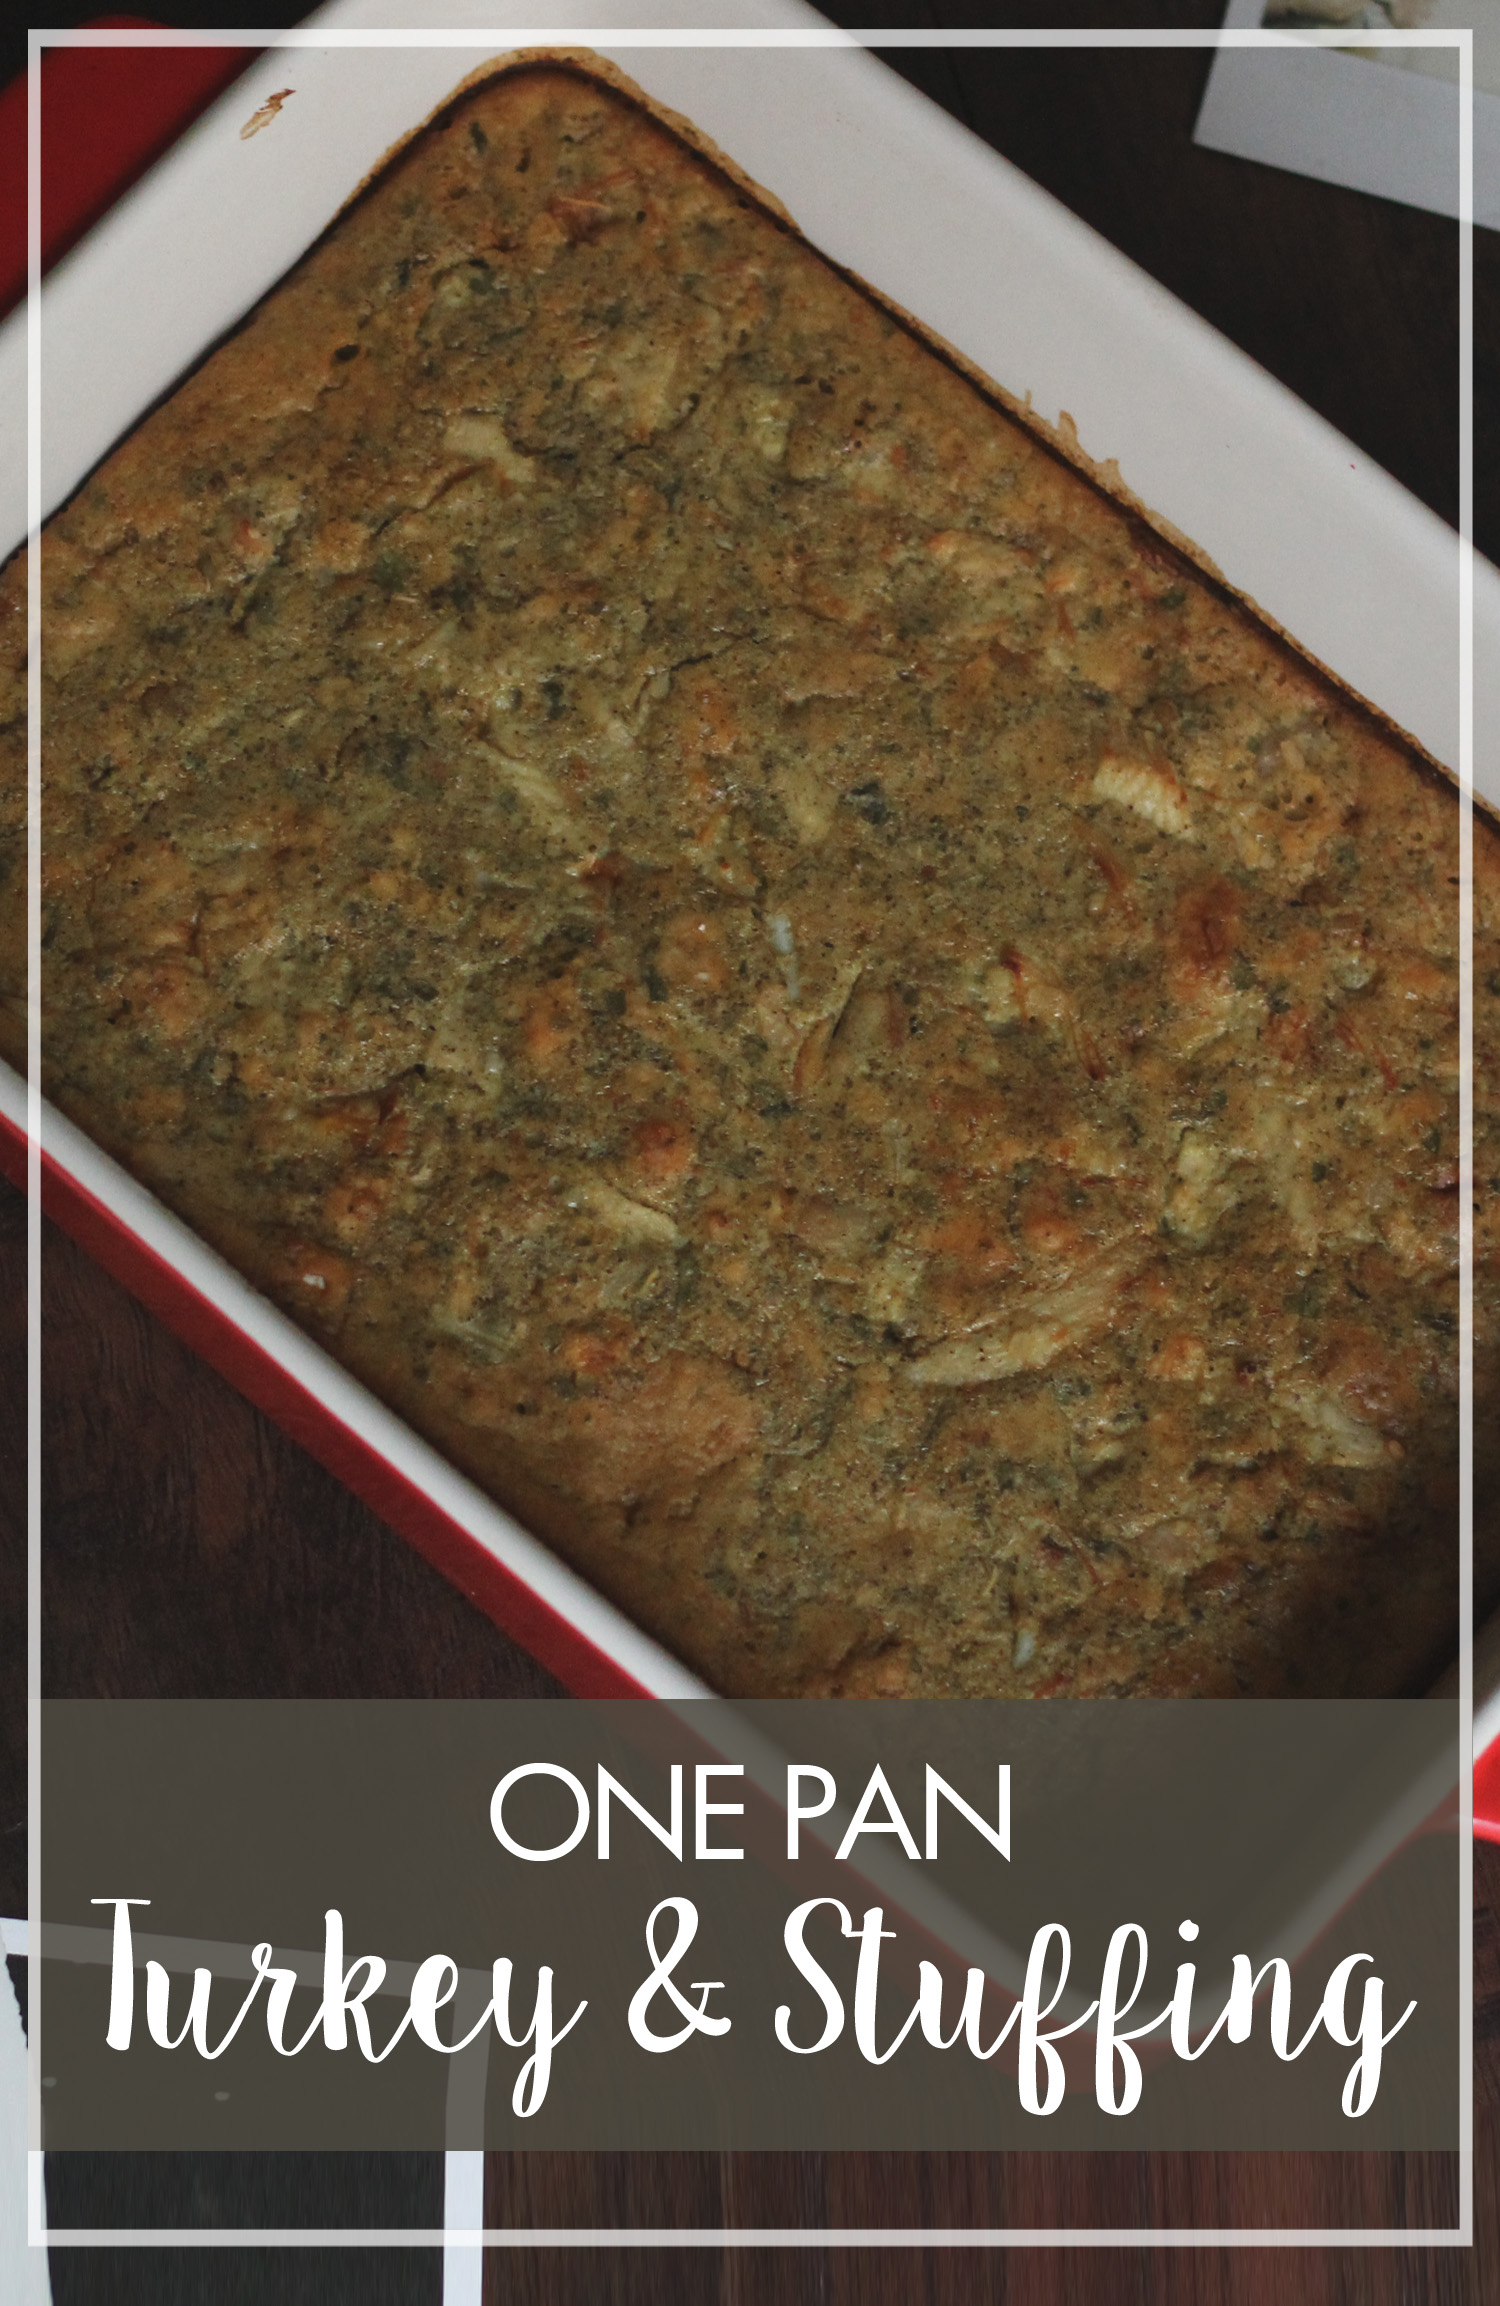
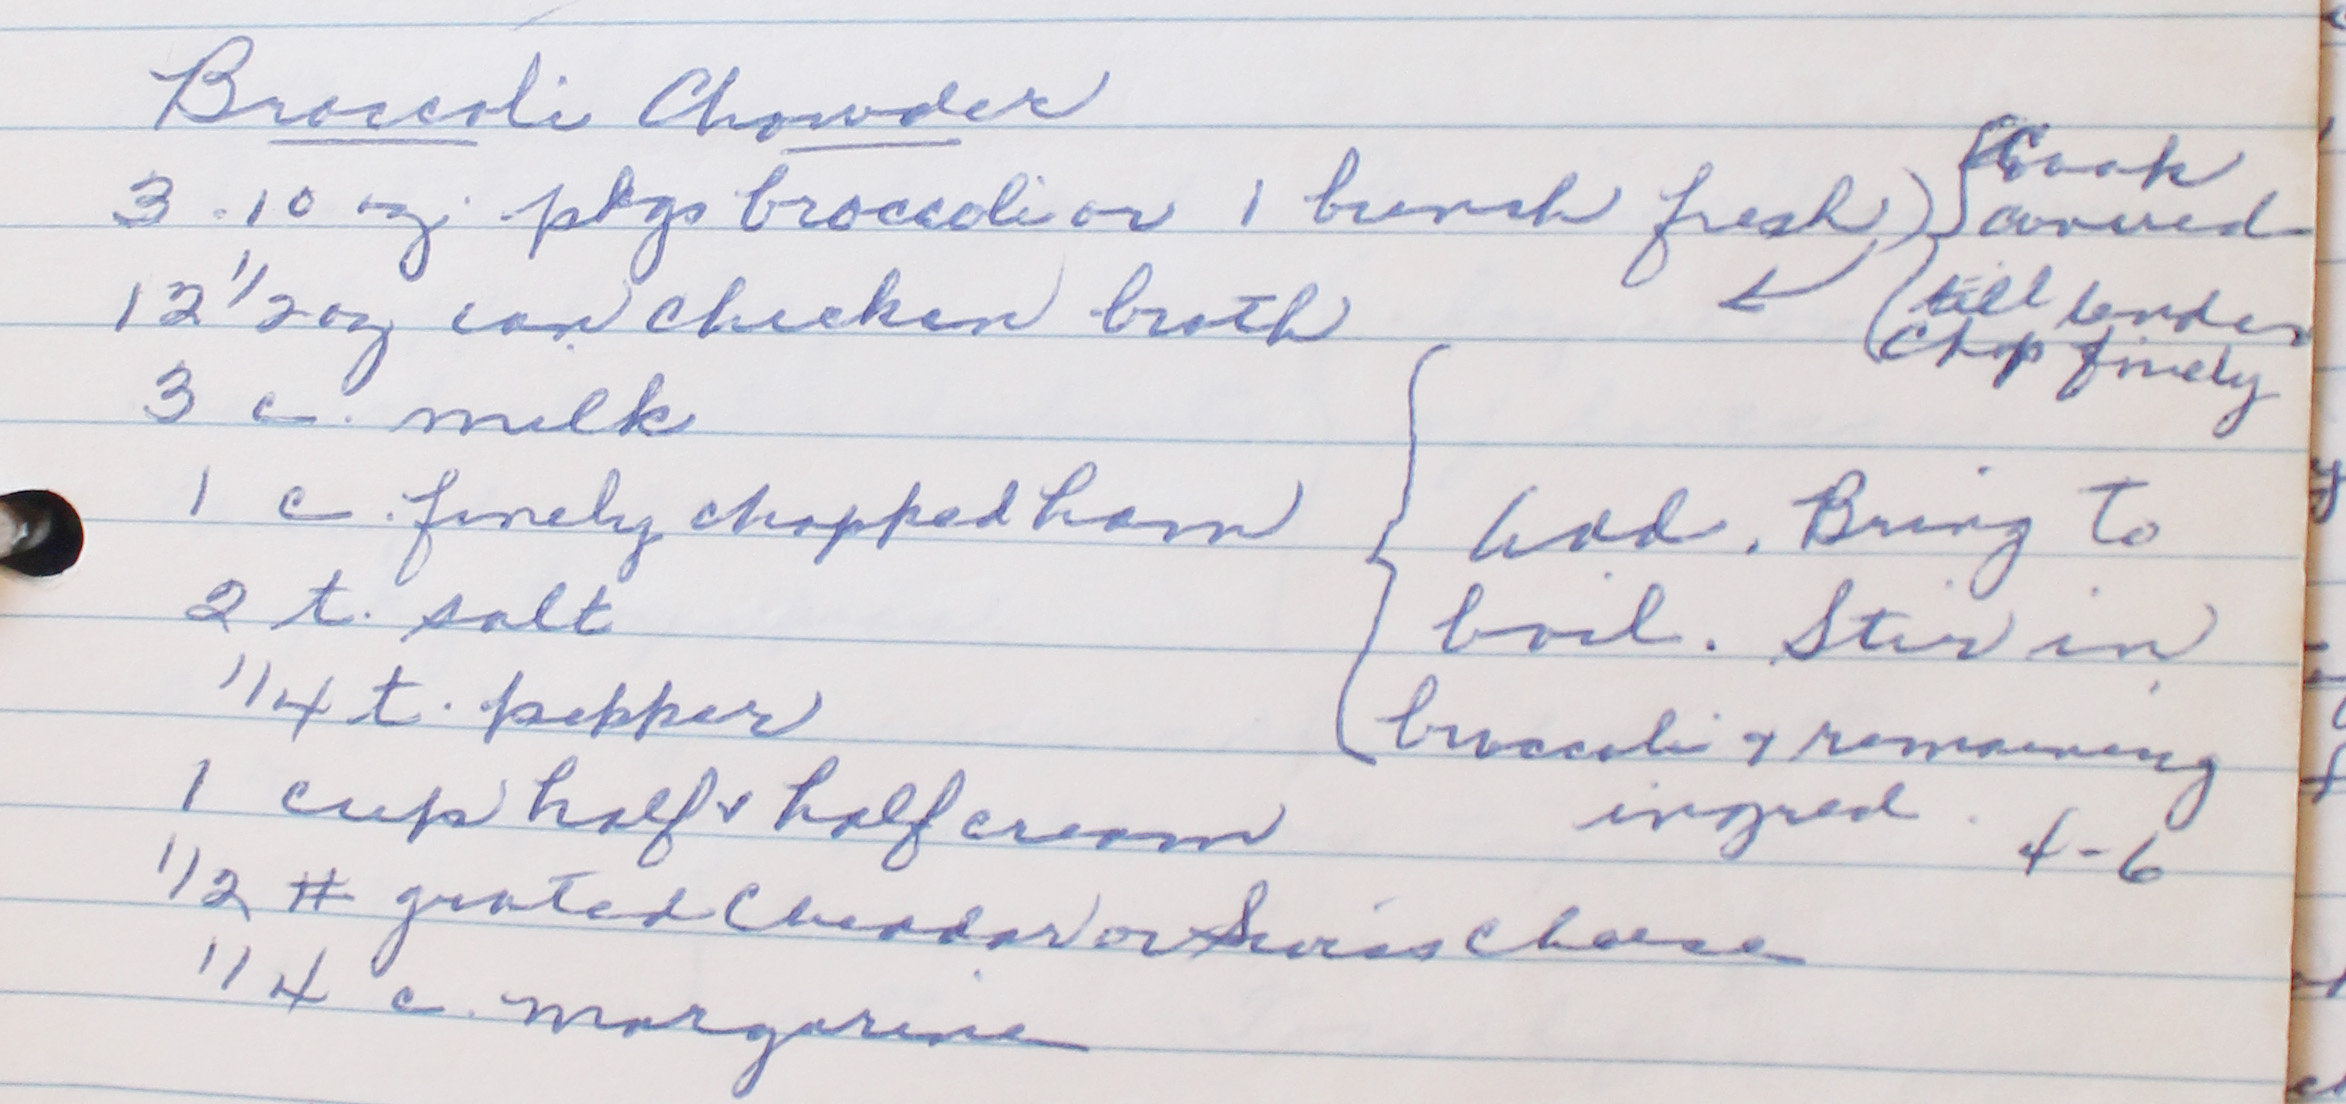
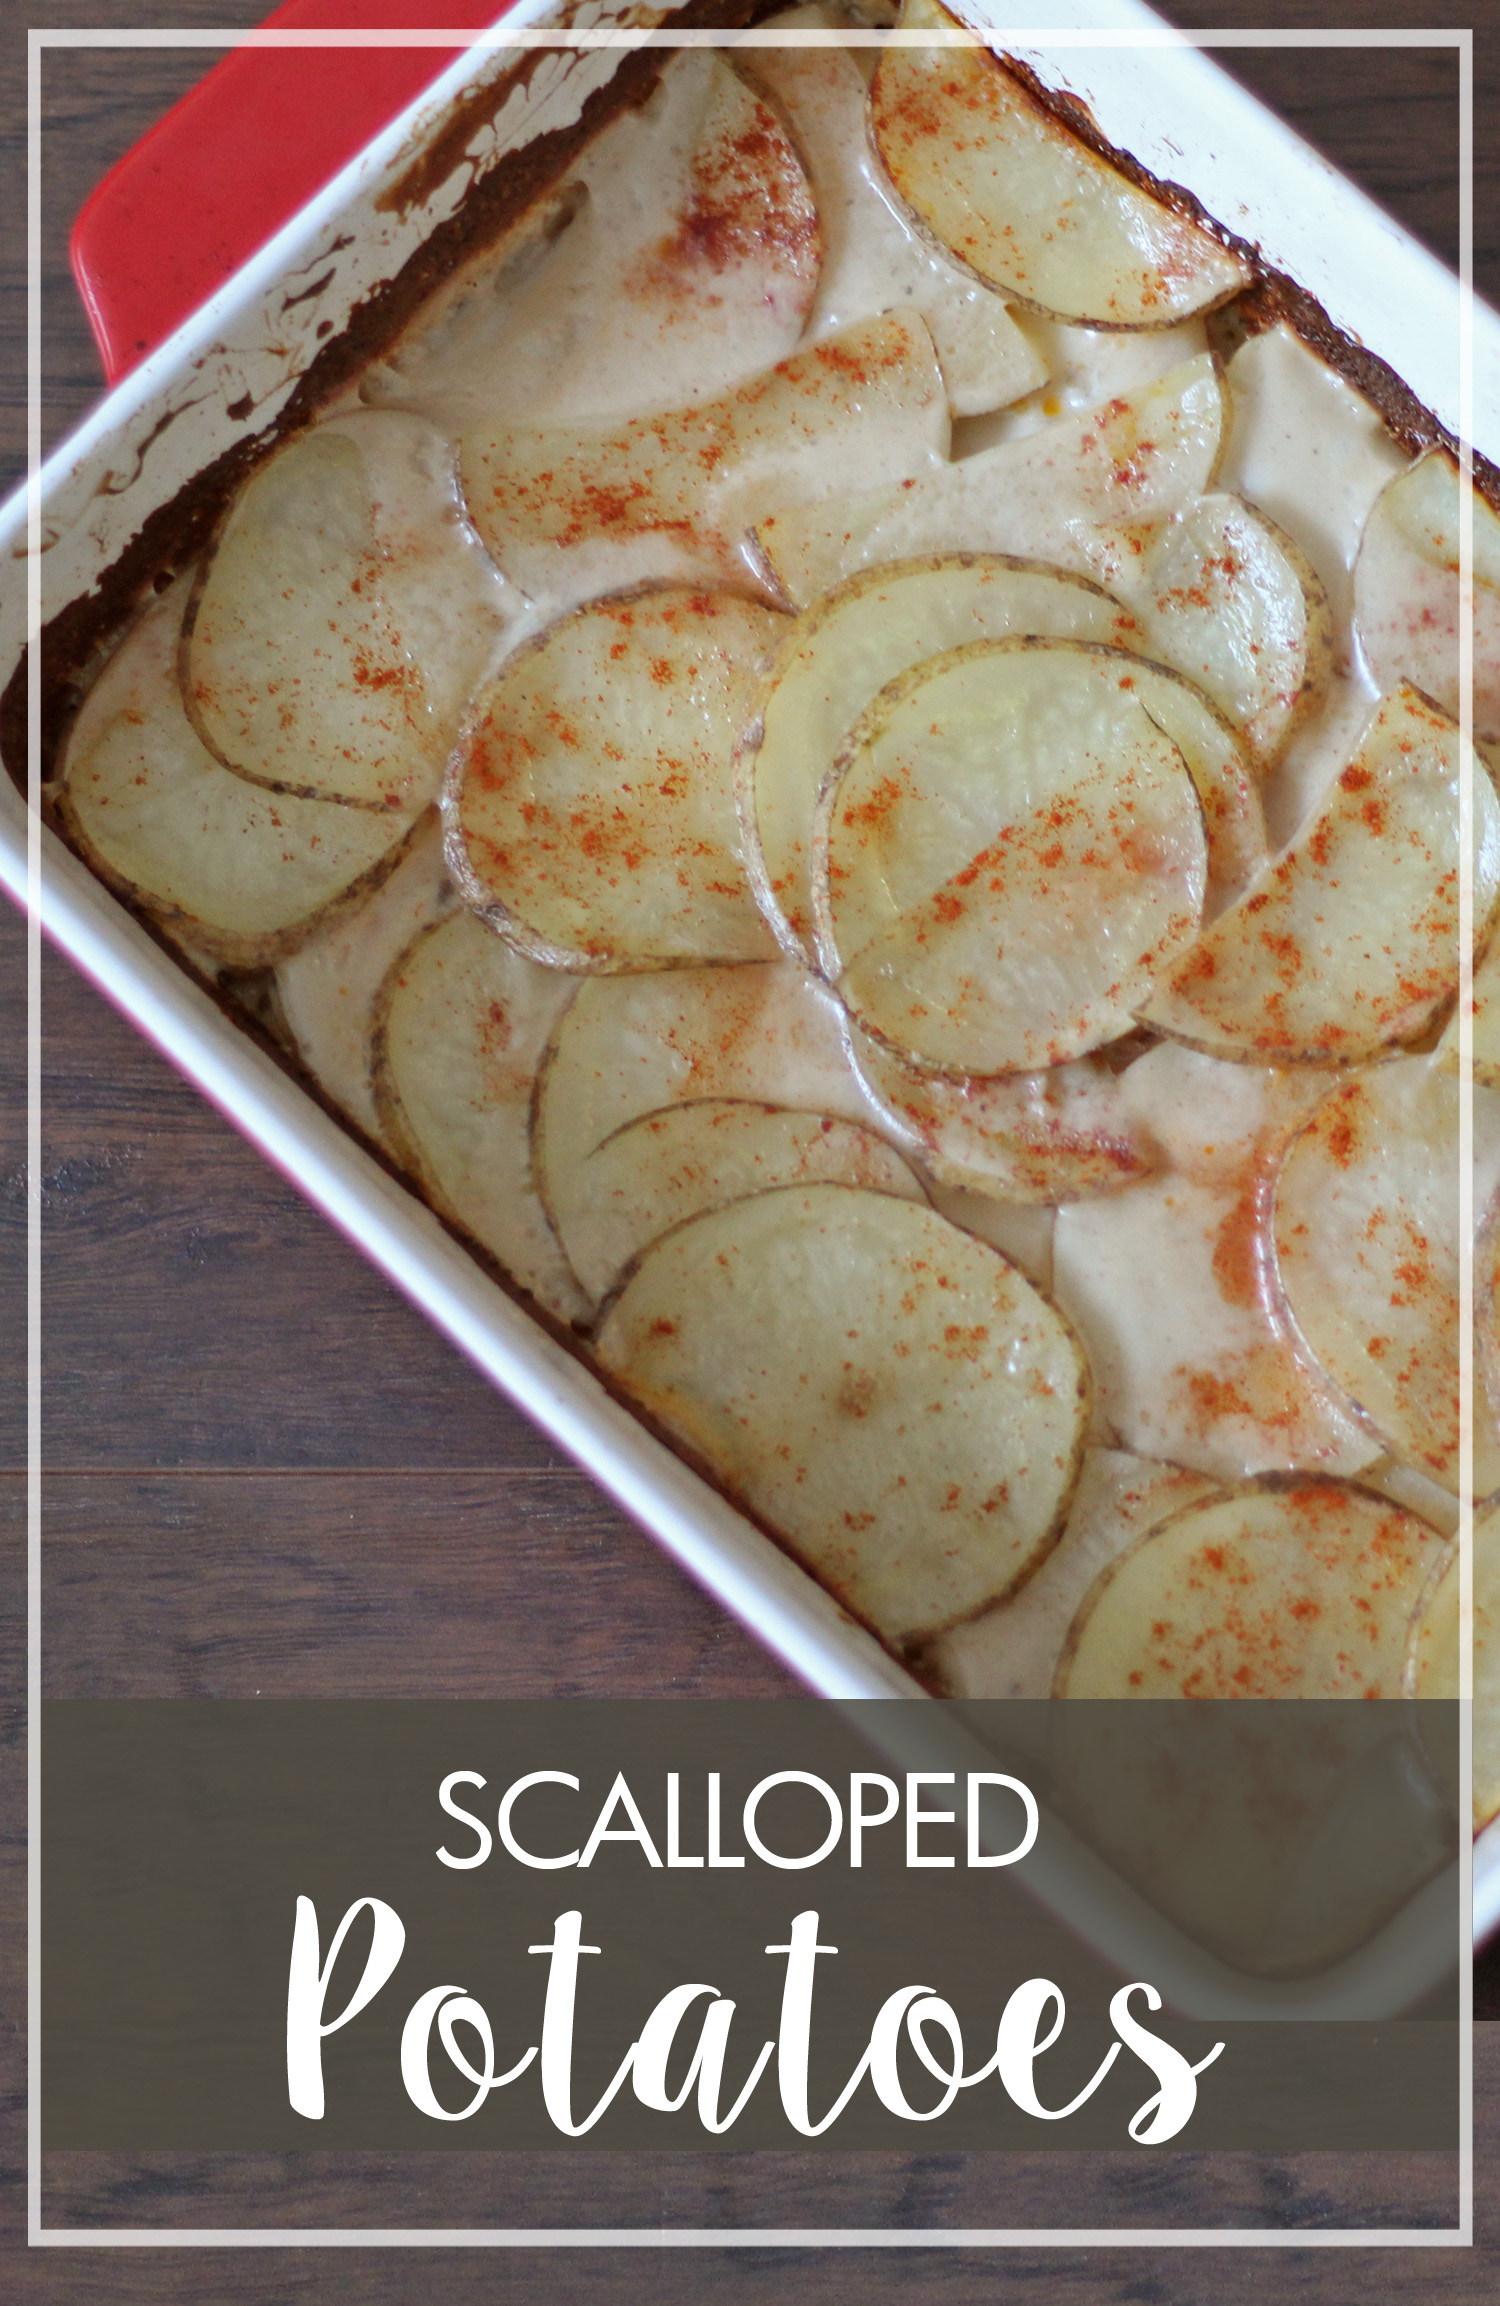
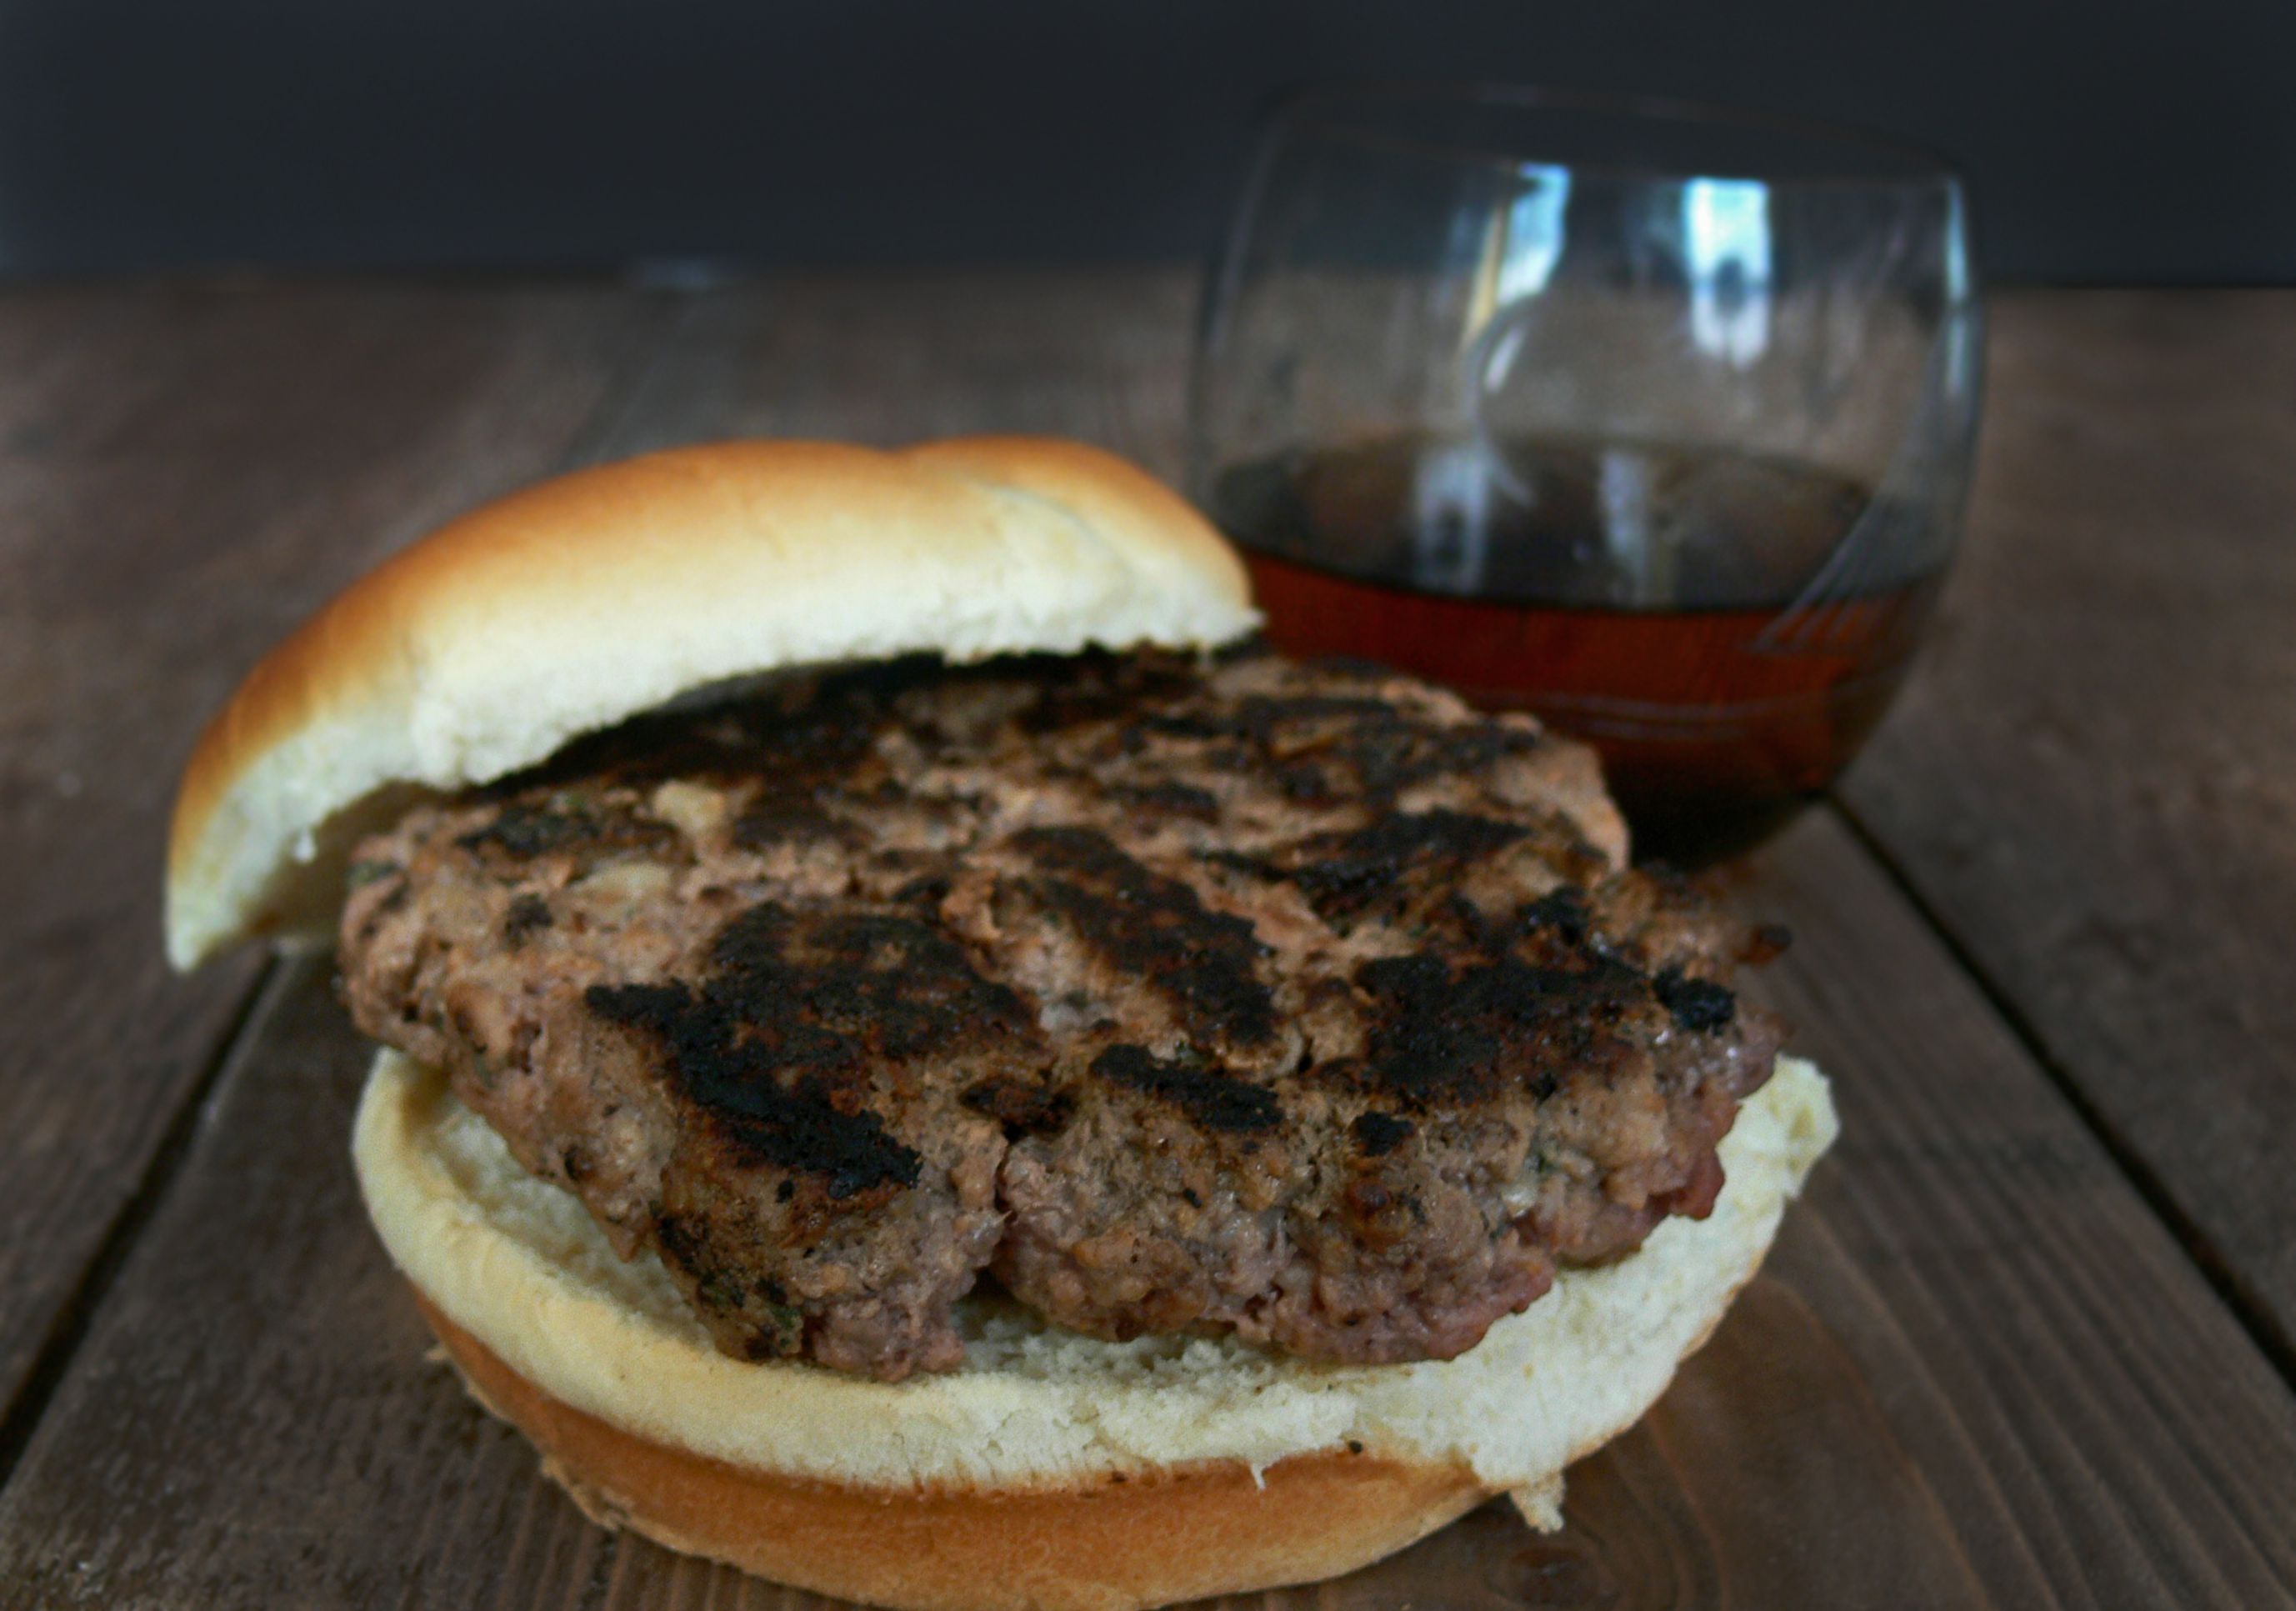
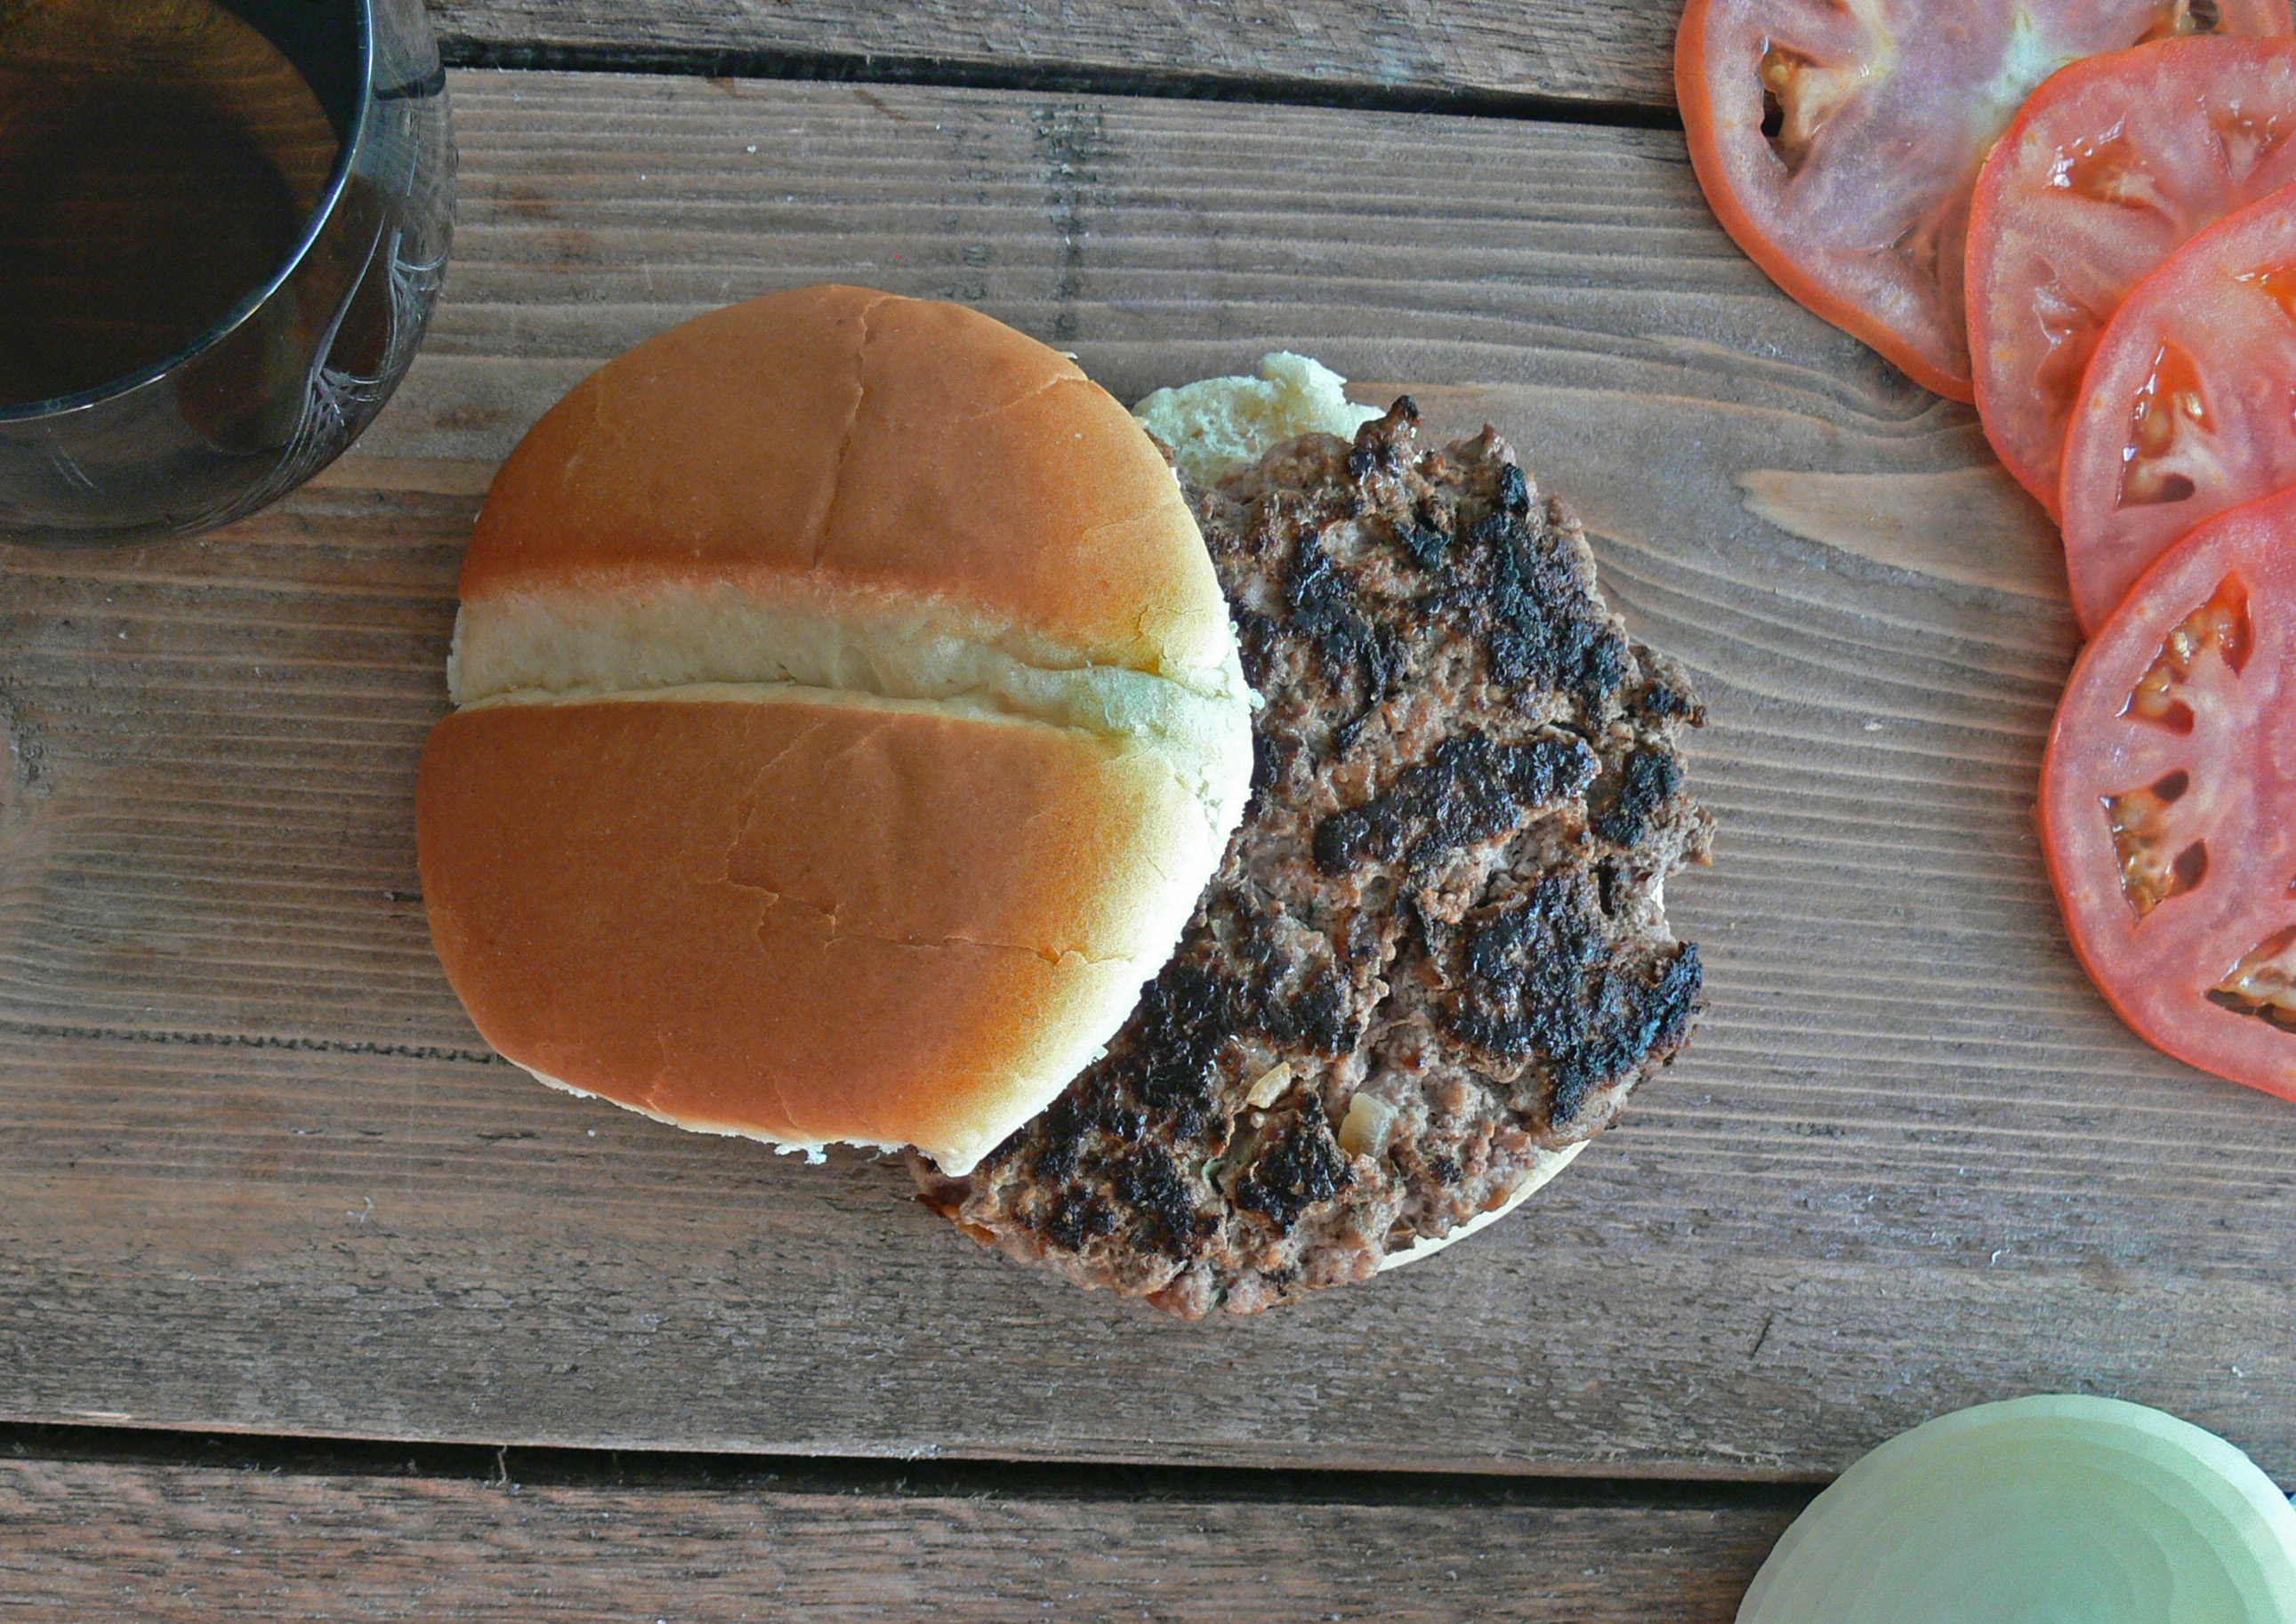
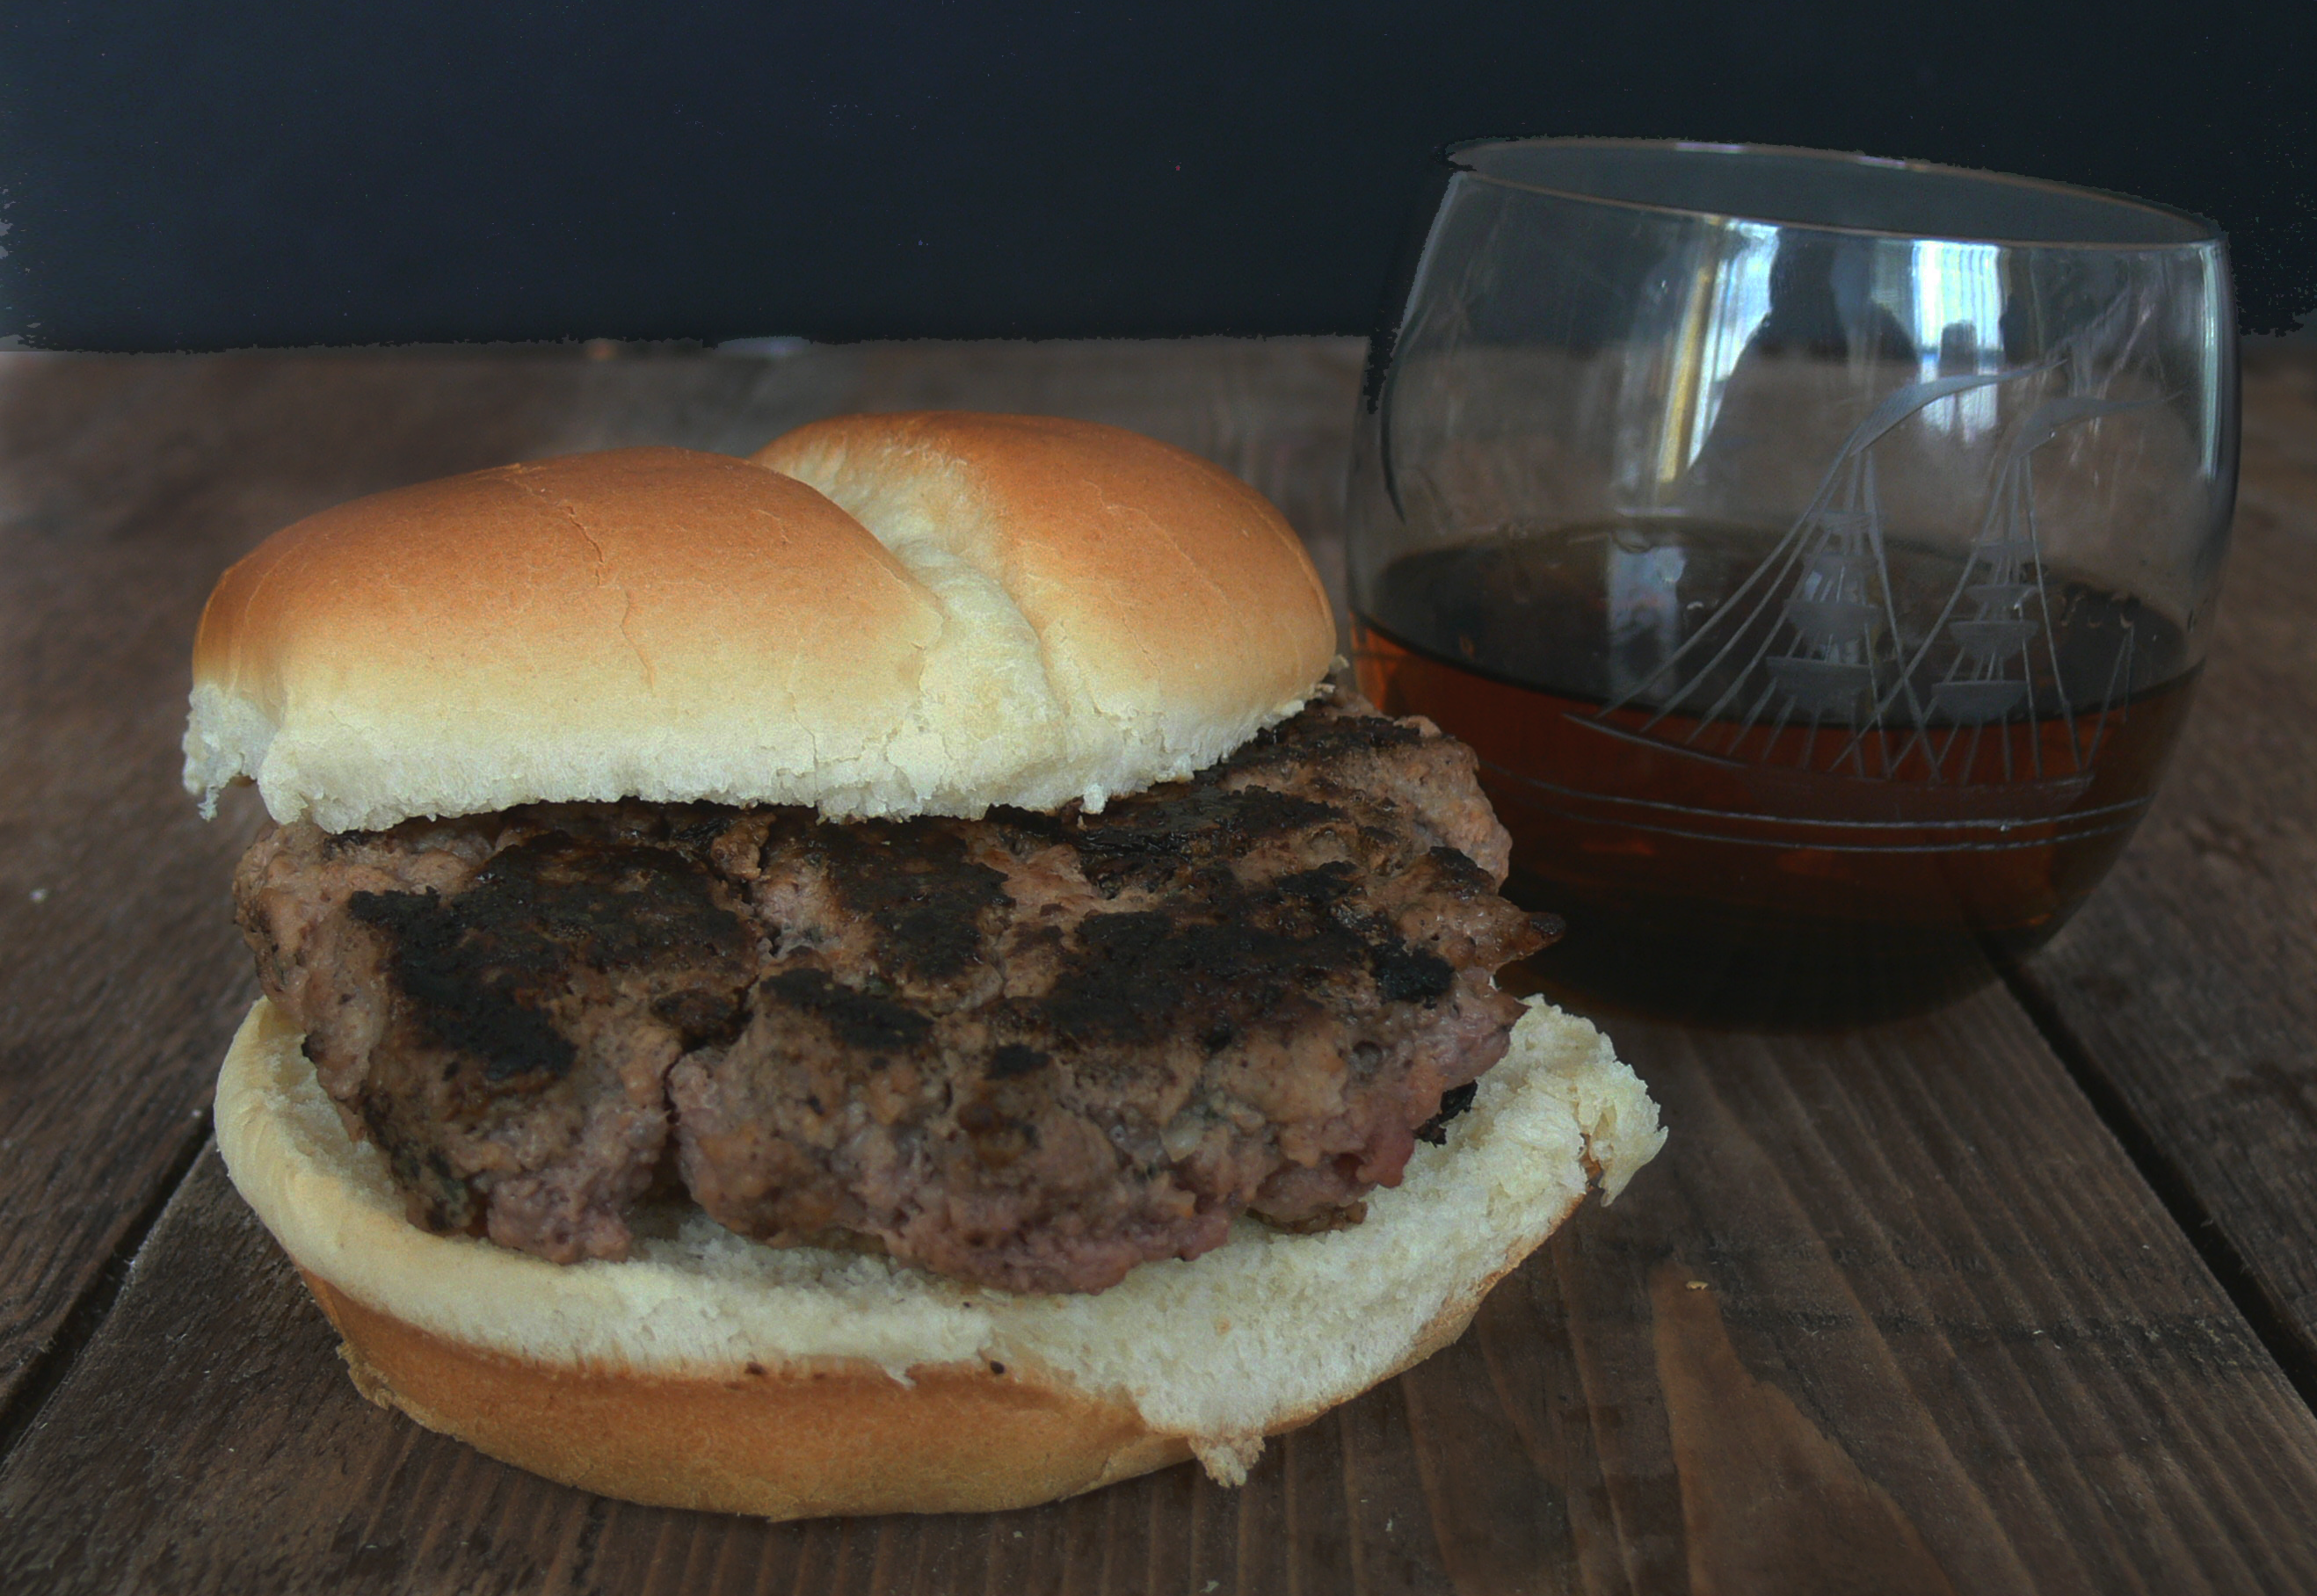
Well, here we are in the midst of the holidays with plenty more leftovers to finish and we could all use a fresh idea or two on how to do that. Luckily, Marguerite had leftover casseroles and other one pan dishes for many different main ingredients. One of the best parts of this one pan ham and cheese bake is that it turned out to be more of a breakfast dish than anything else. A great twist and a different way to have dinner time leftovers!

Here’s what Marguerite had to say:

onepanhamcheeserecipe

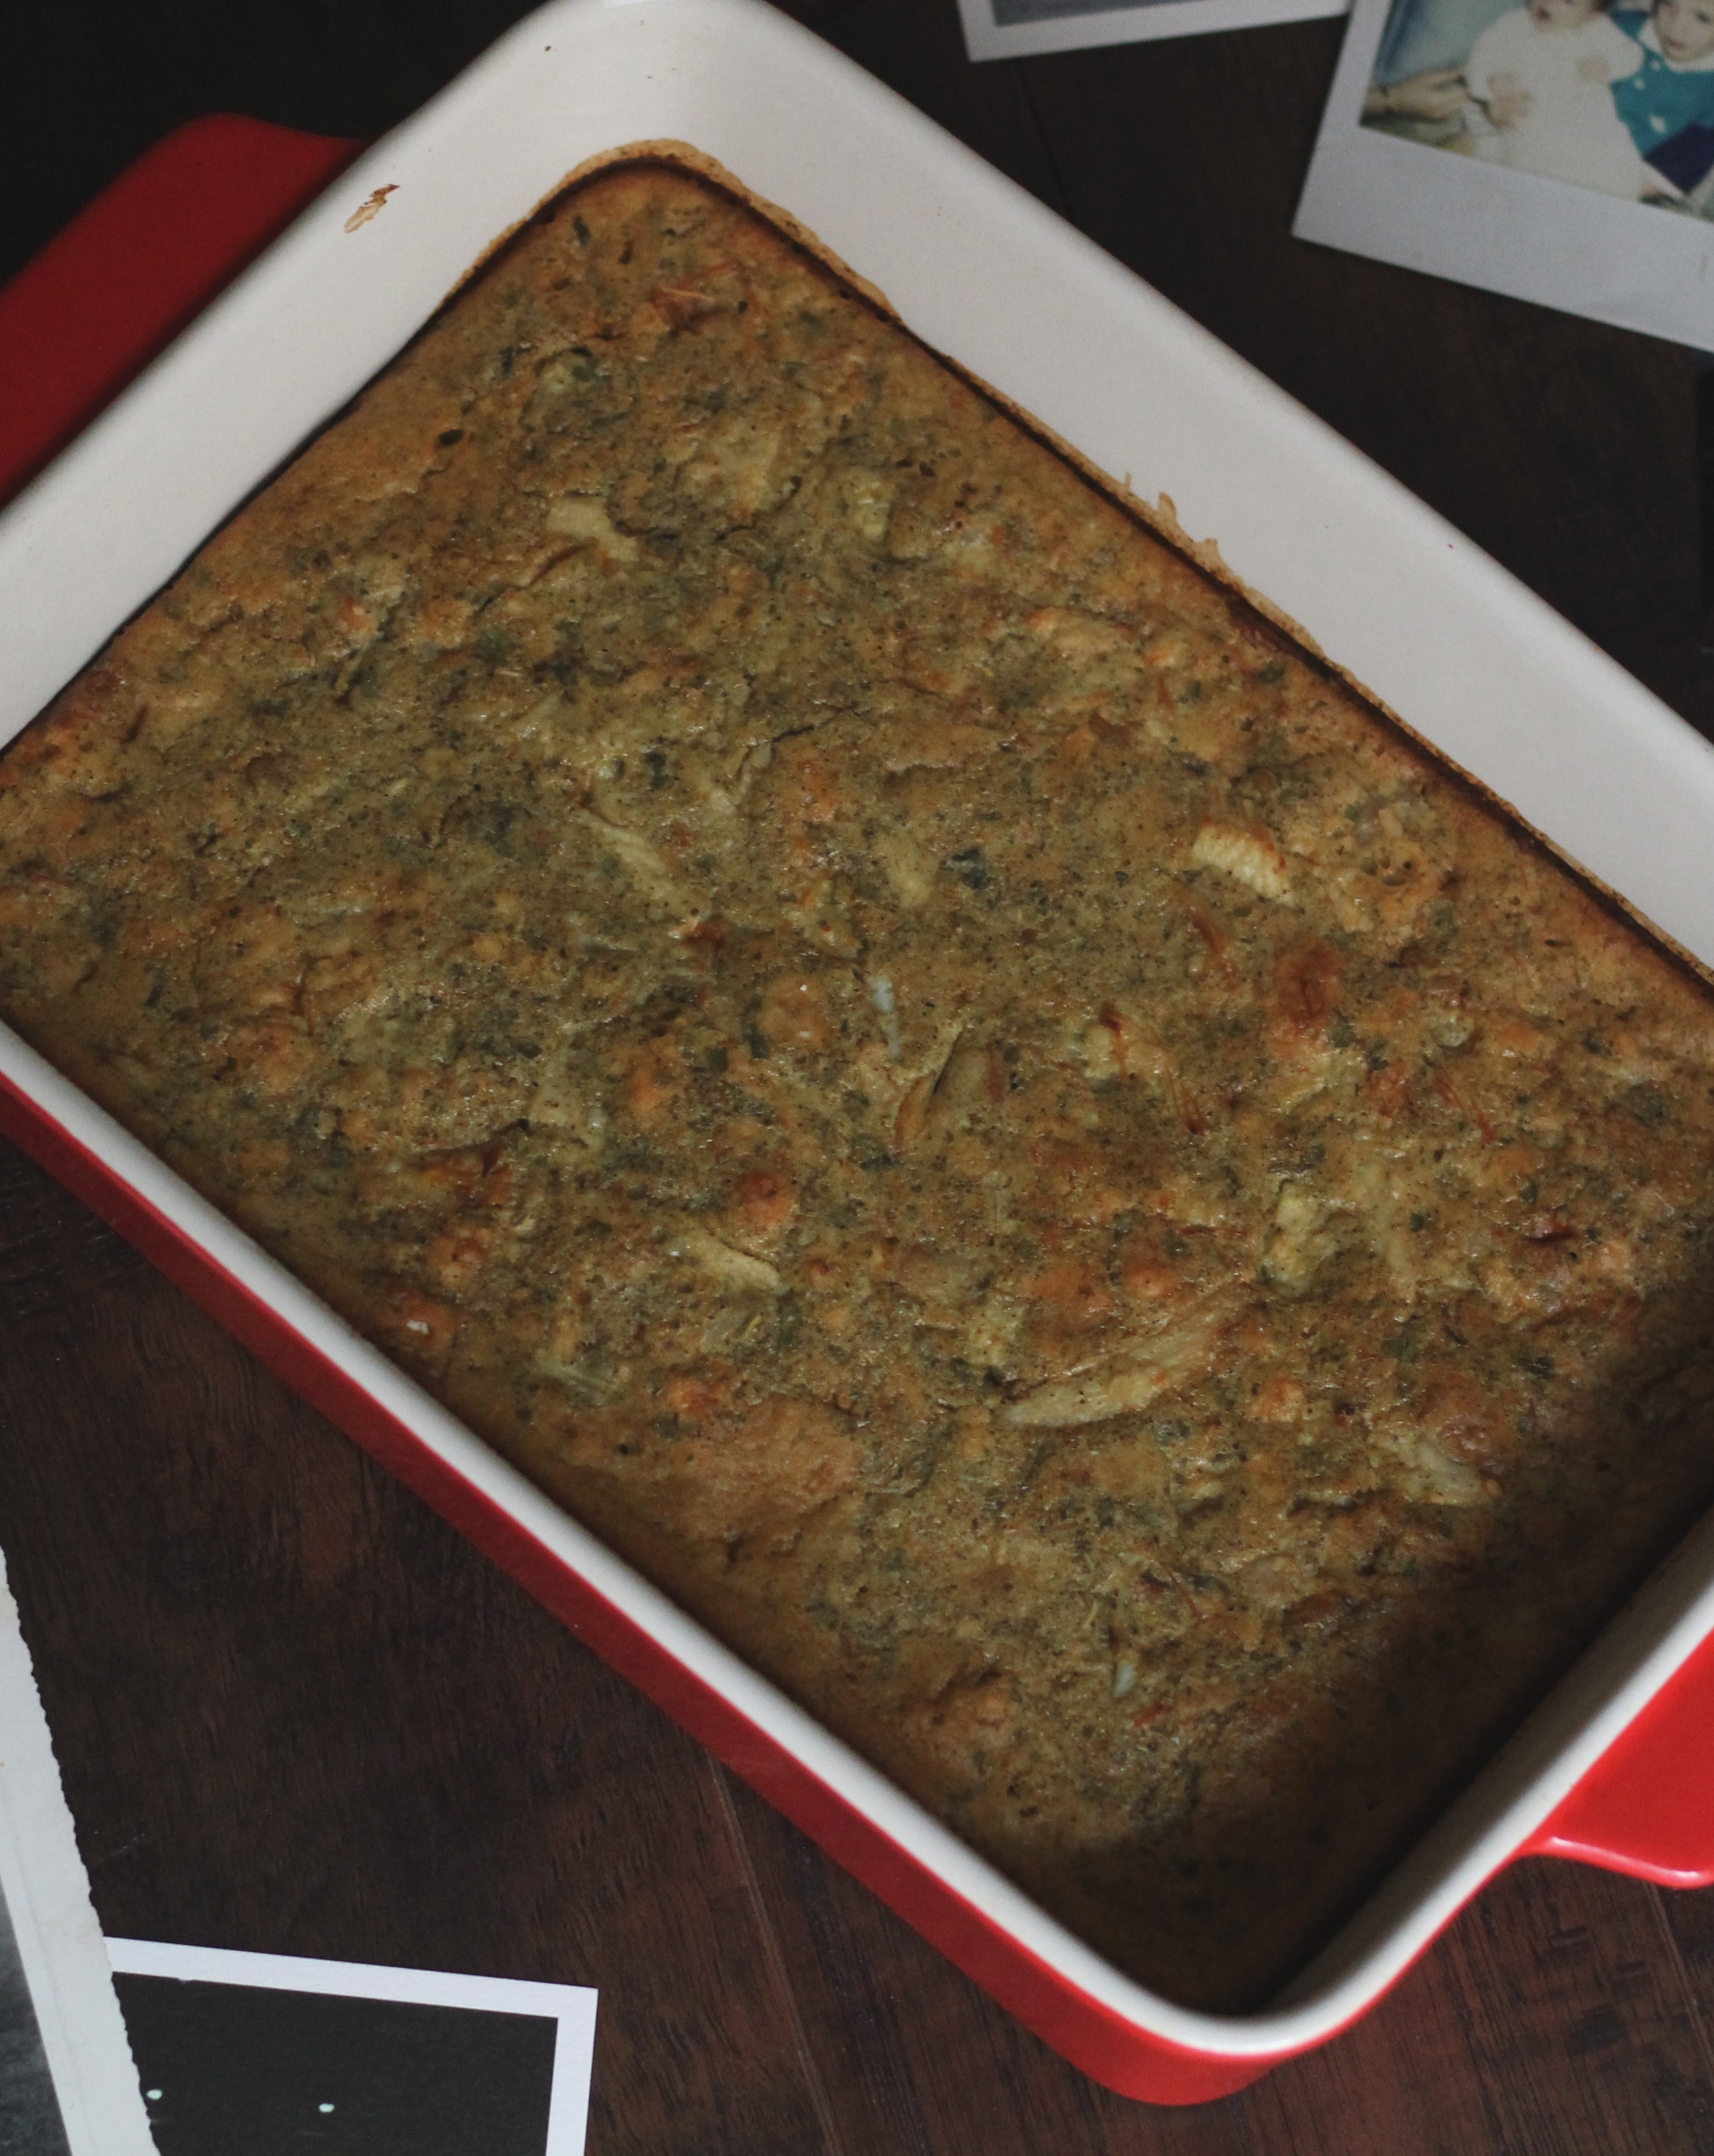
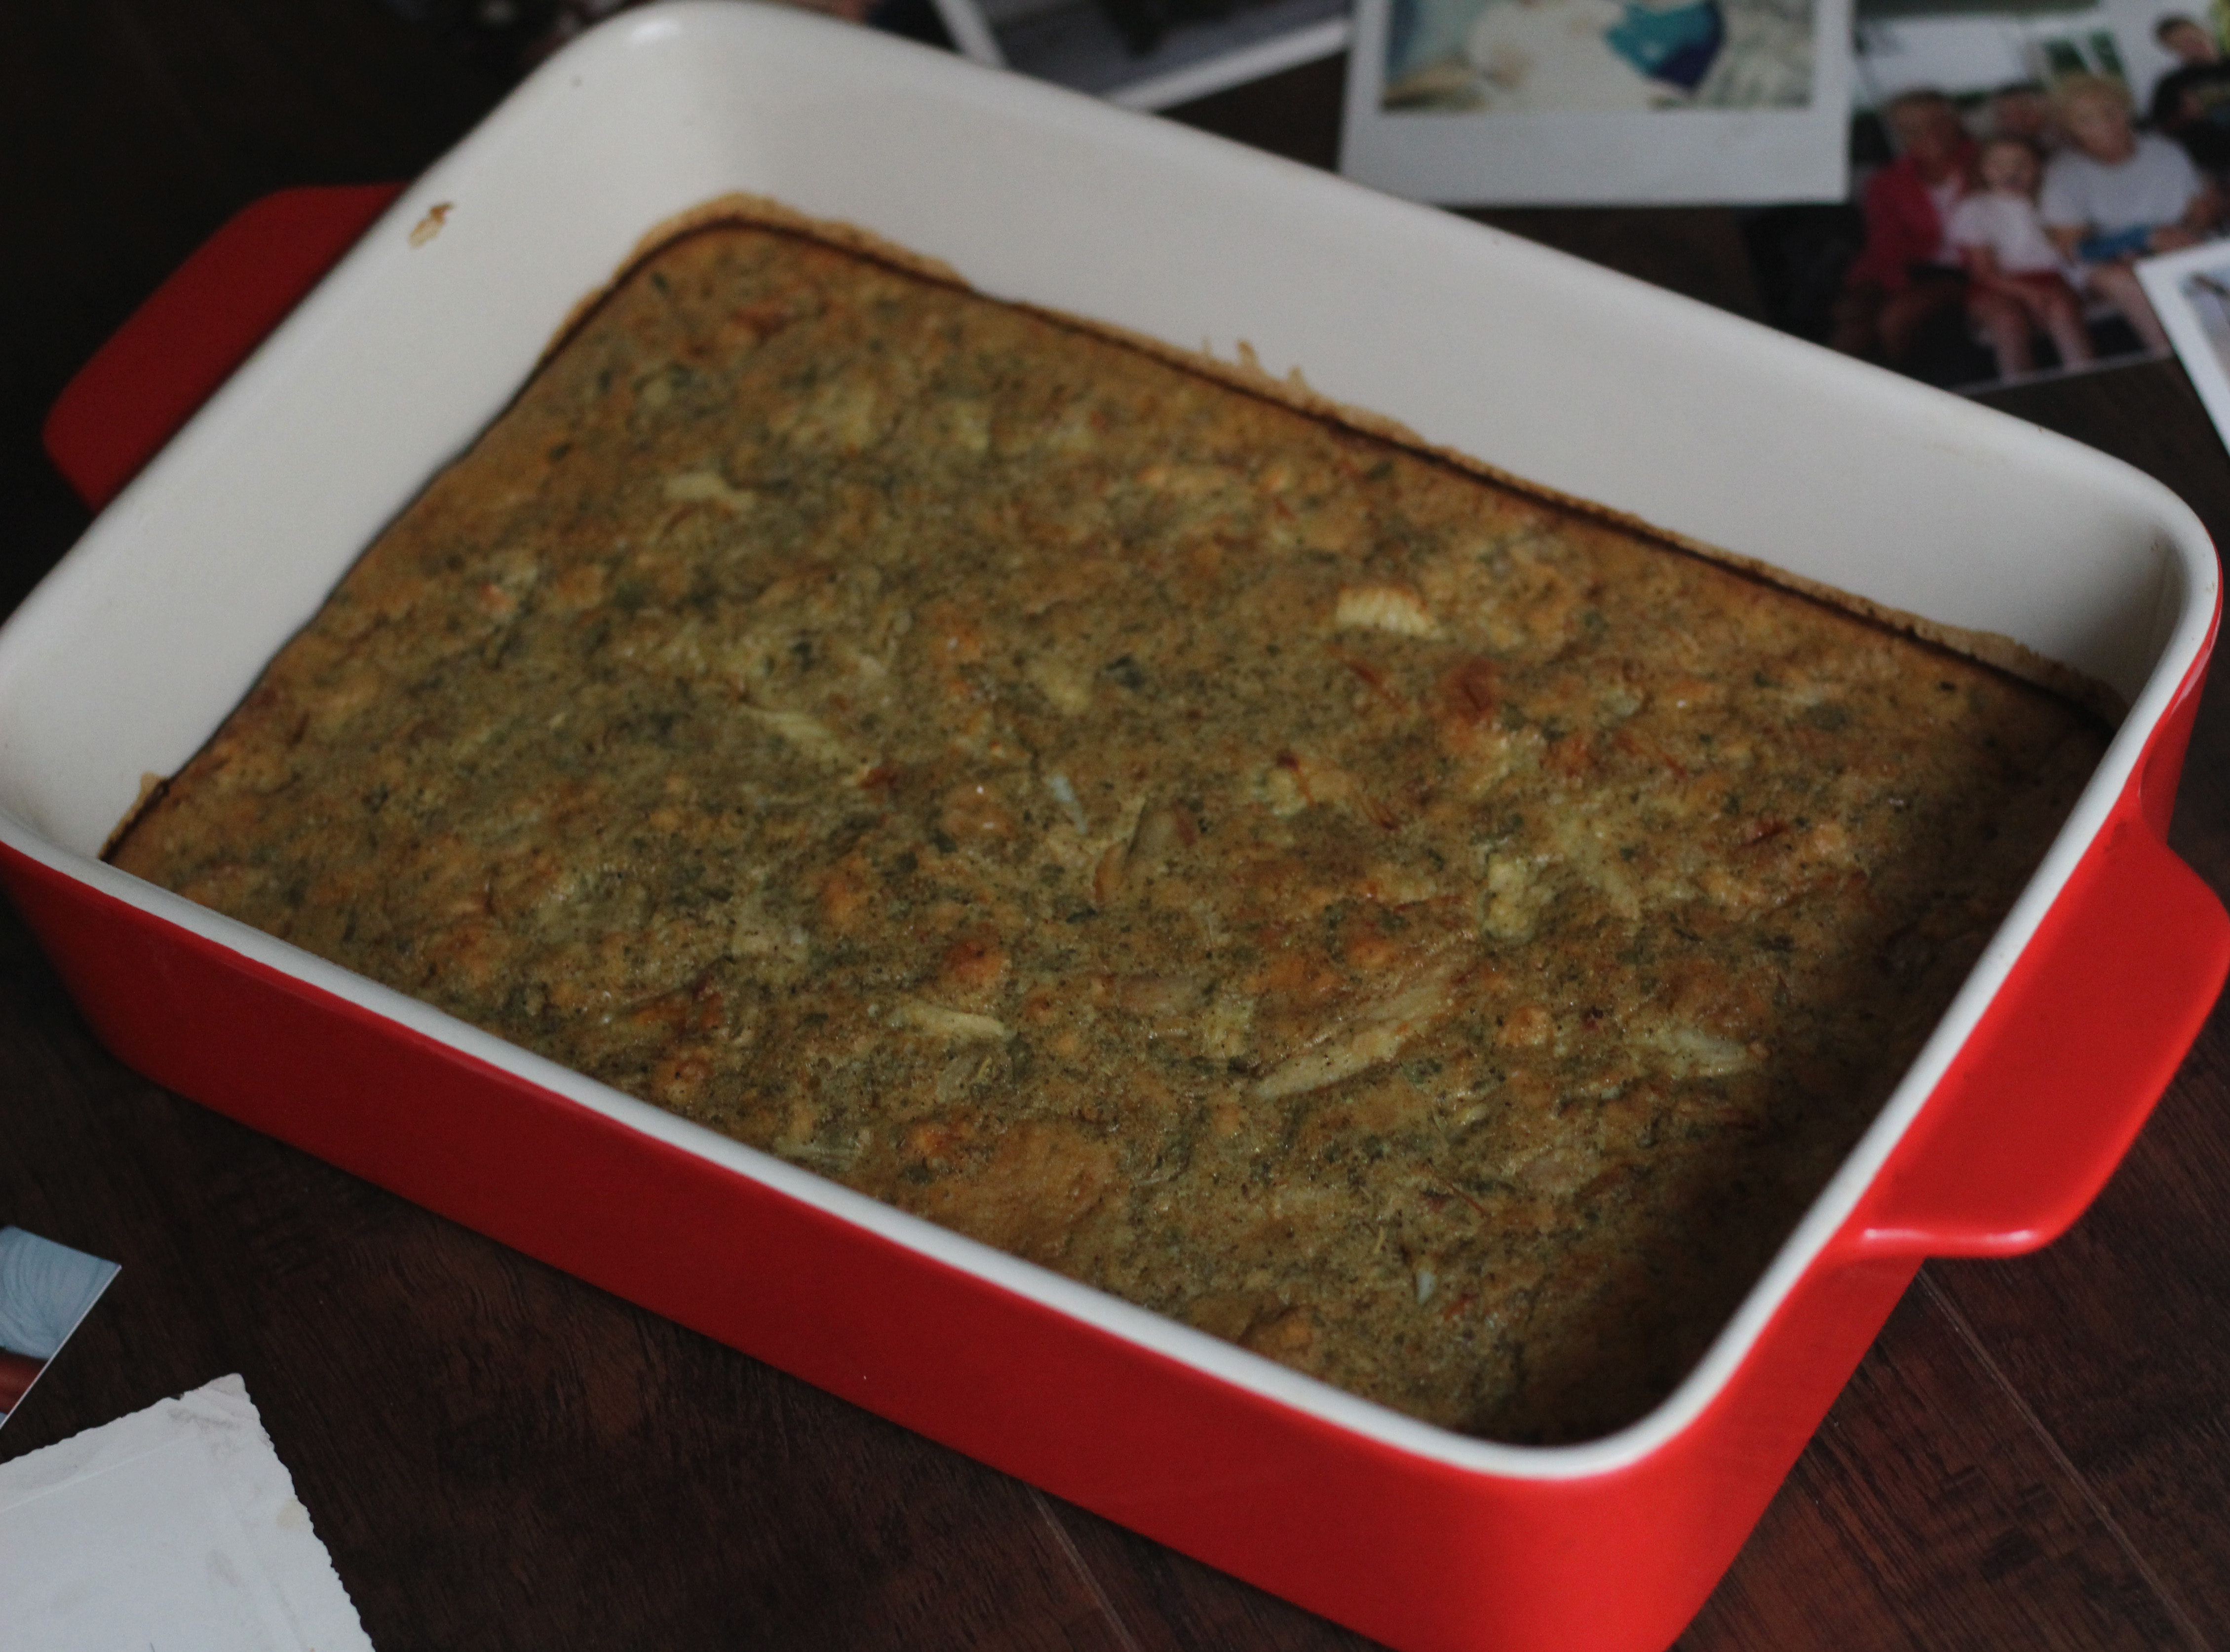
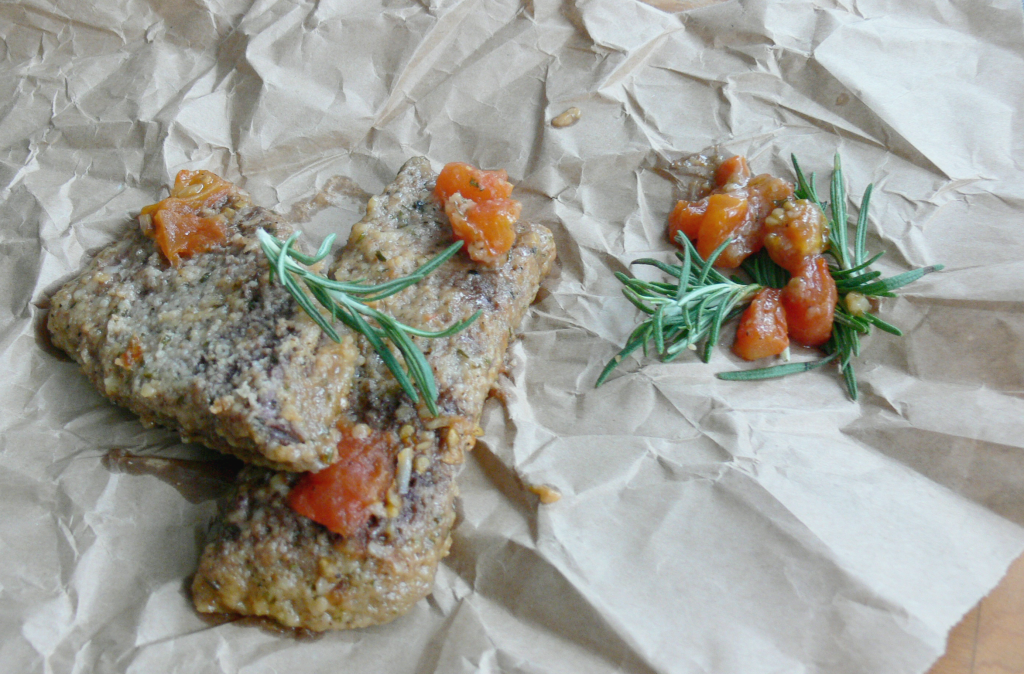
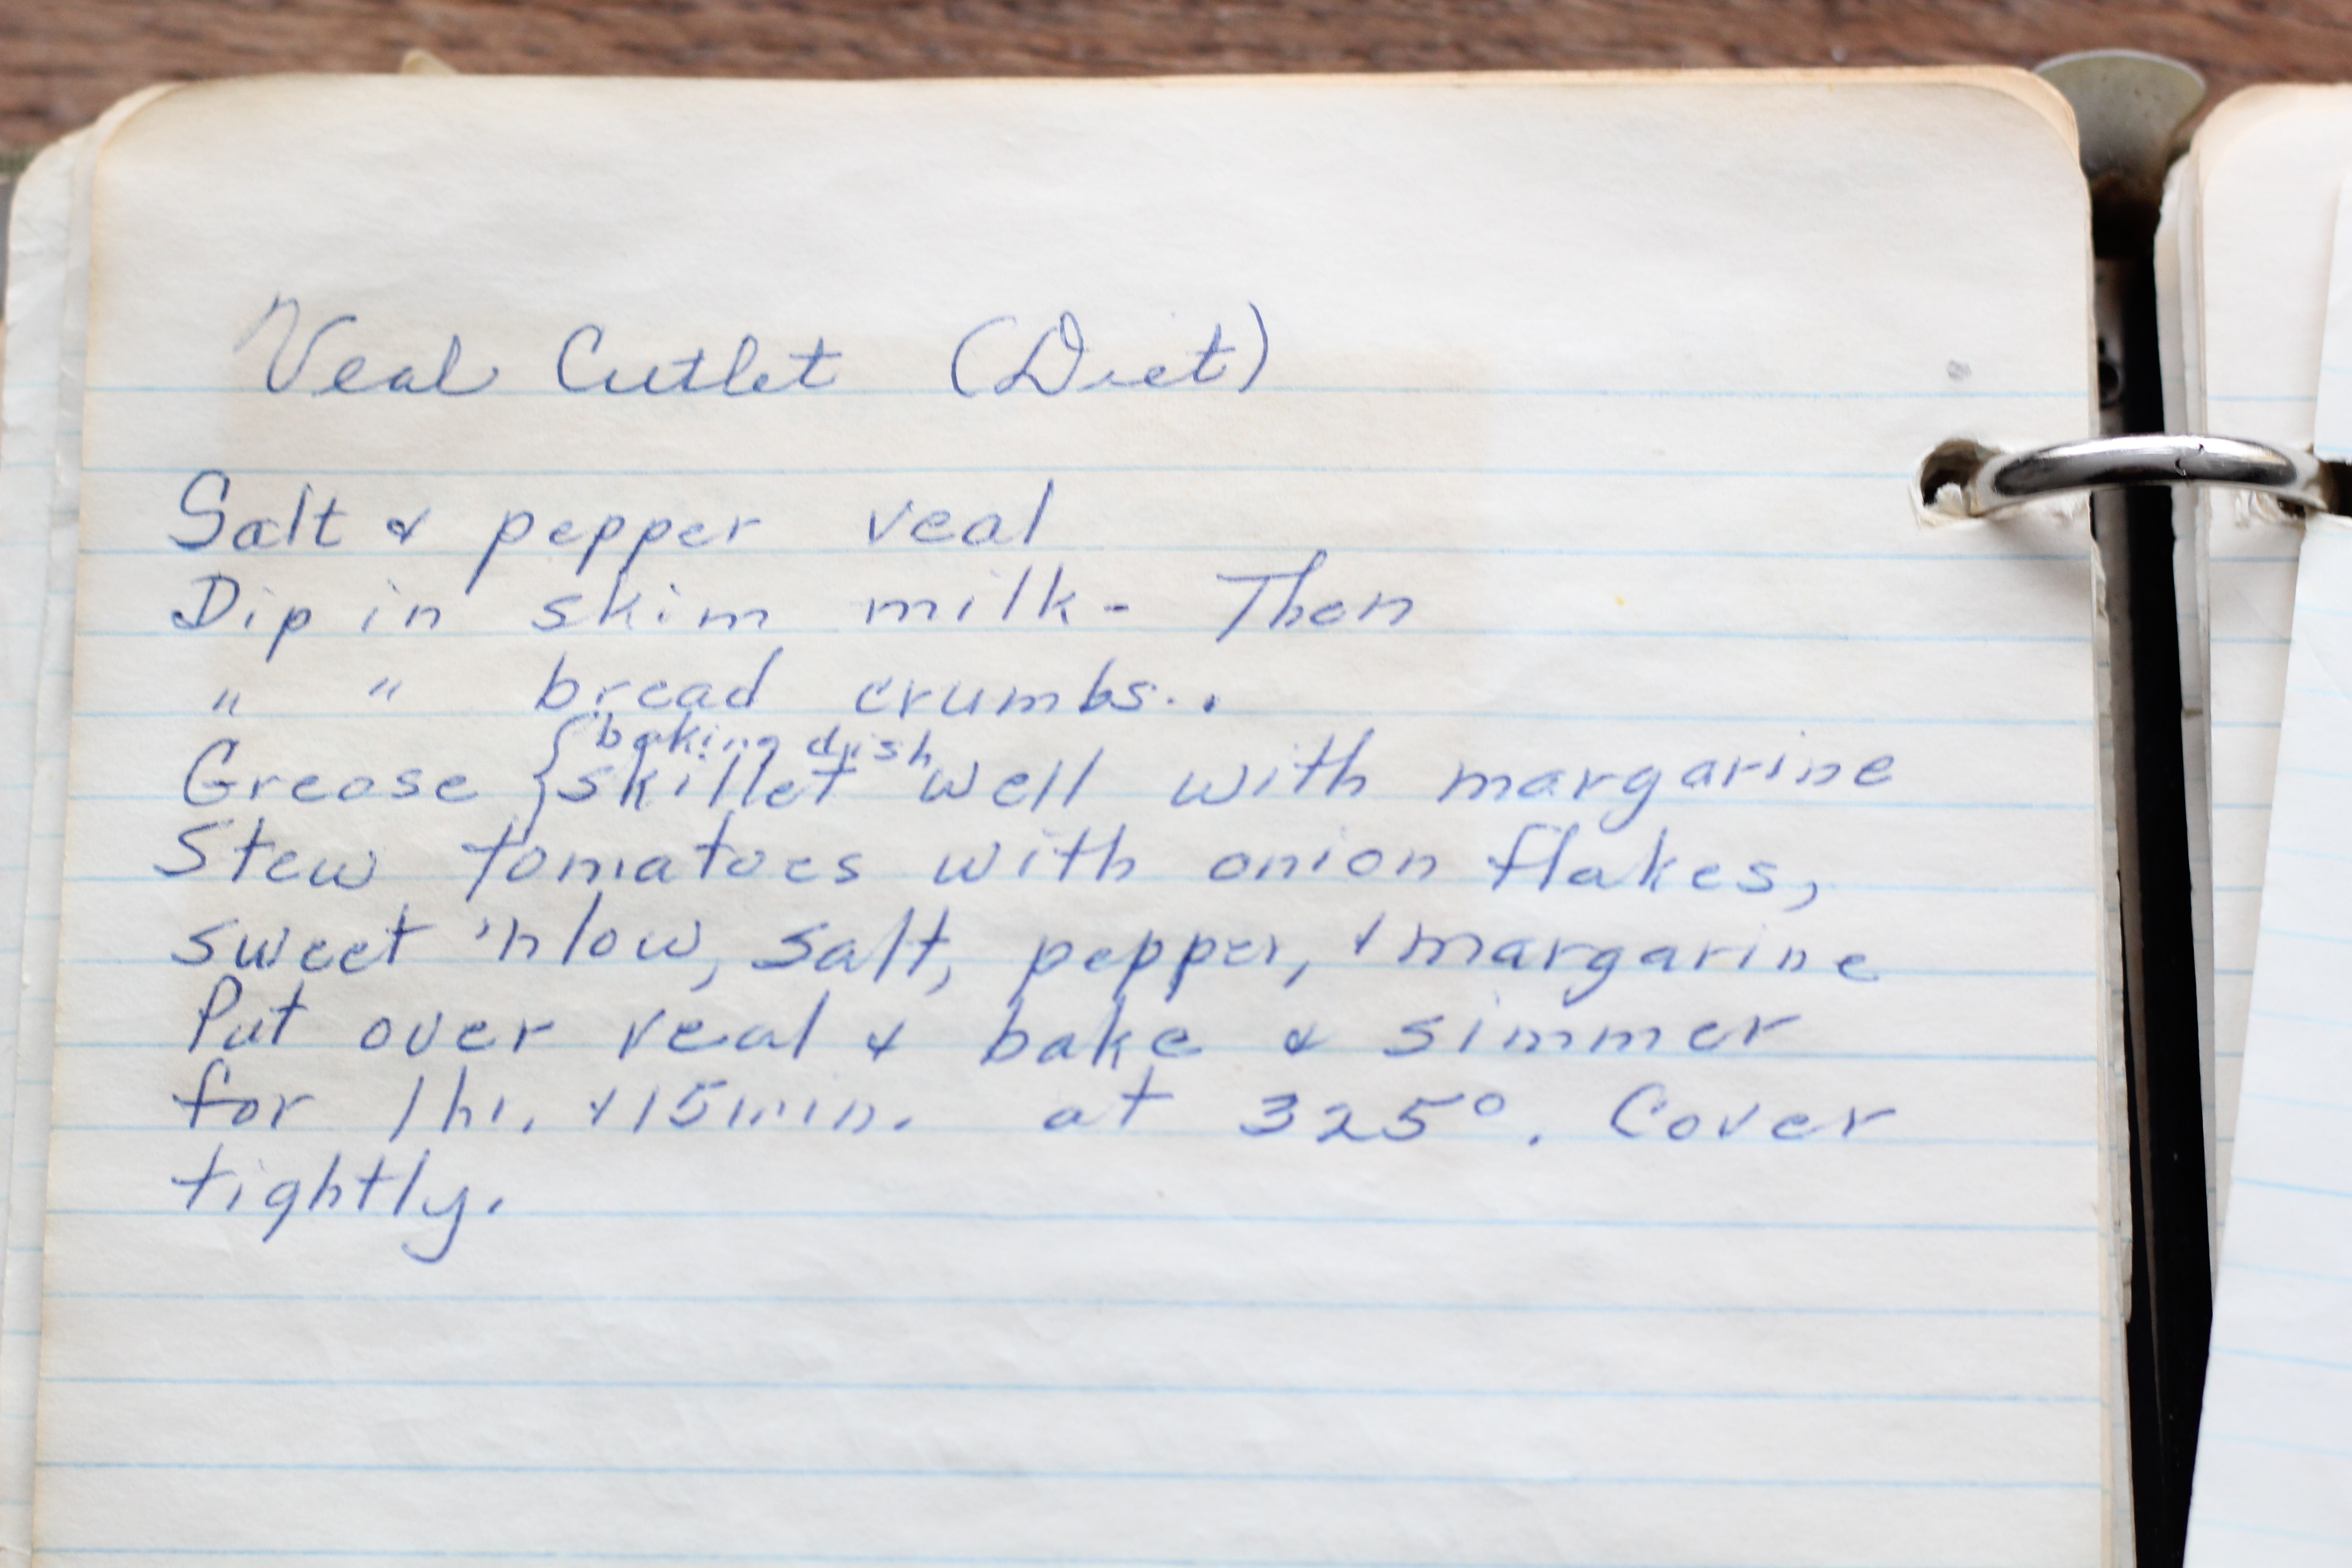
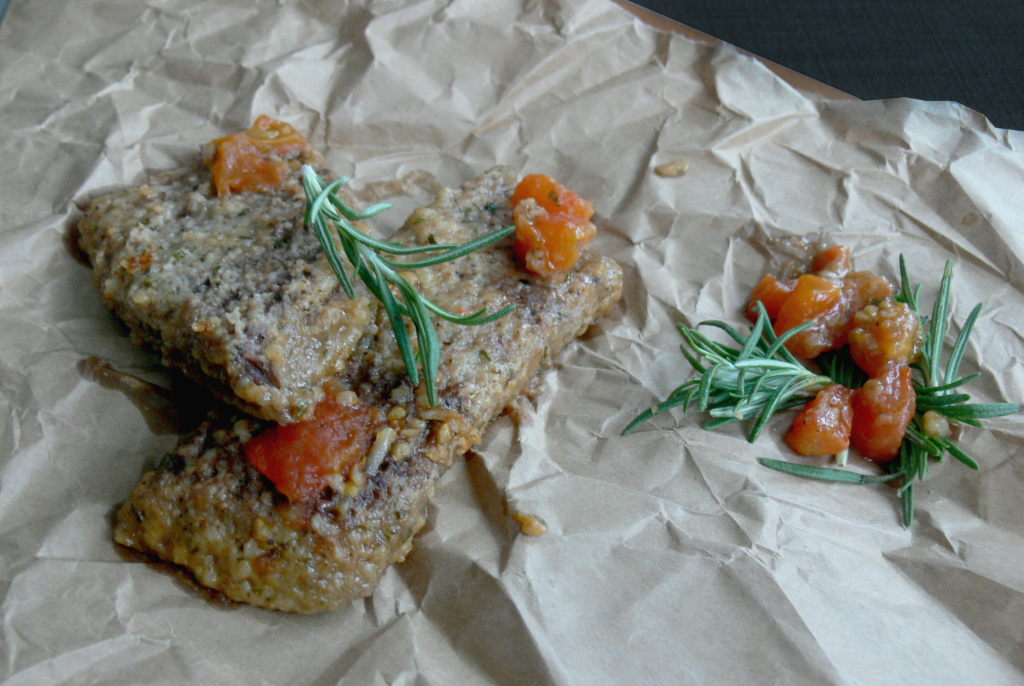
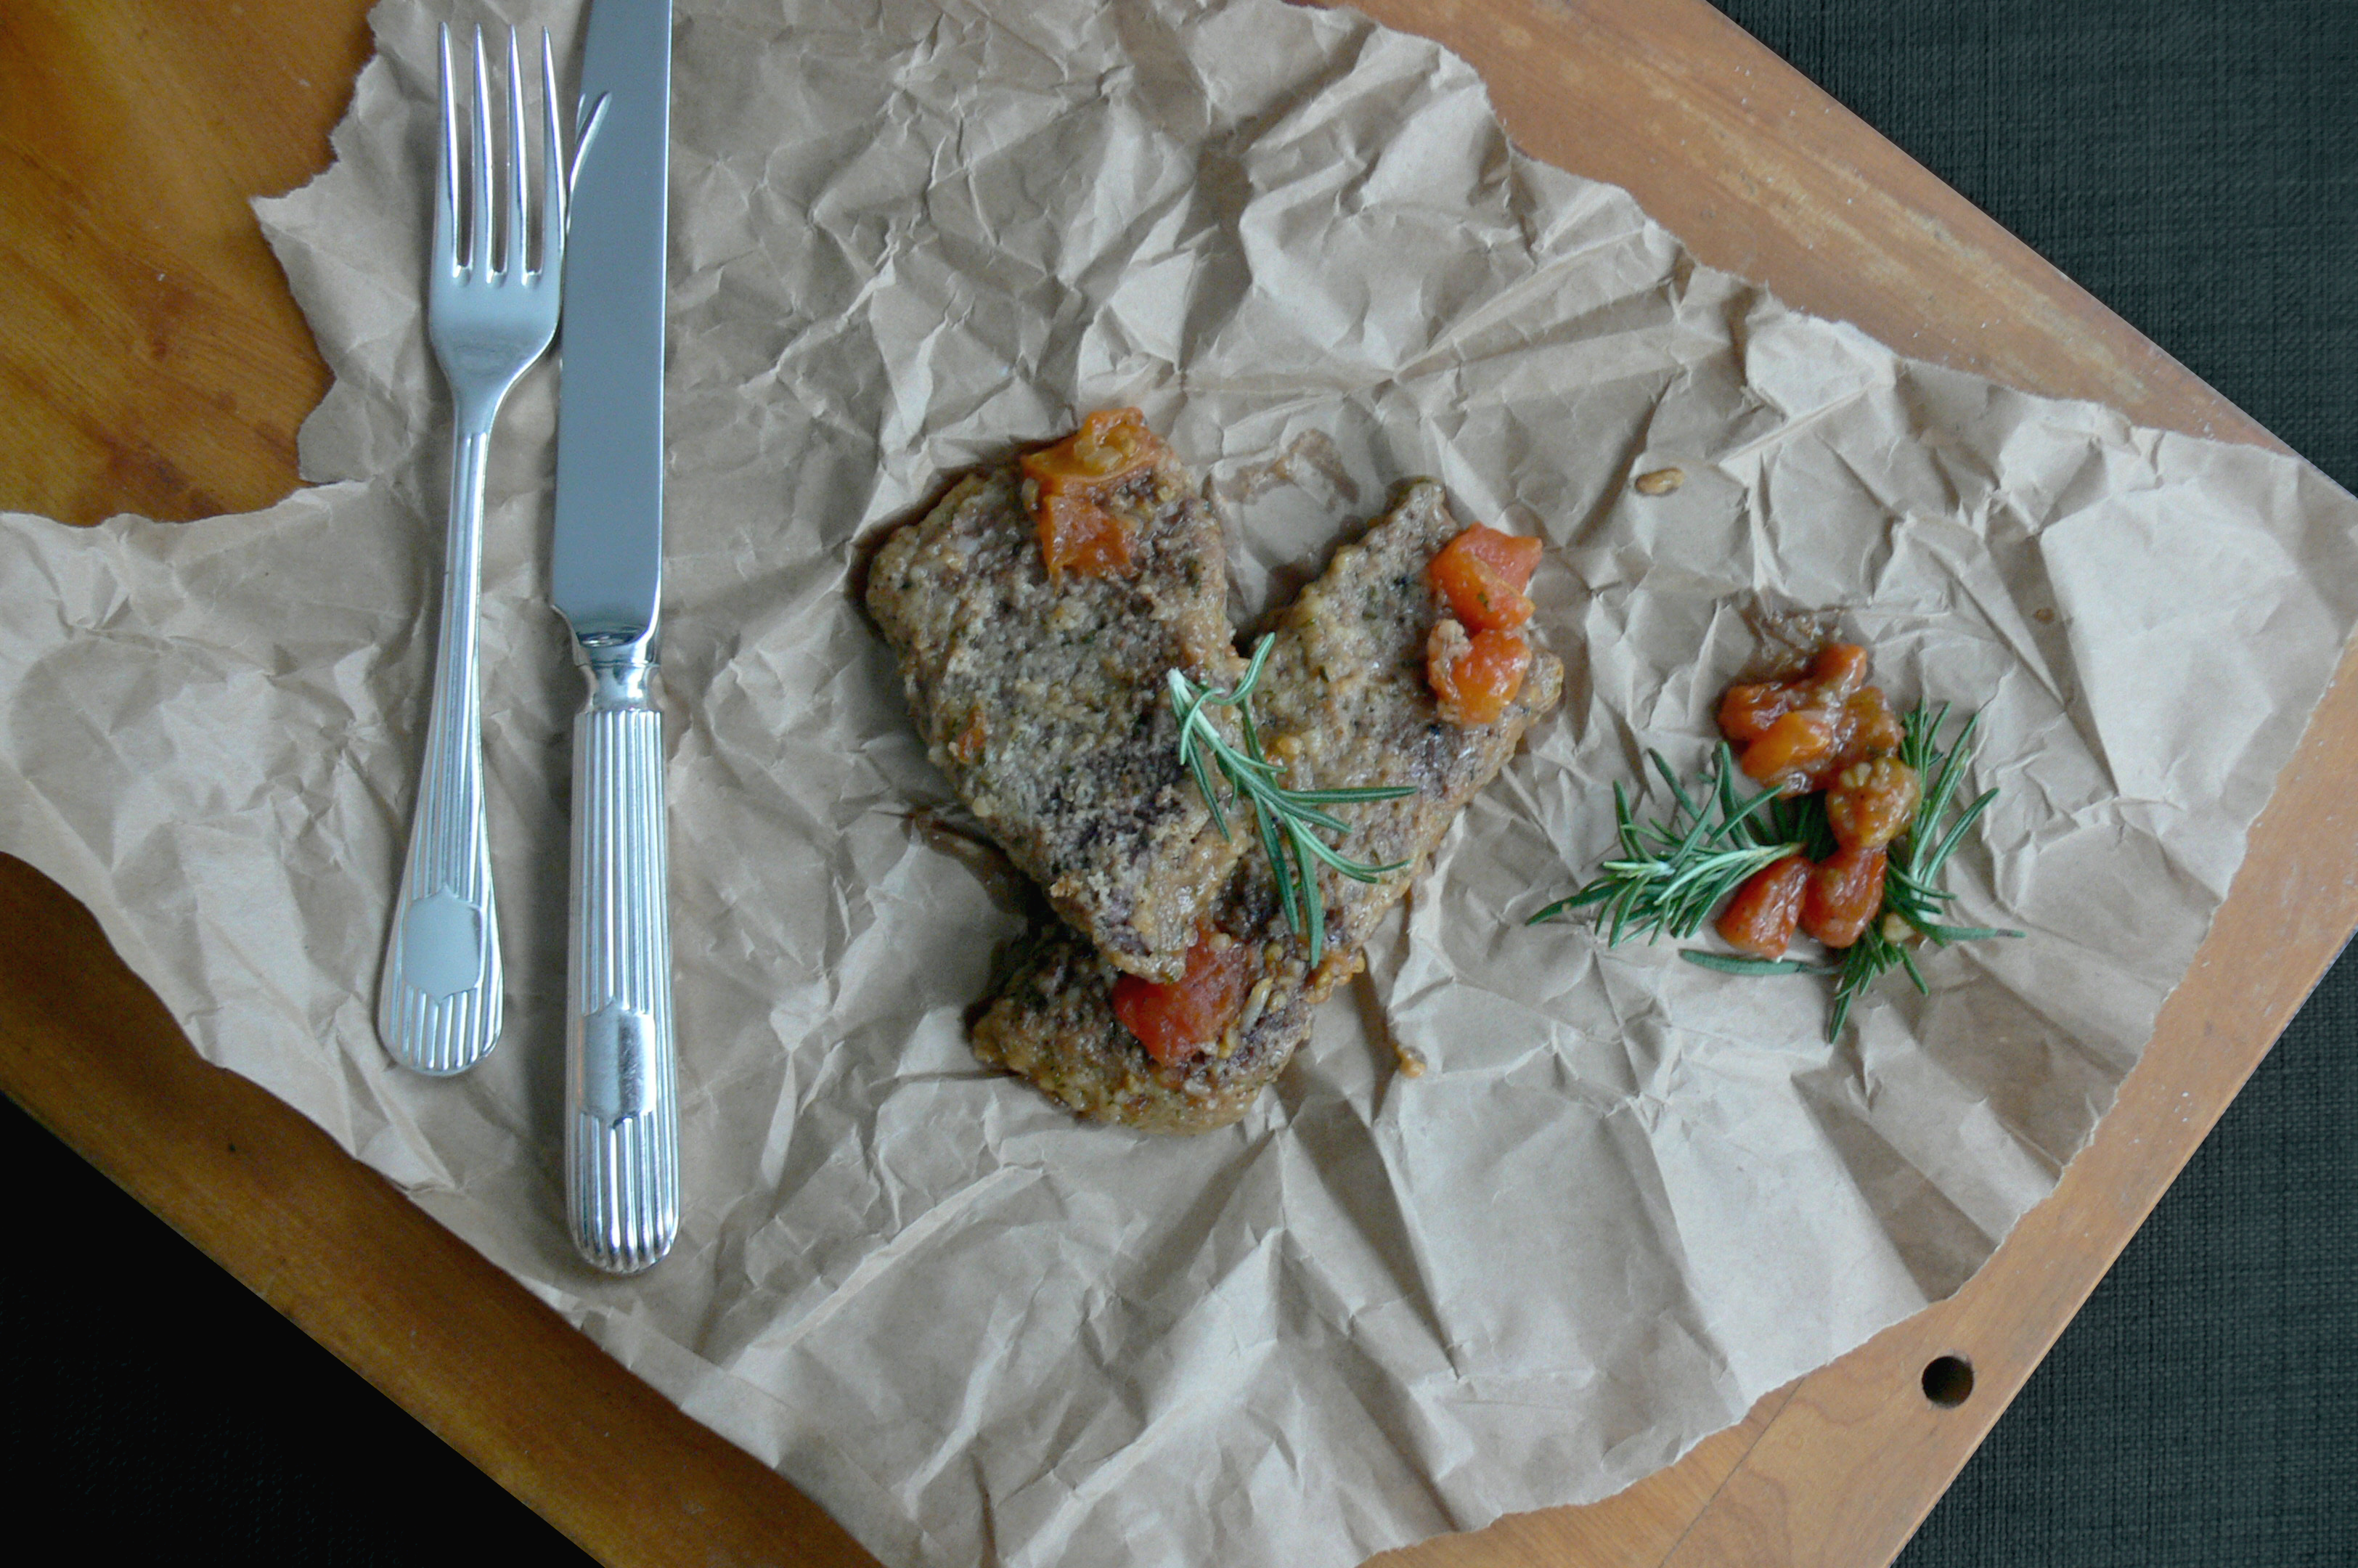
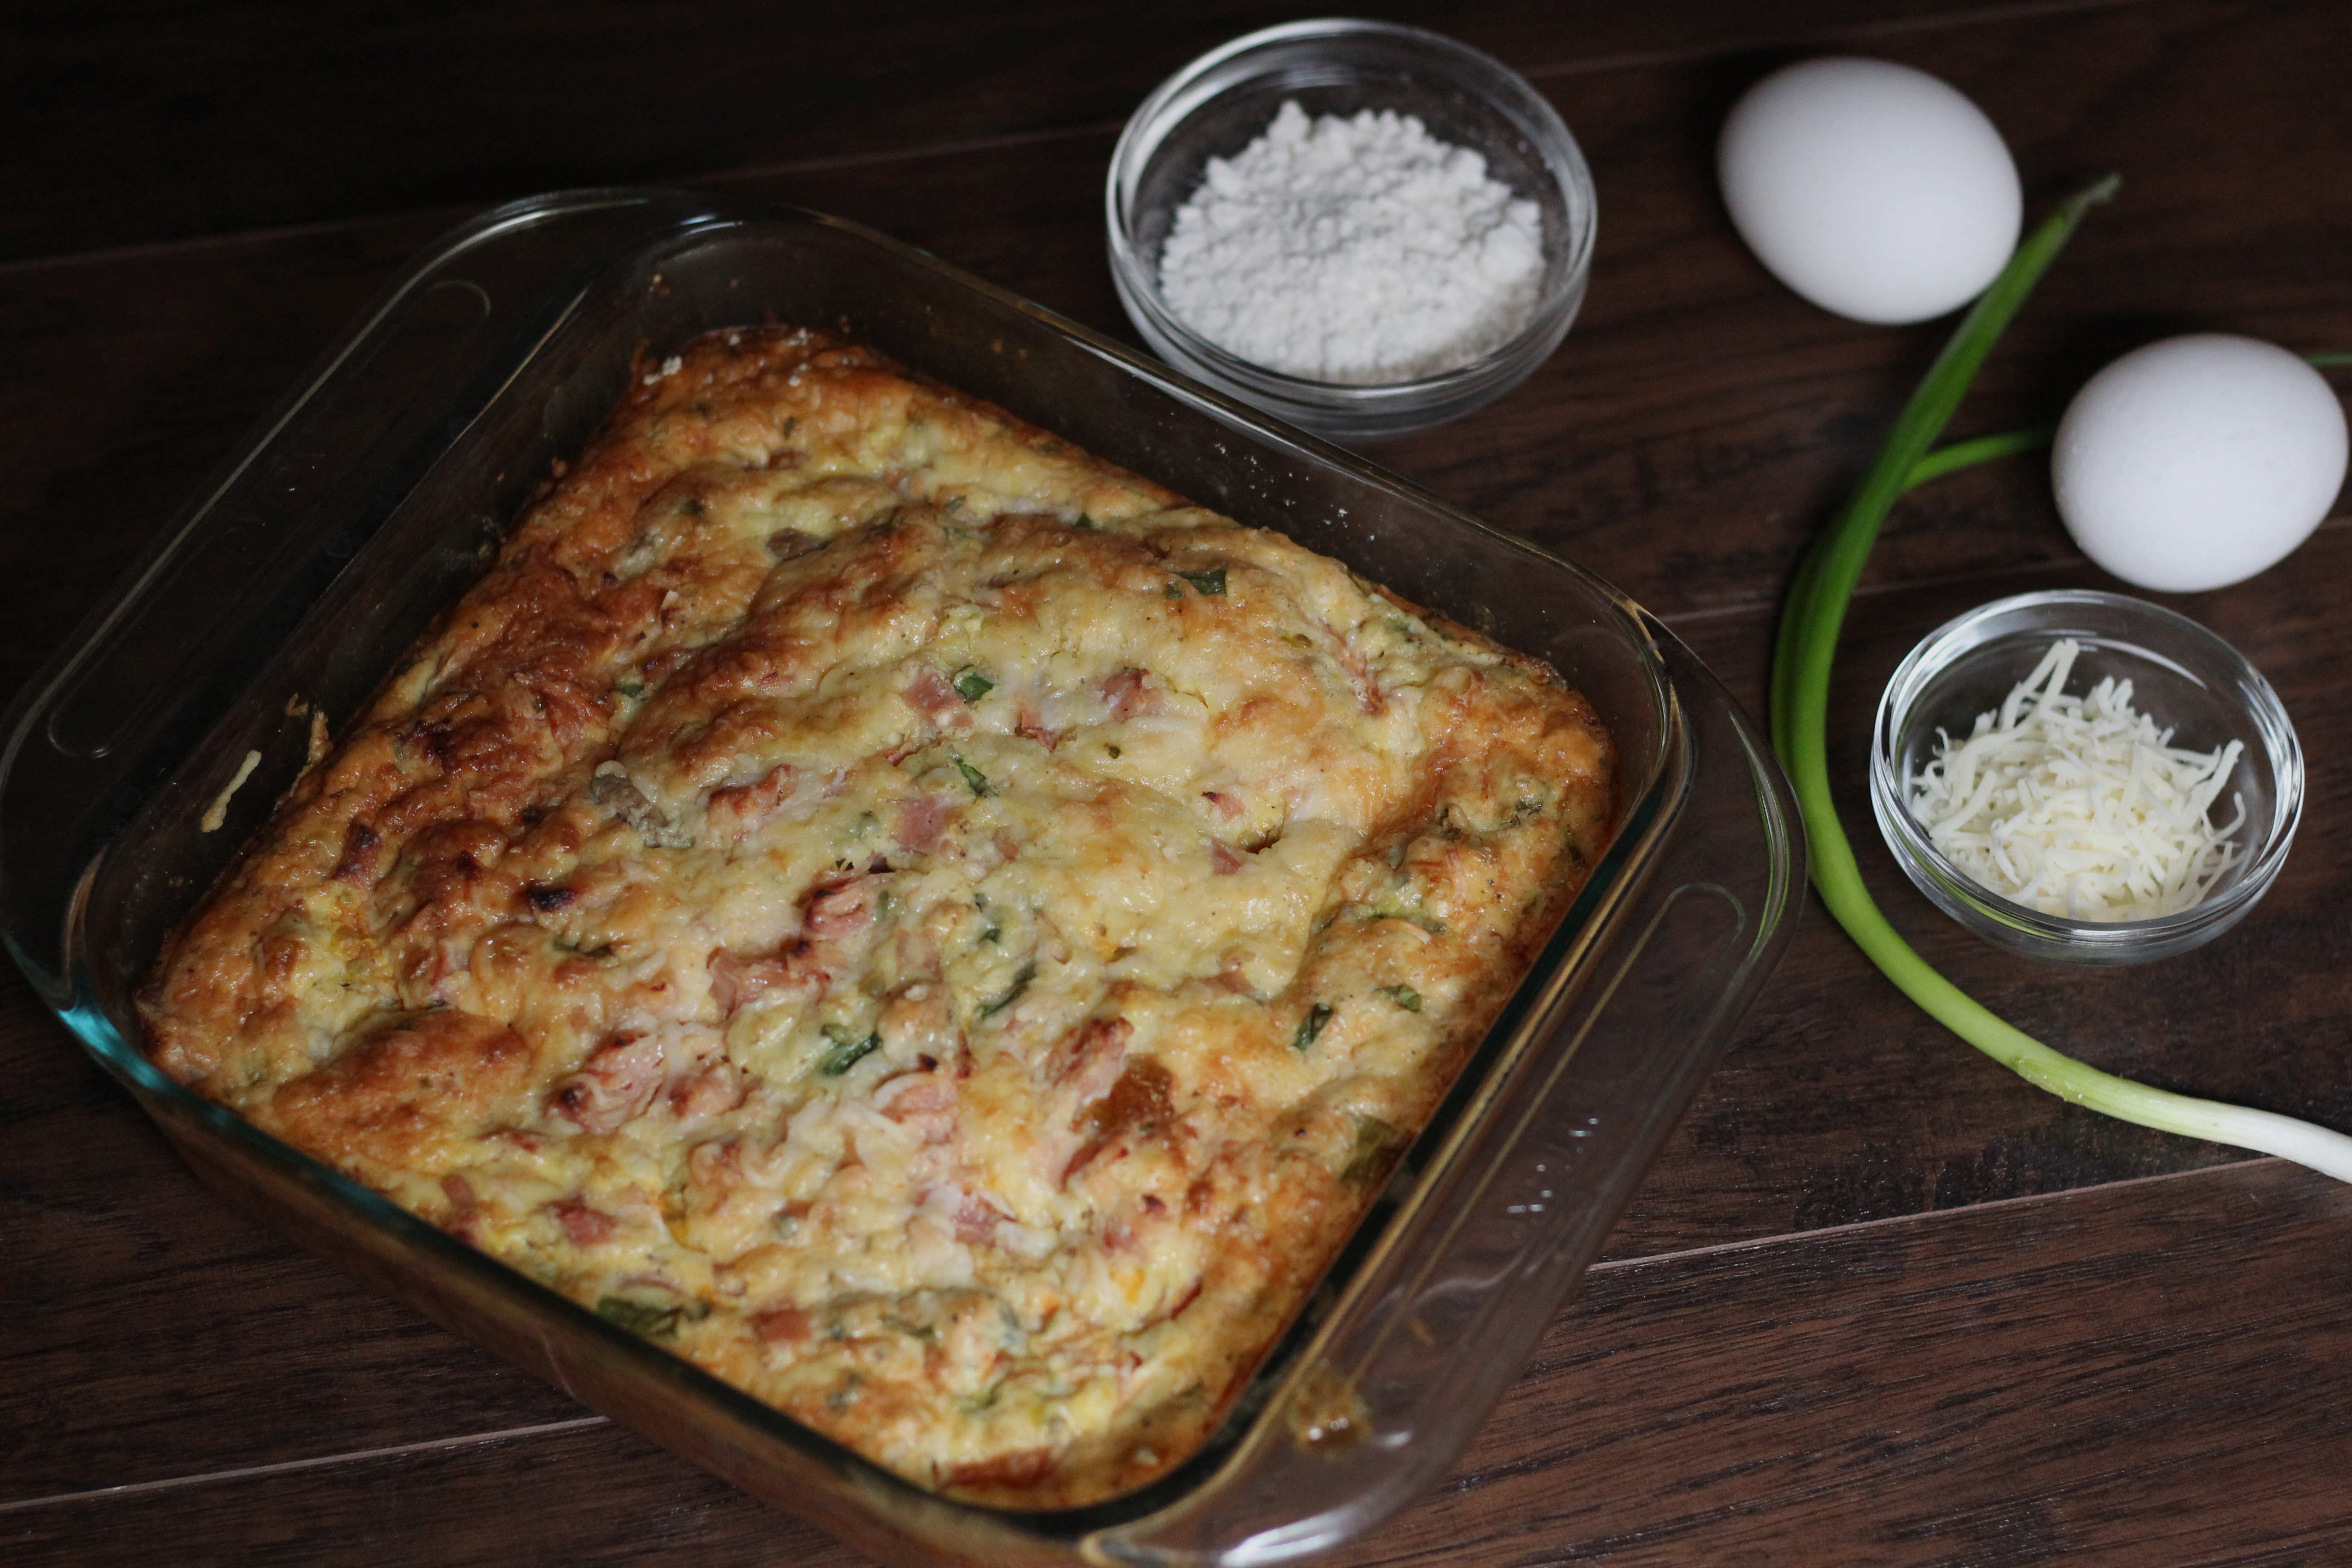
The nice thing about the ingredients in this recipe is that they include a nice mix of fresh and pre-cooked ingredients. It was also extra quick and easy because Marguerite seemed to suggest the ingredients should be mixed right in the casserole that went in the oven. Baking was also simple and the time Marguerite said in her recipe was just about right on. Checking the middle with a knife was an easy way to make sure the one pan ham and cheese was done completely.

cheese ham quiche

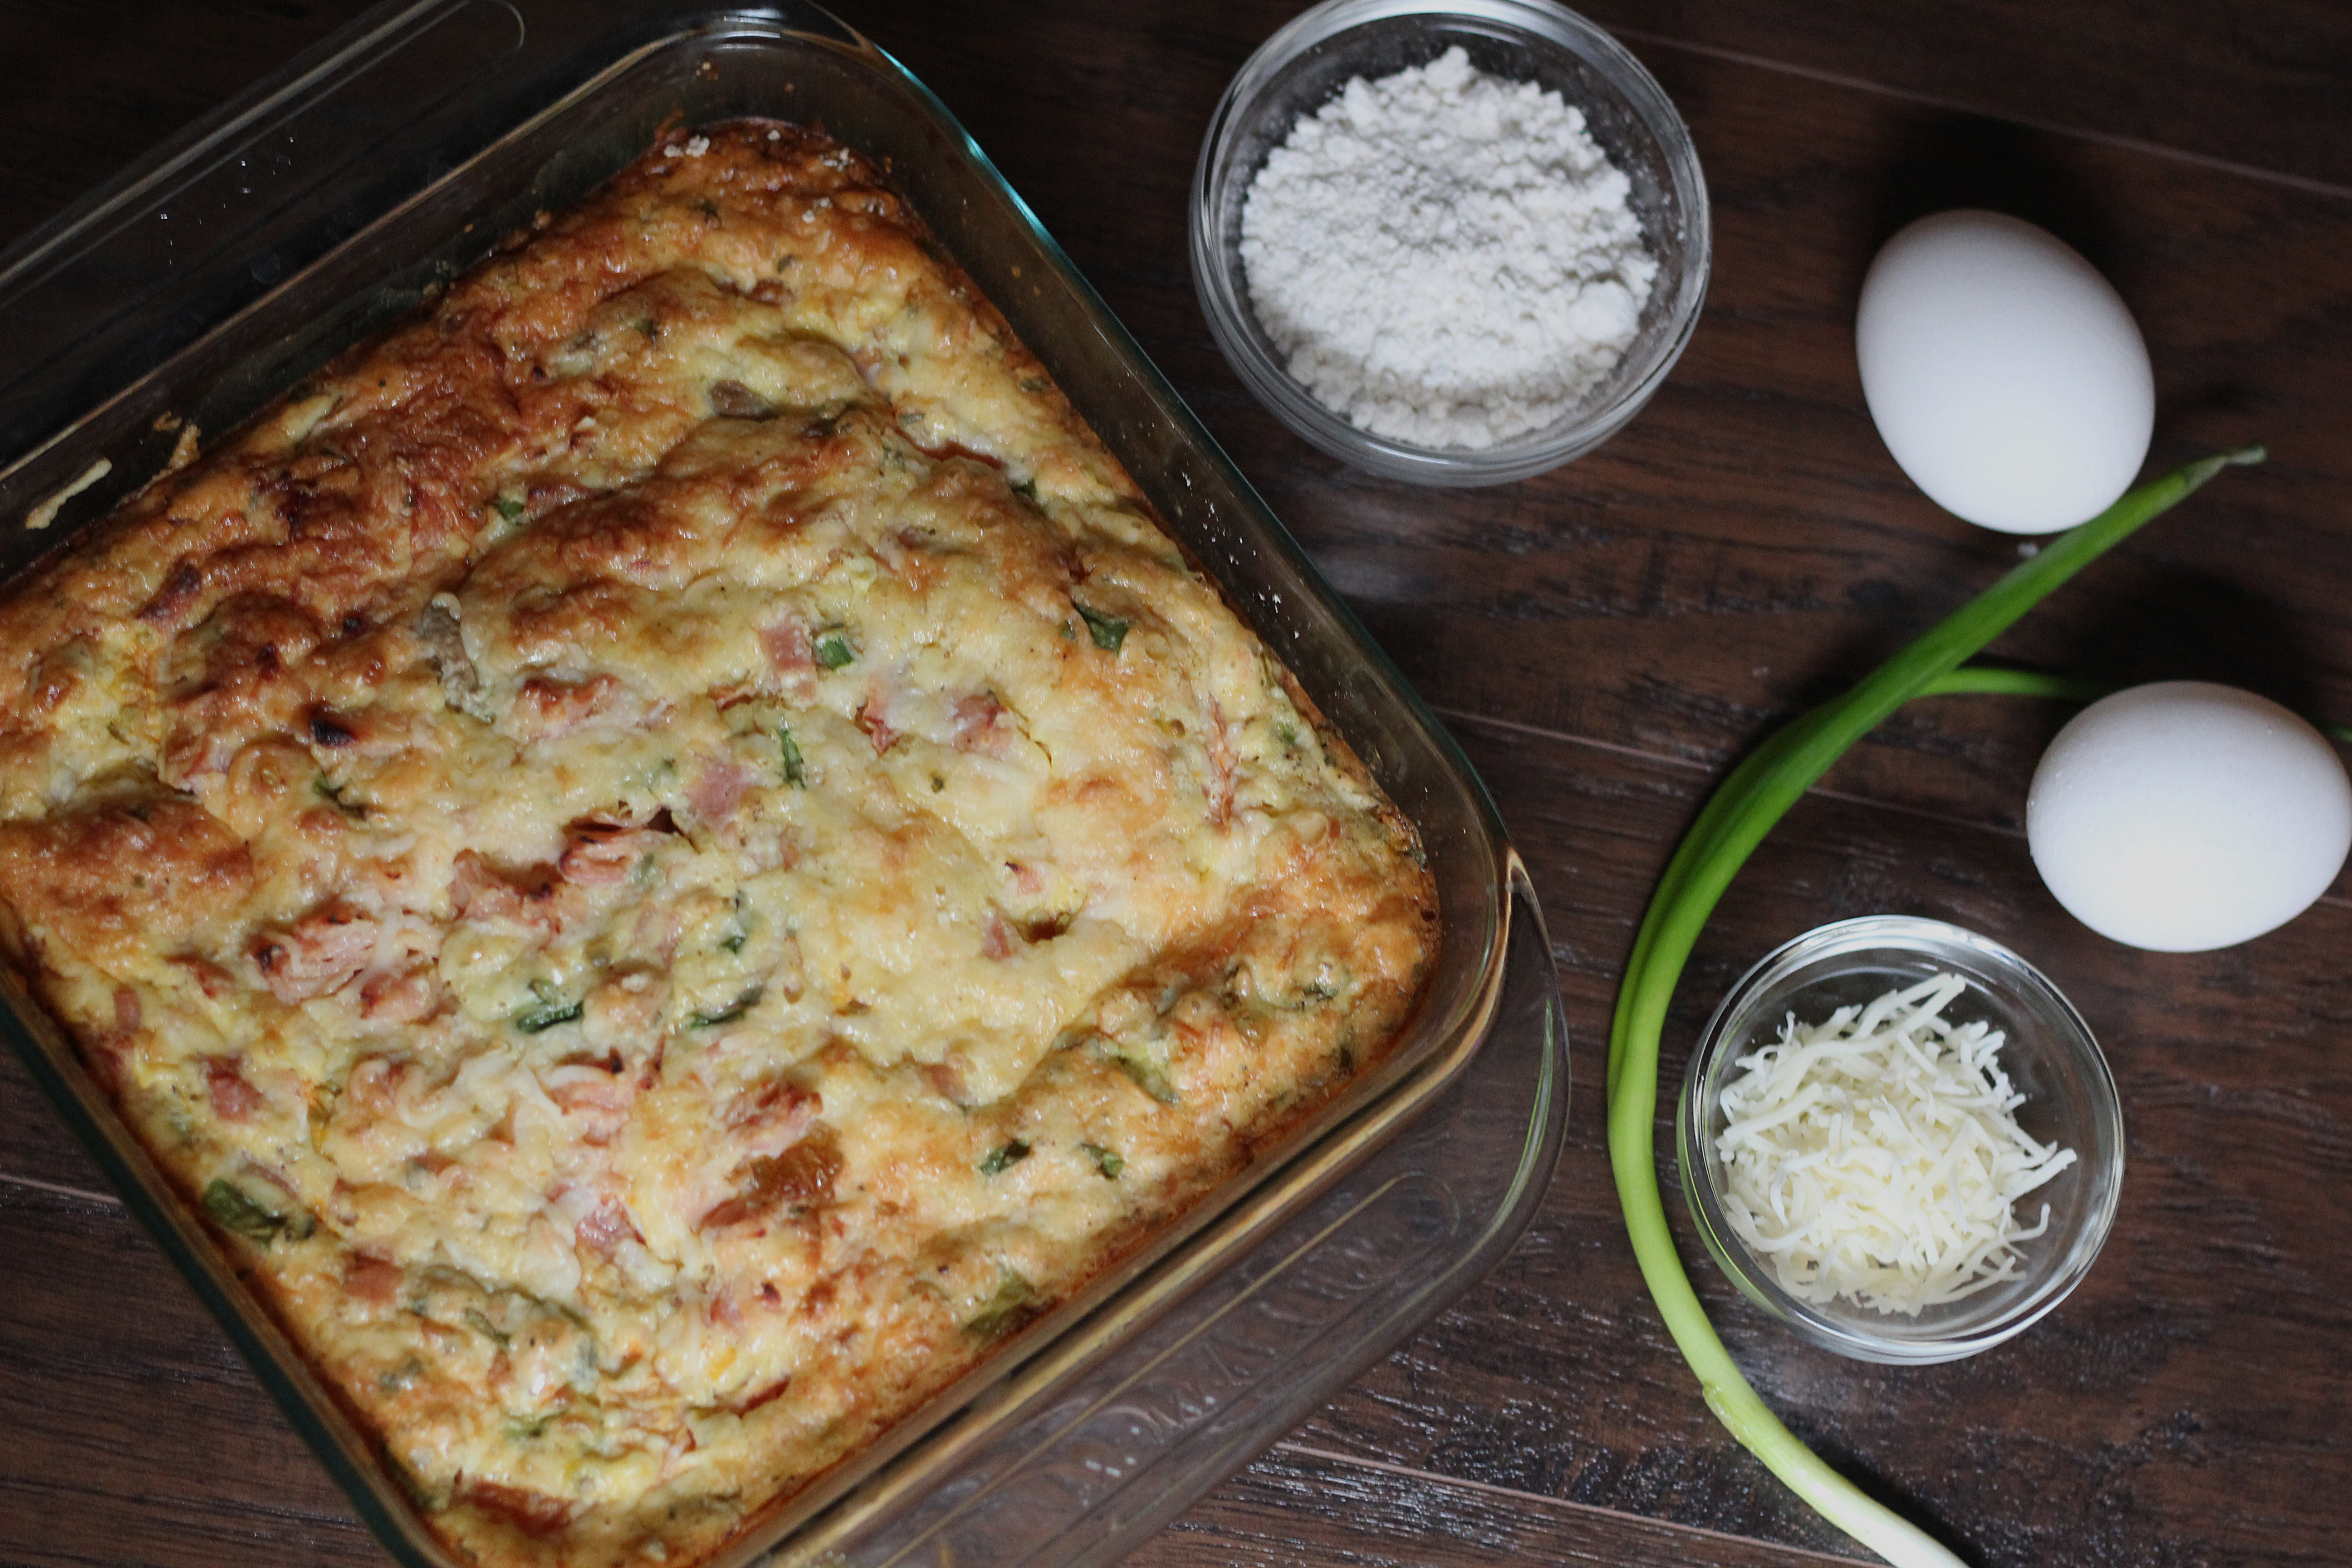
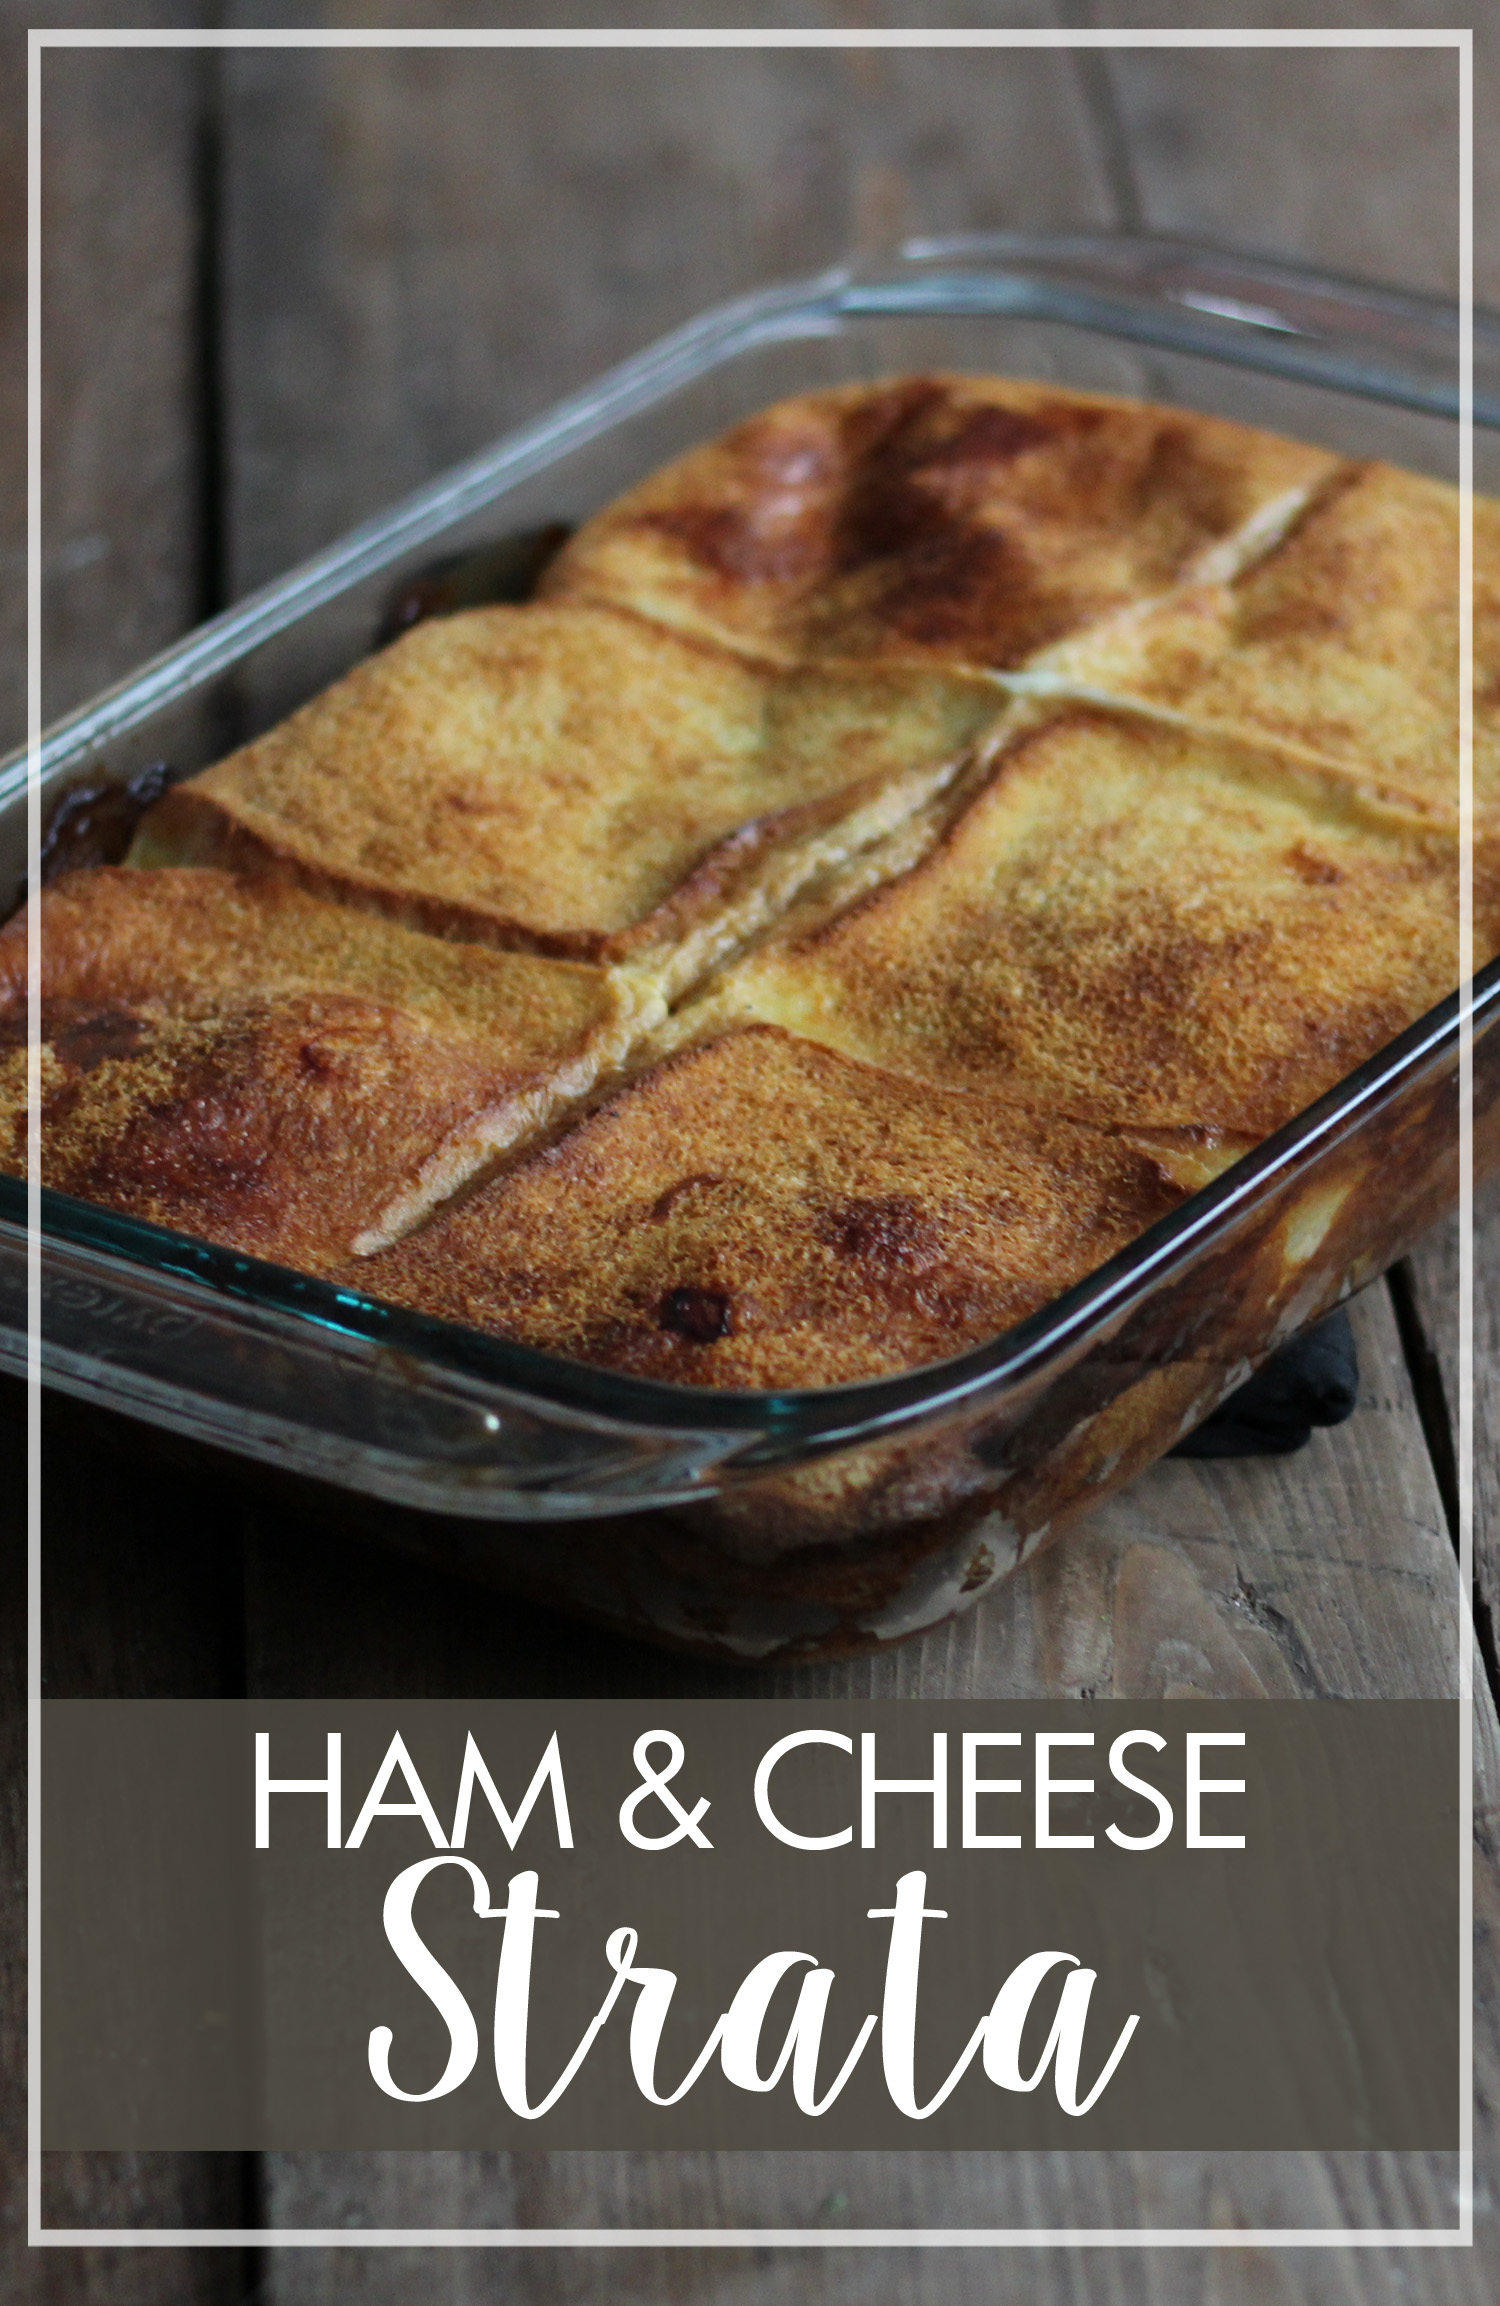
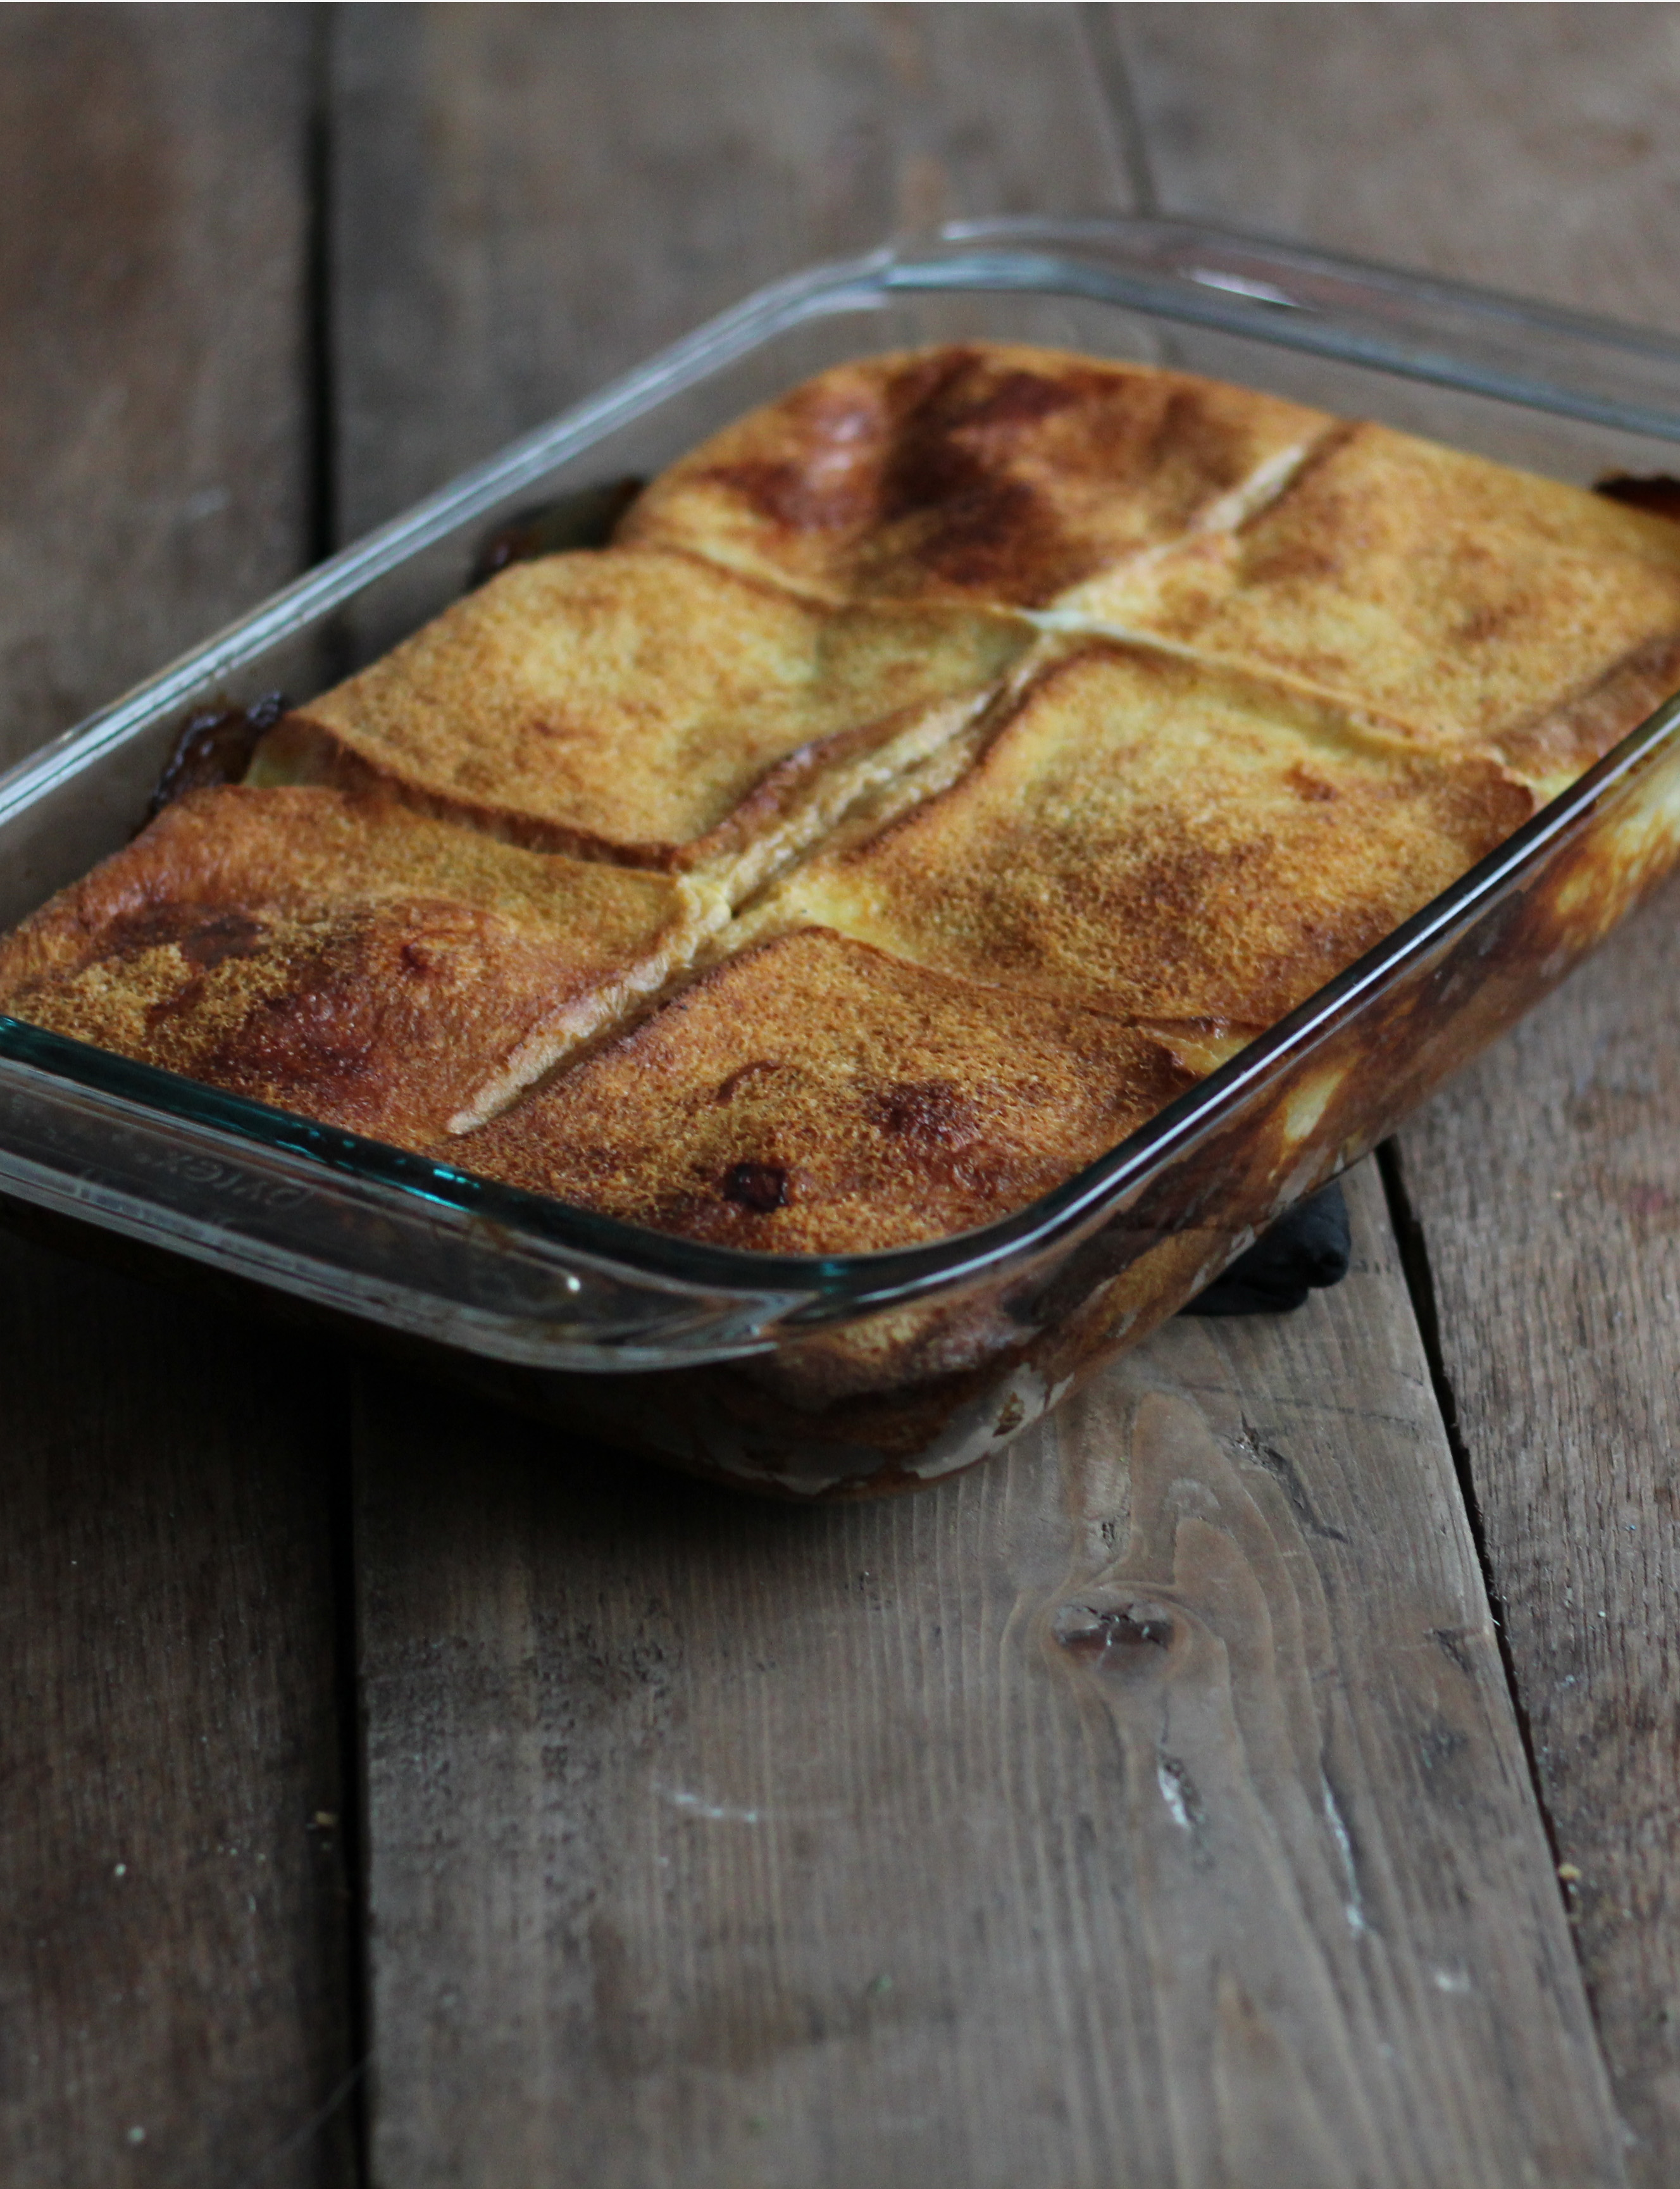
Now this ham and cheese recipe was mostly eggs and Bisquick. That made it turn out incredibly quiche-like. This is much like another ham and cheese recipe, our Ham and Cheese Strata, which was also like the breakfast dish. However, the main difference in this recipe is that it had many more ingredients, which gave way to a more exciting dish with more flavor.

ham and cheese bake

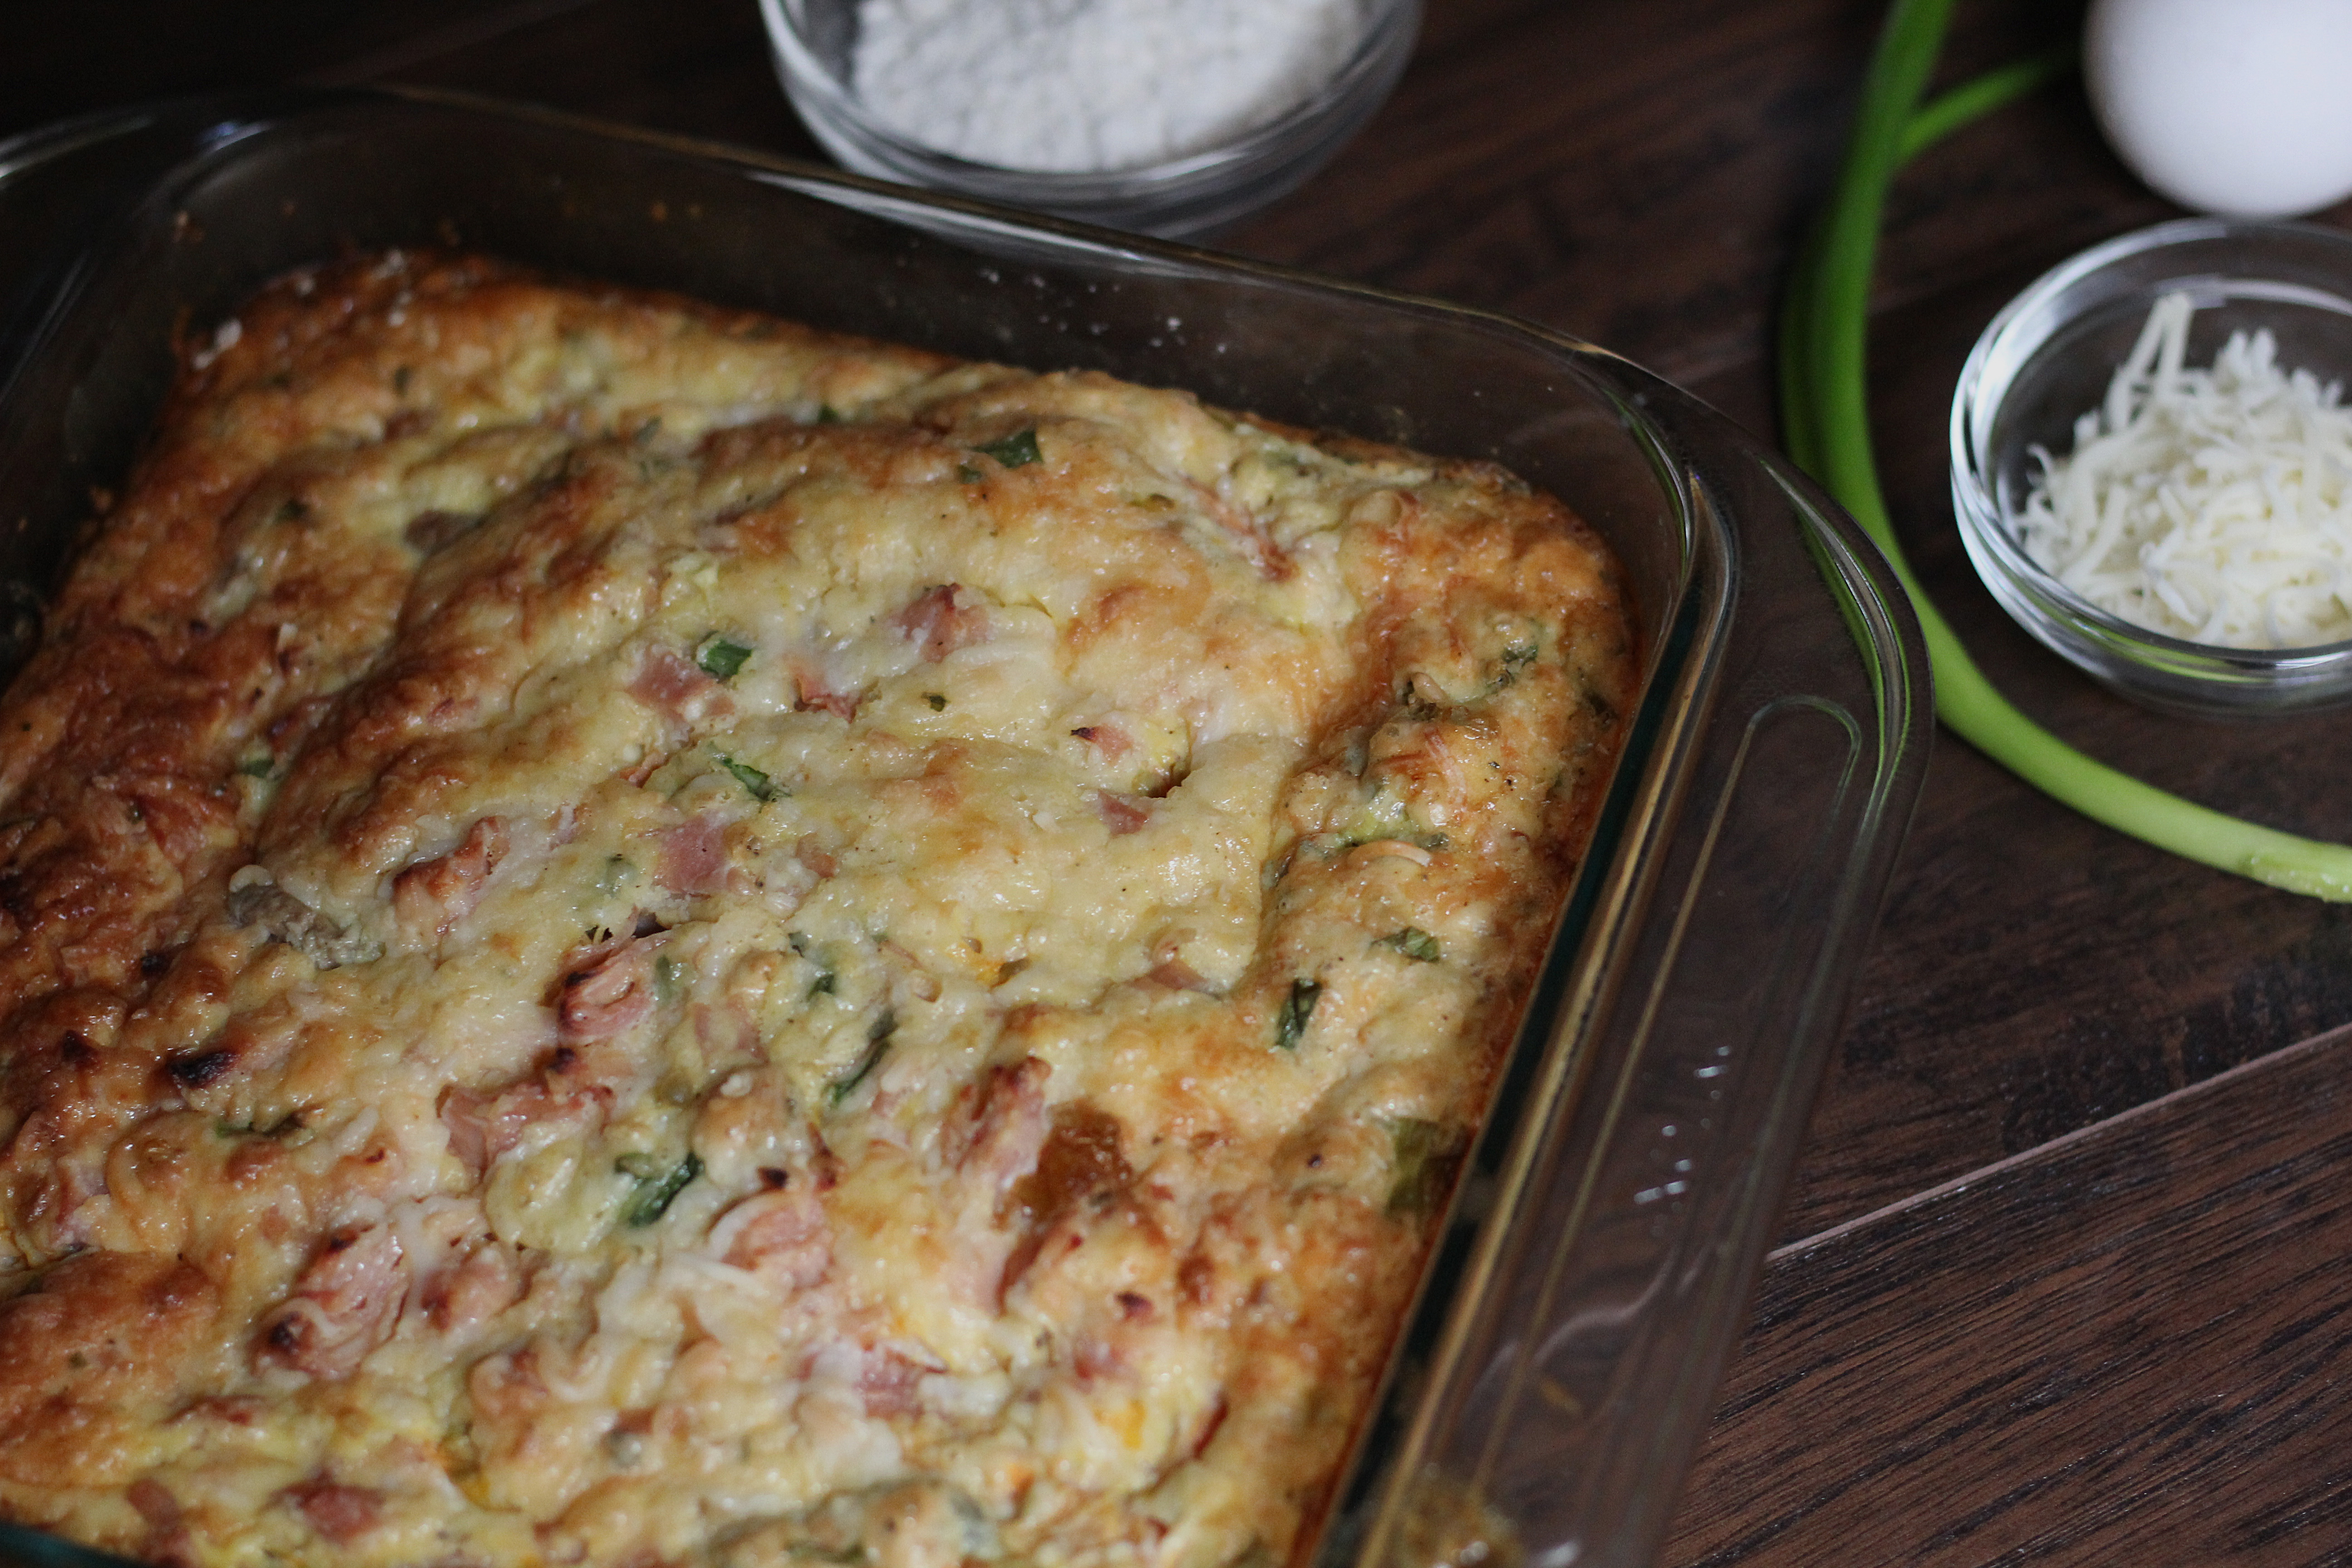
While I like Bisquick because it is normally made into pancakes, I am not a huge fan of eggs for breakfast, so I wasn’t the craziest for this recipe. I did like that it was prettier than the aforementioned strata, having much more color due to the green onions, tomatoes, and the like. Aaron enjoys quiches and omelets, as well as the vegetables in the dish, so he did enjoy having it, and for breakfast no less, even though the ham had been for dinner! If you try this one pan ham and cheese recipe to use up some of your Christmas ham this season, we hope it makes your breakfast, or any meal you happen to have it for, a little more relaxing as 2016 winds down.
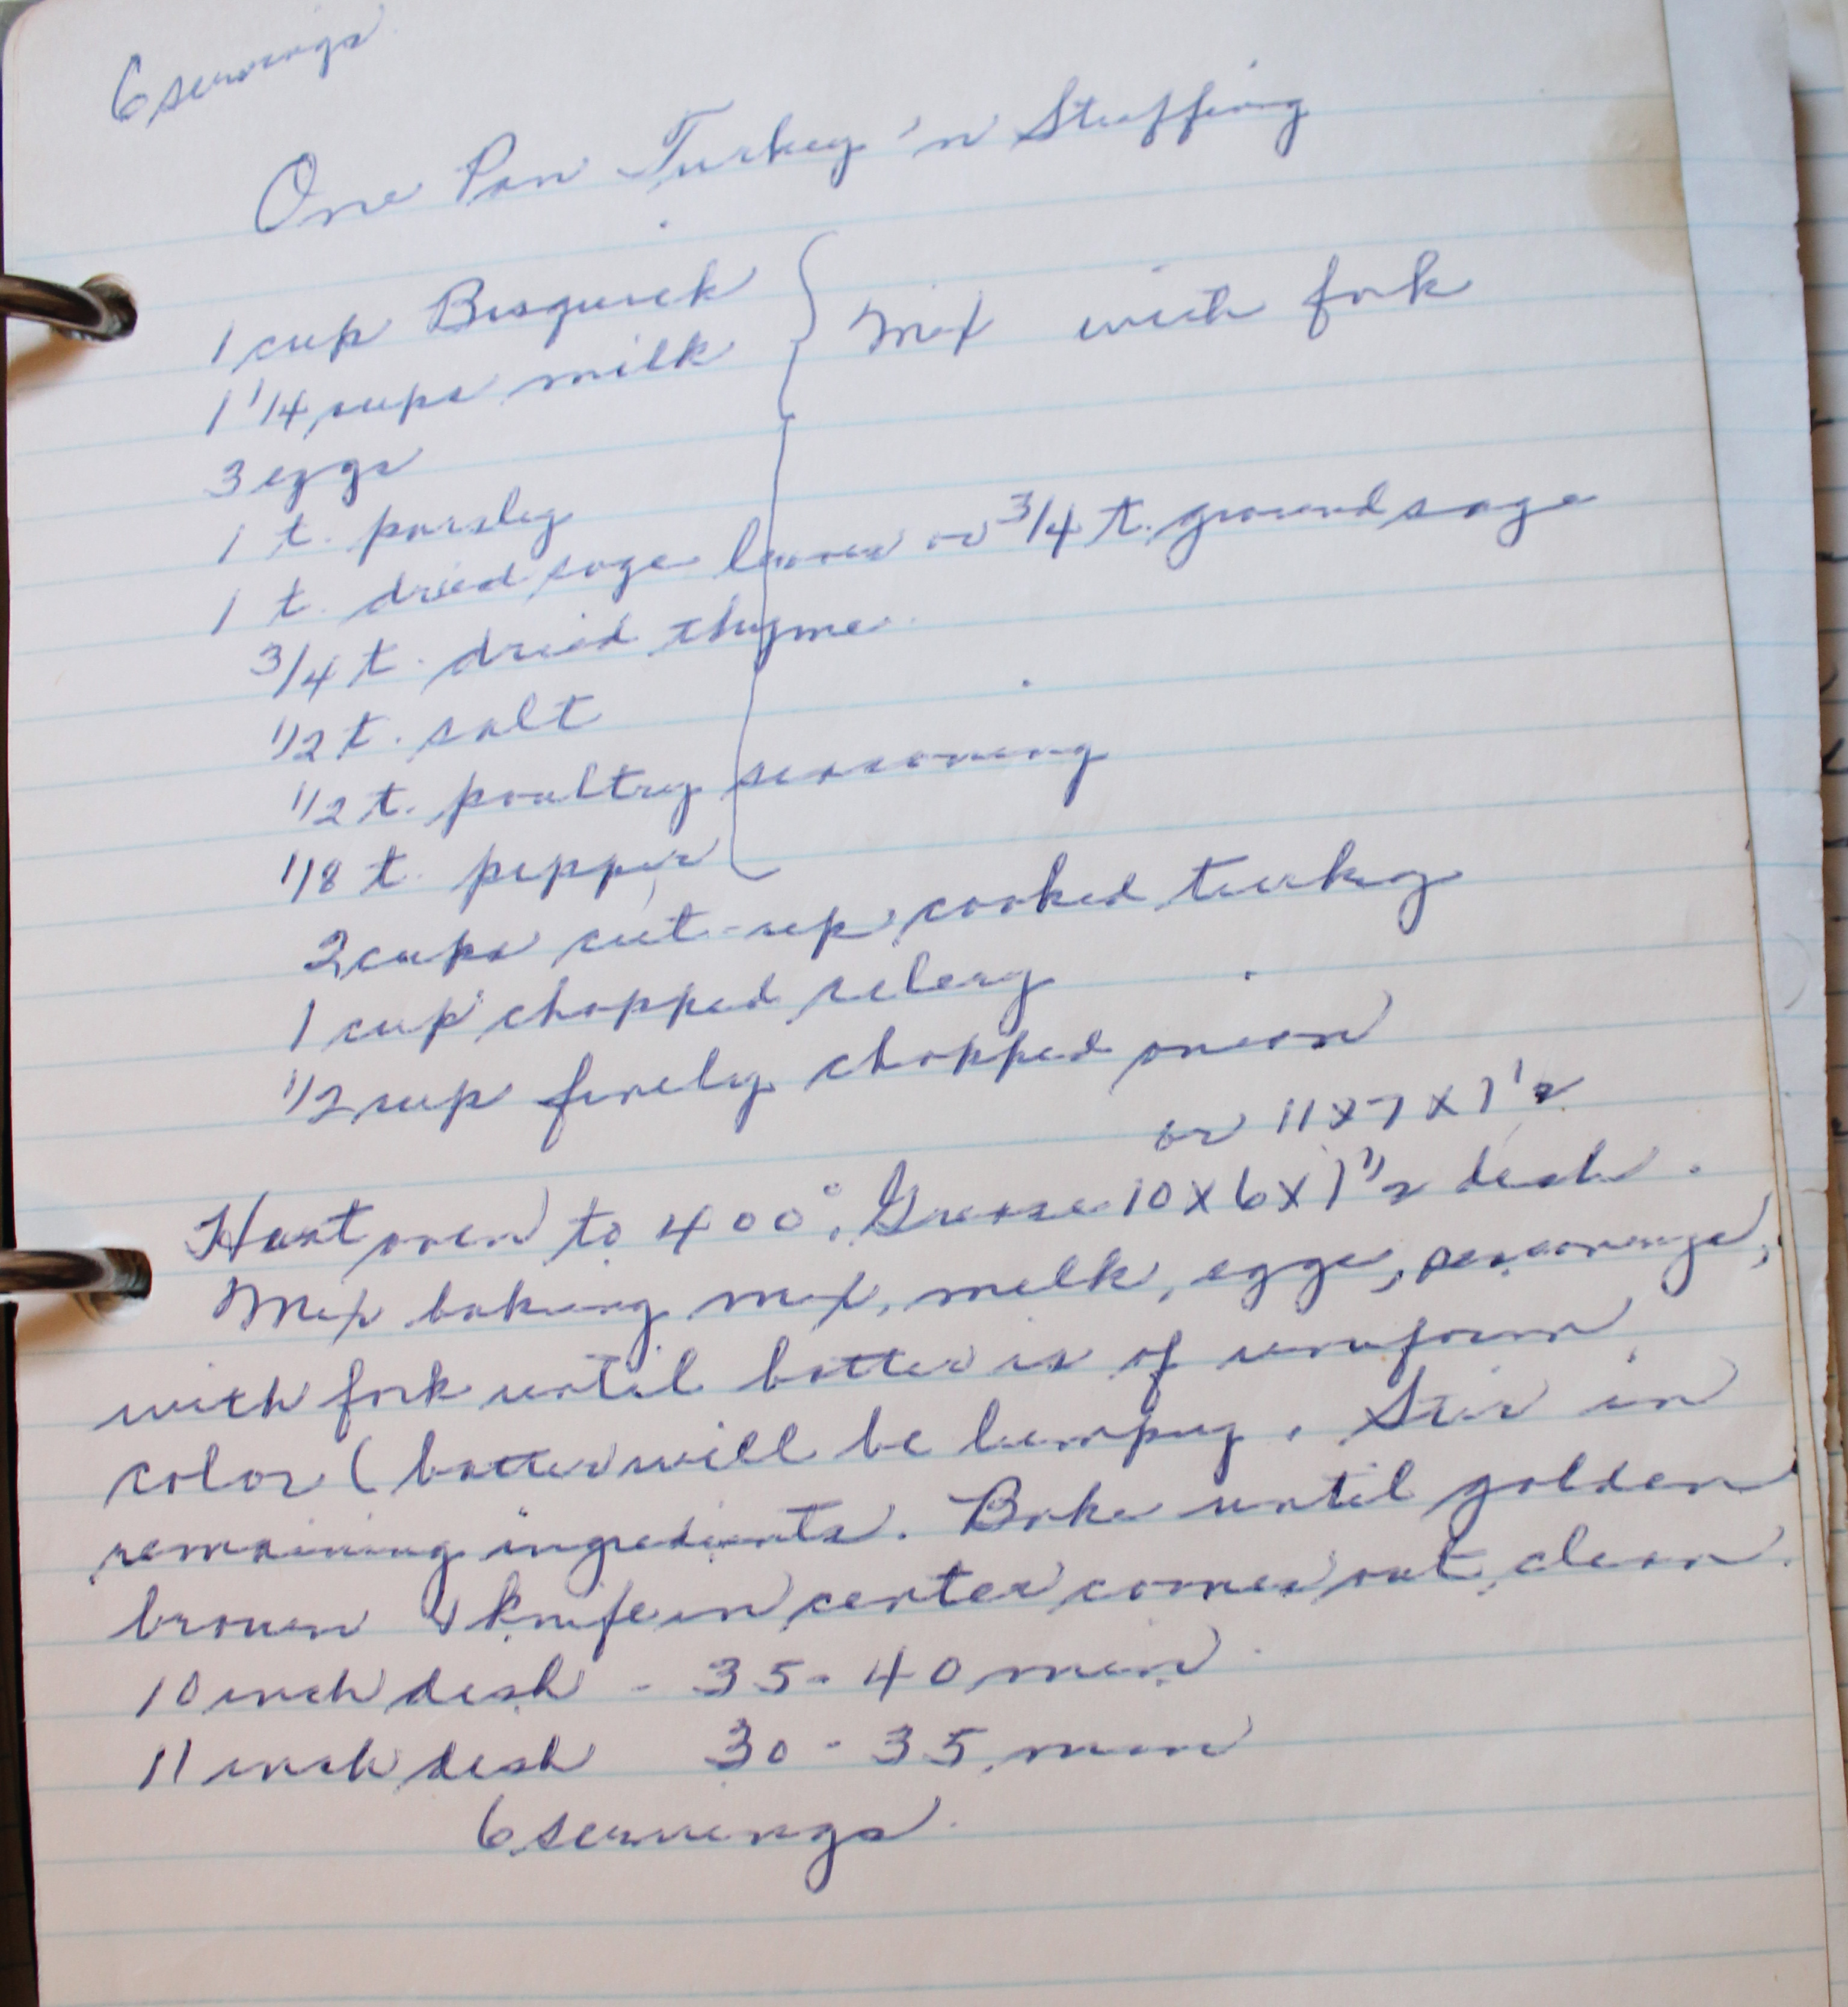
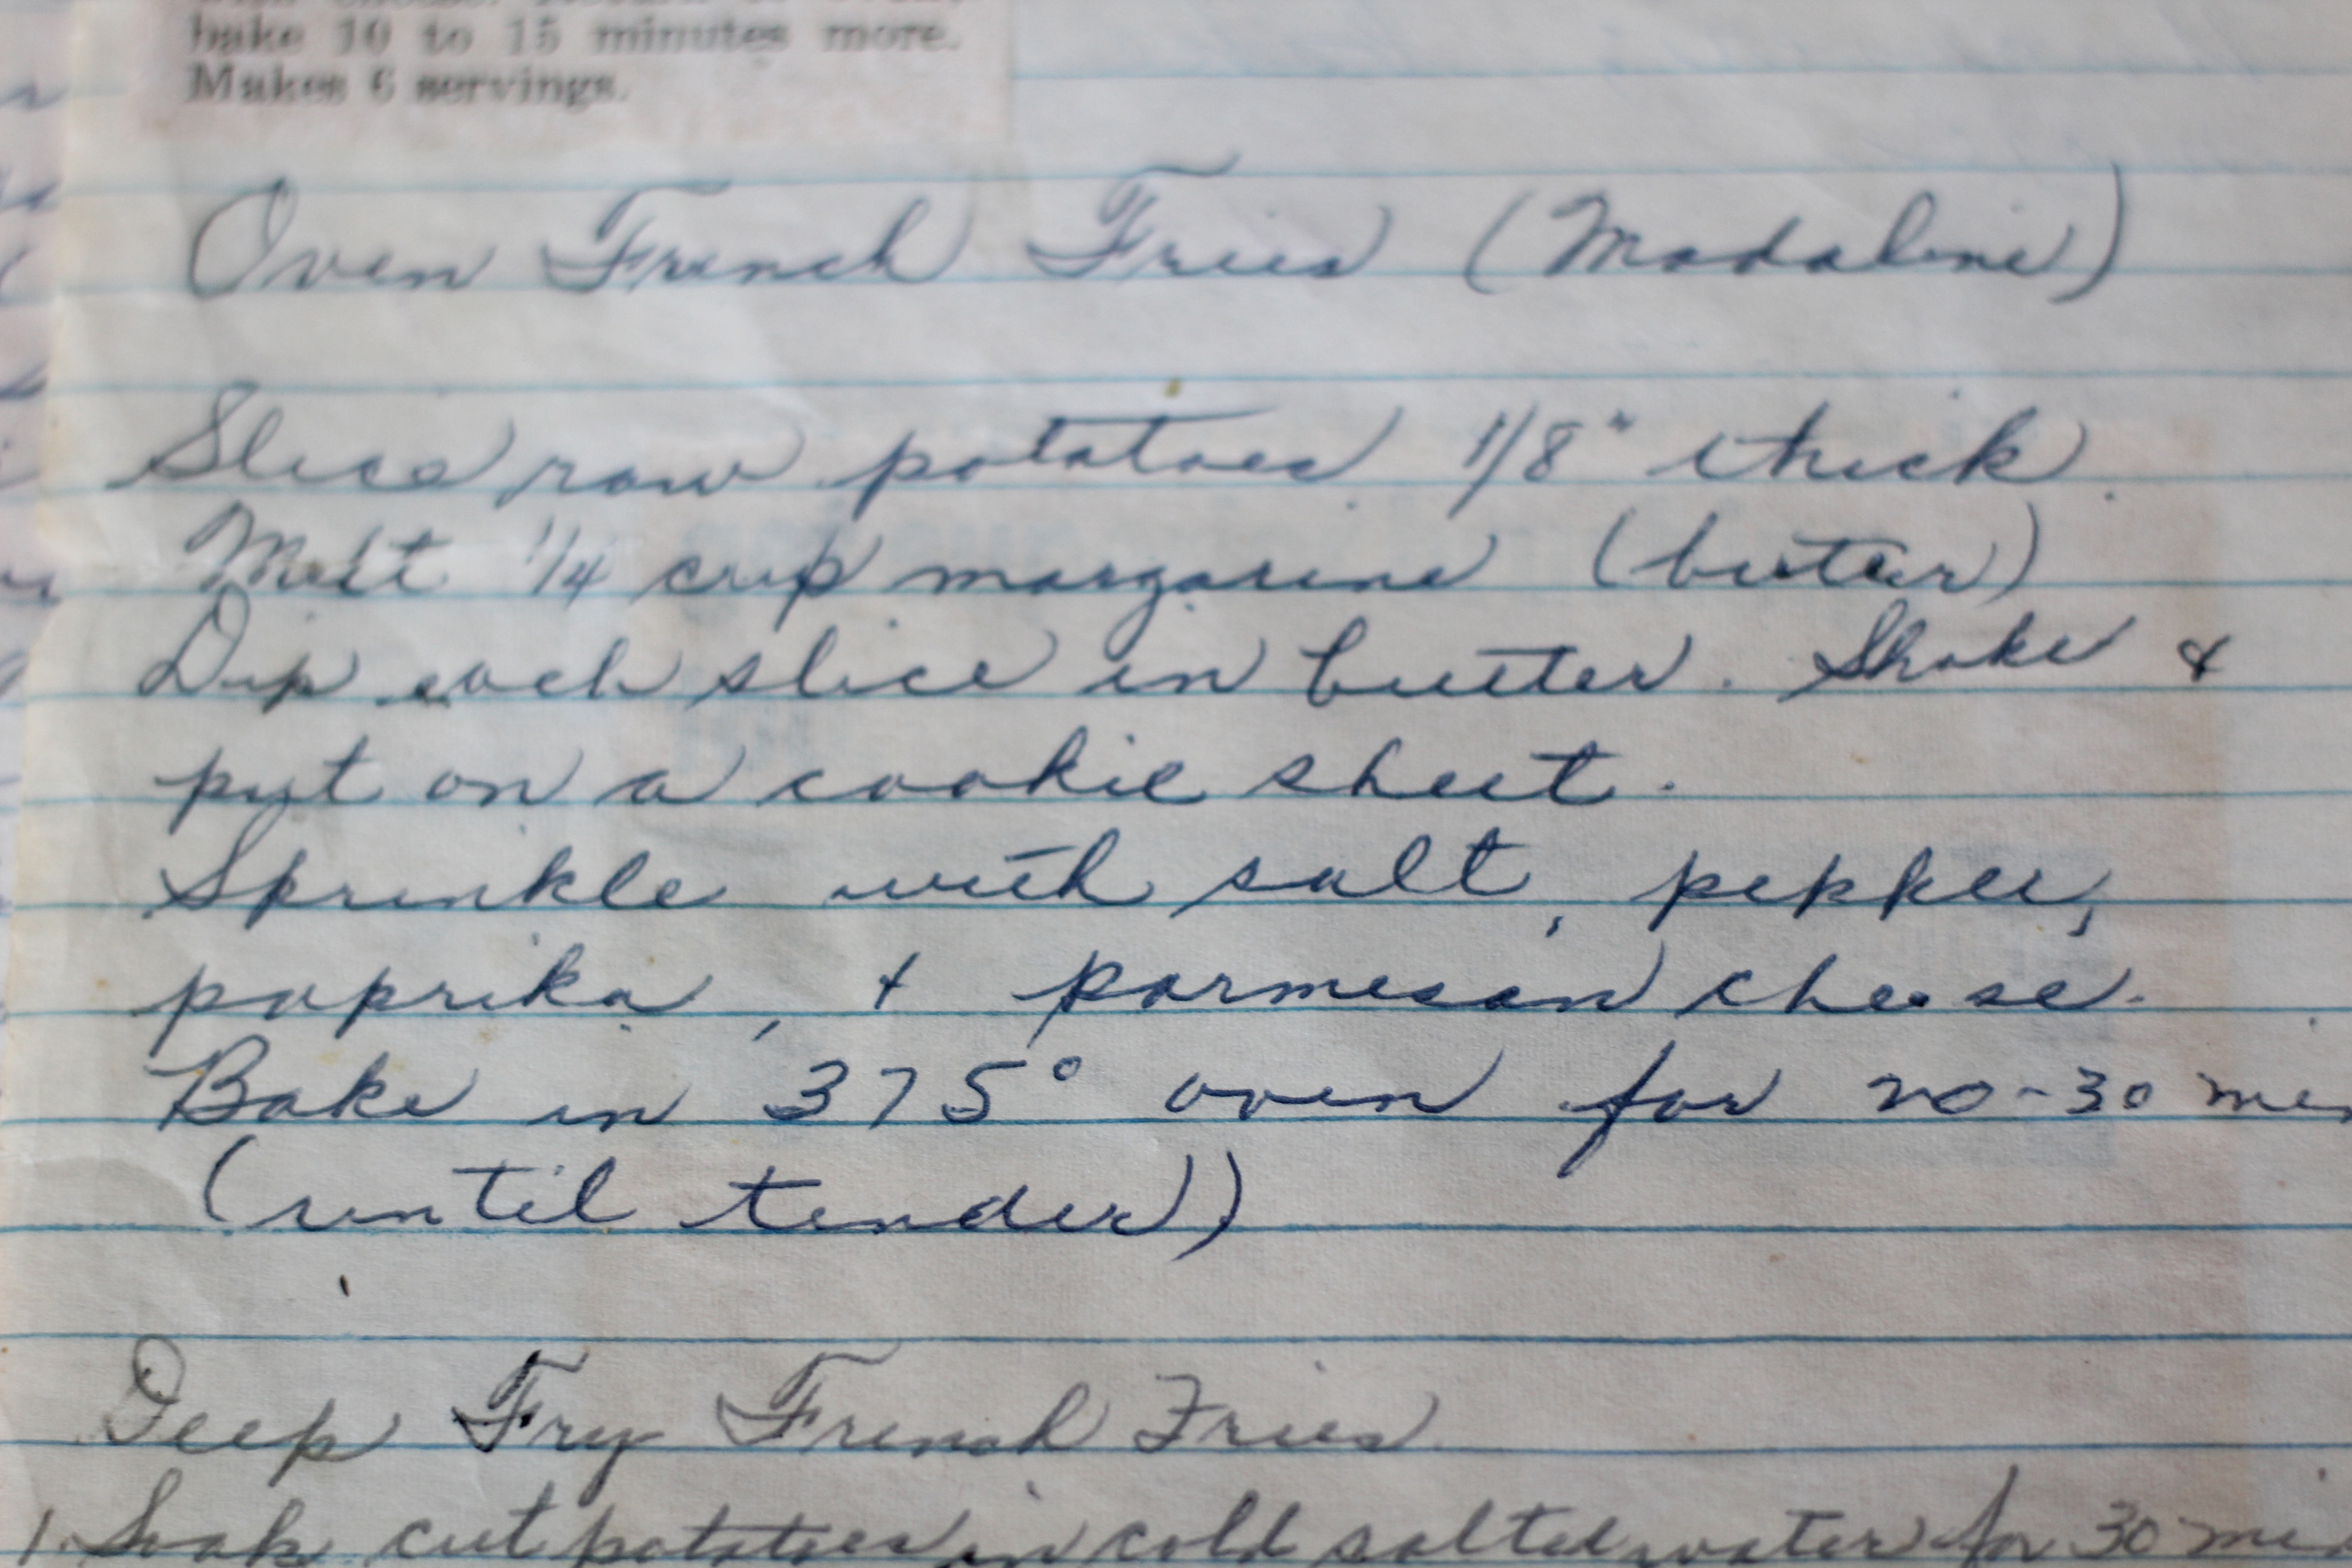
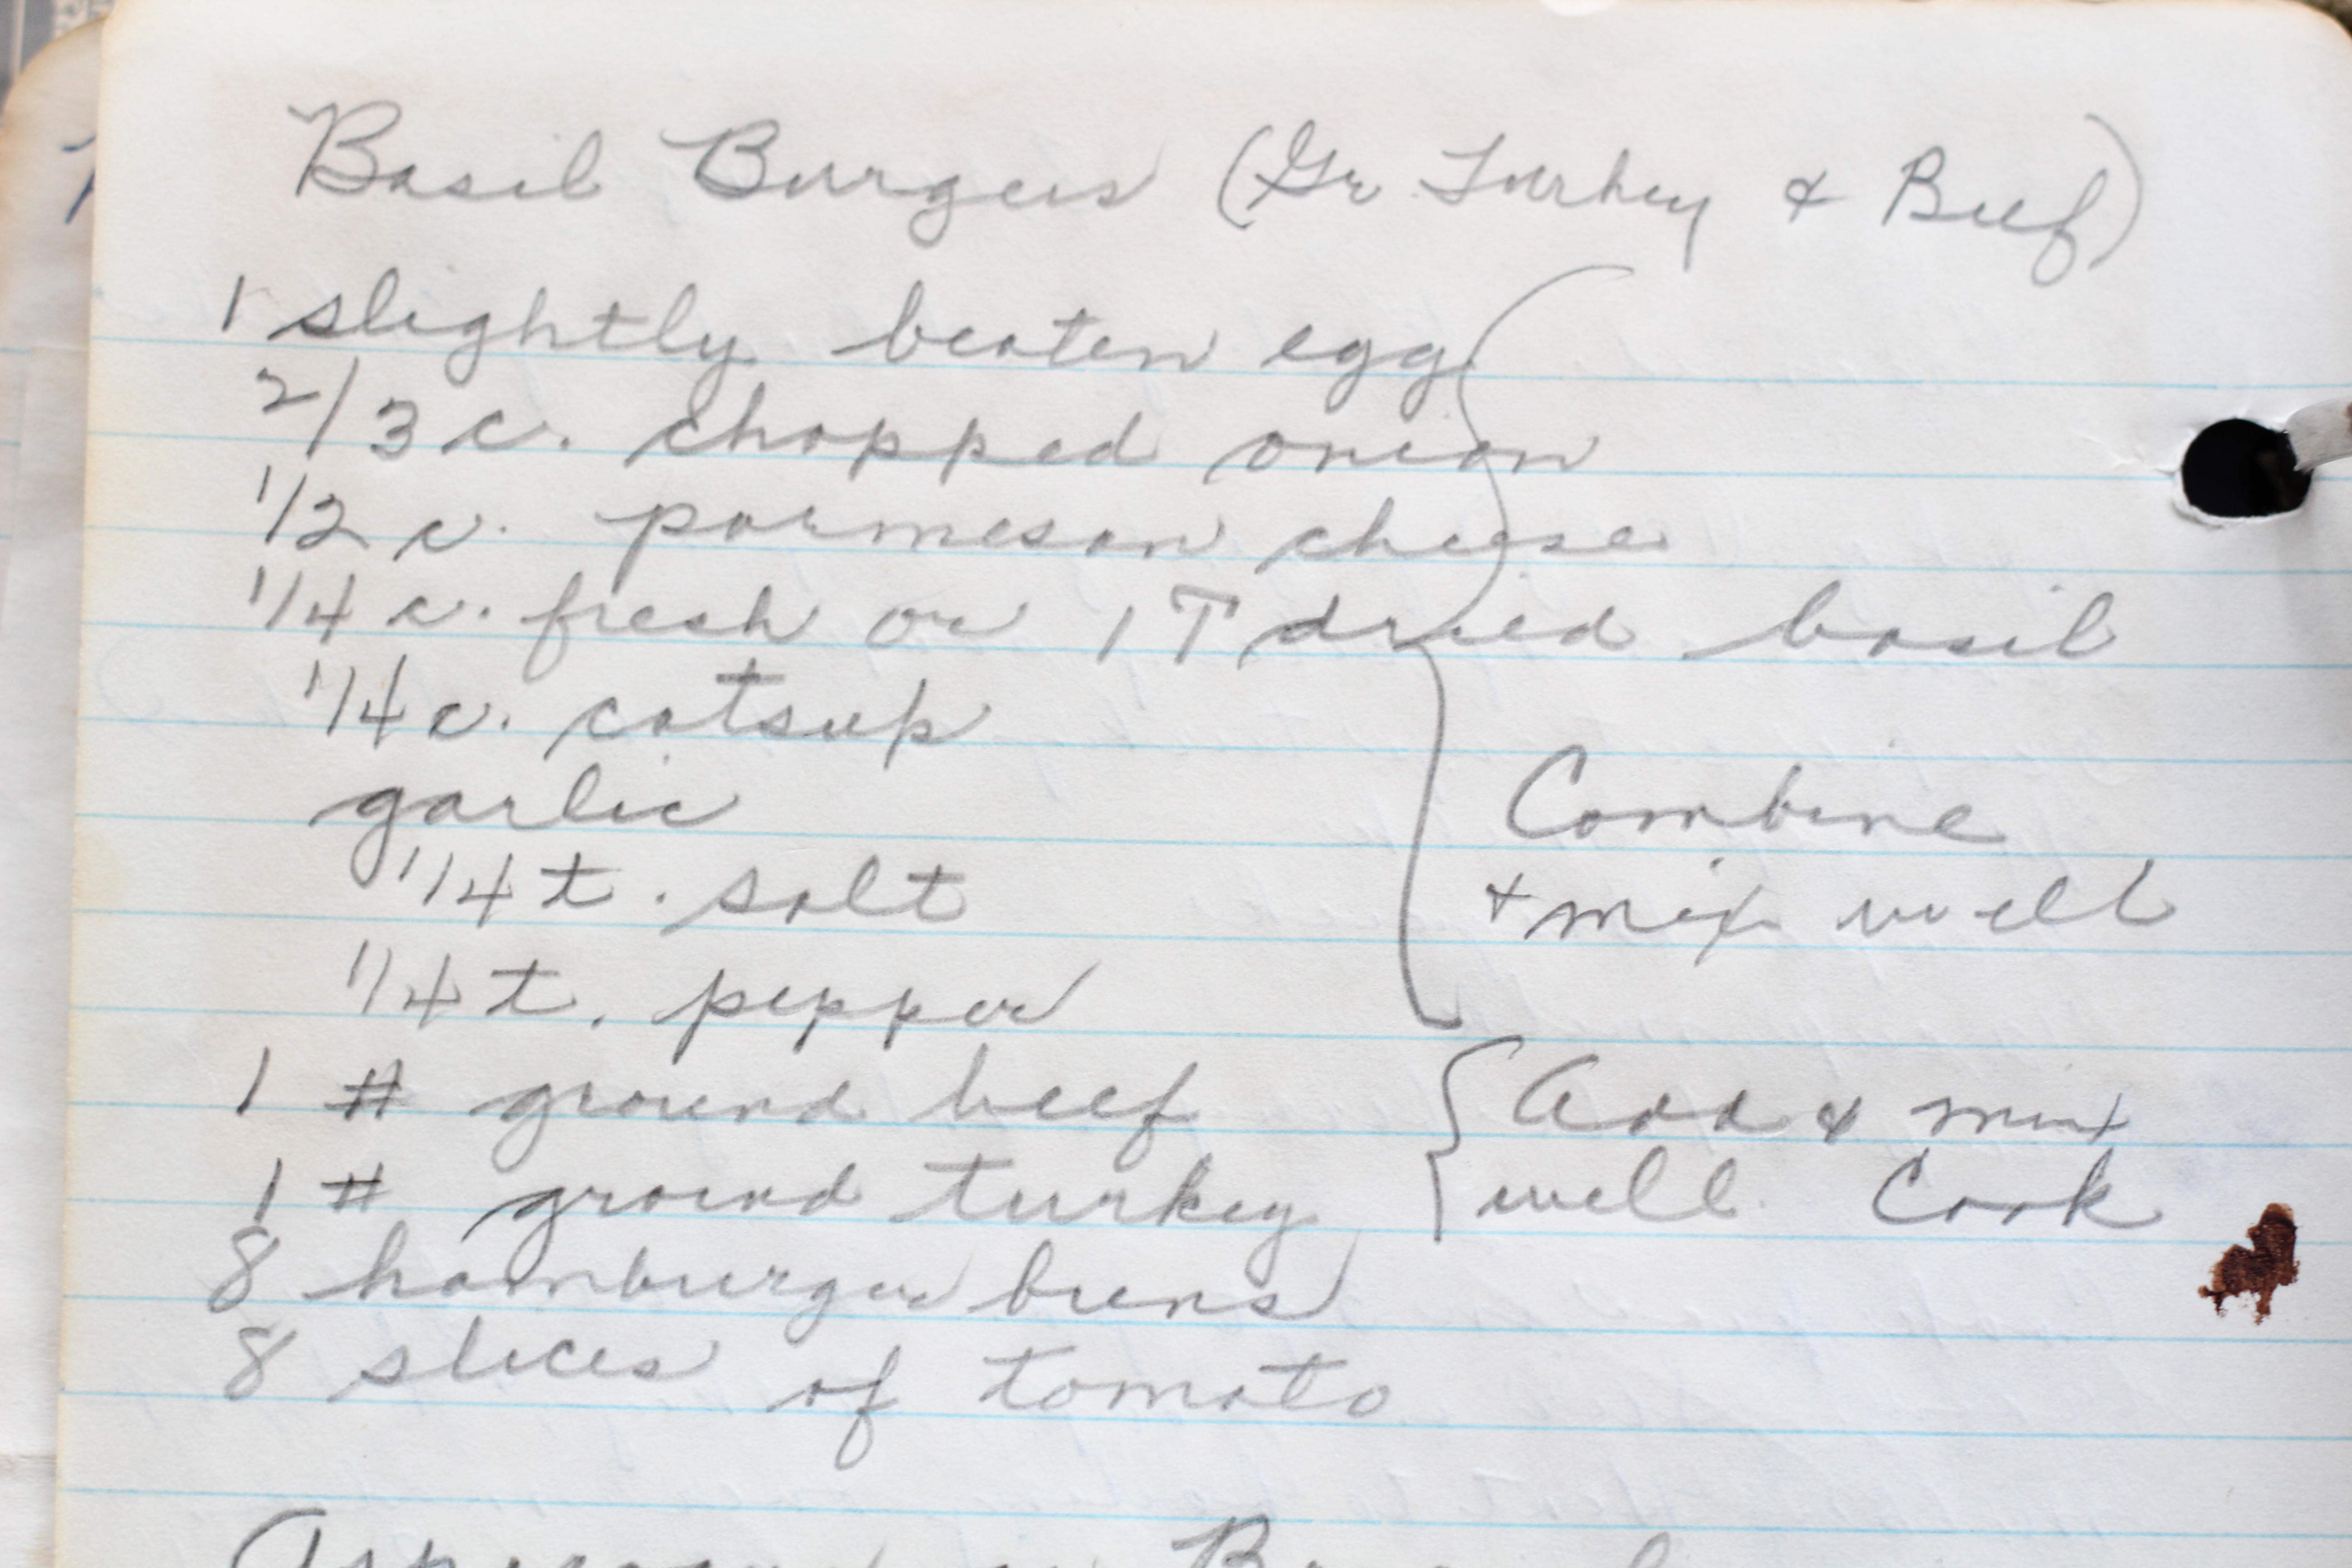
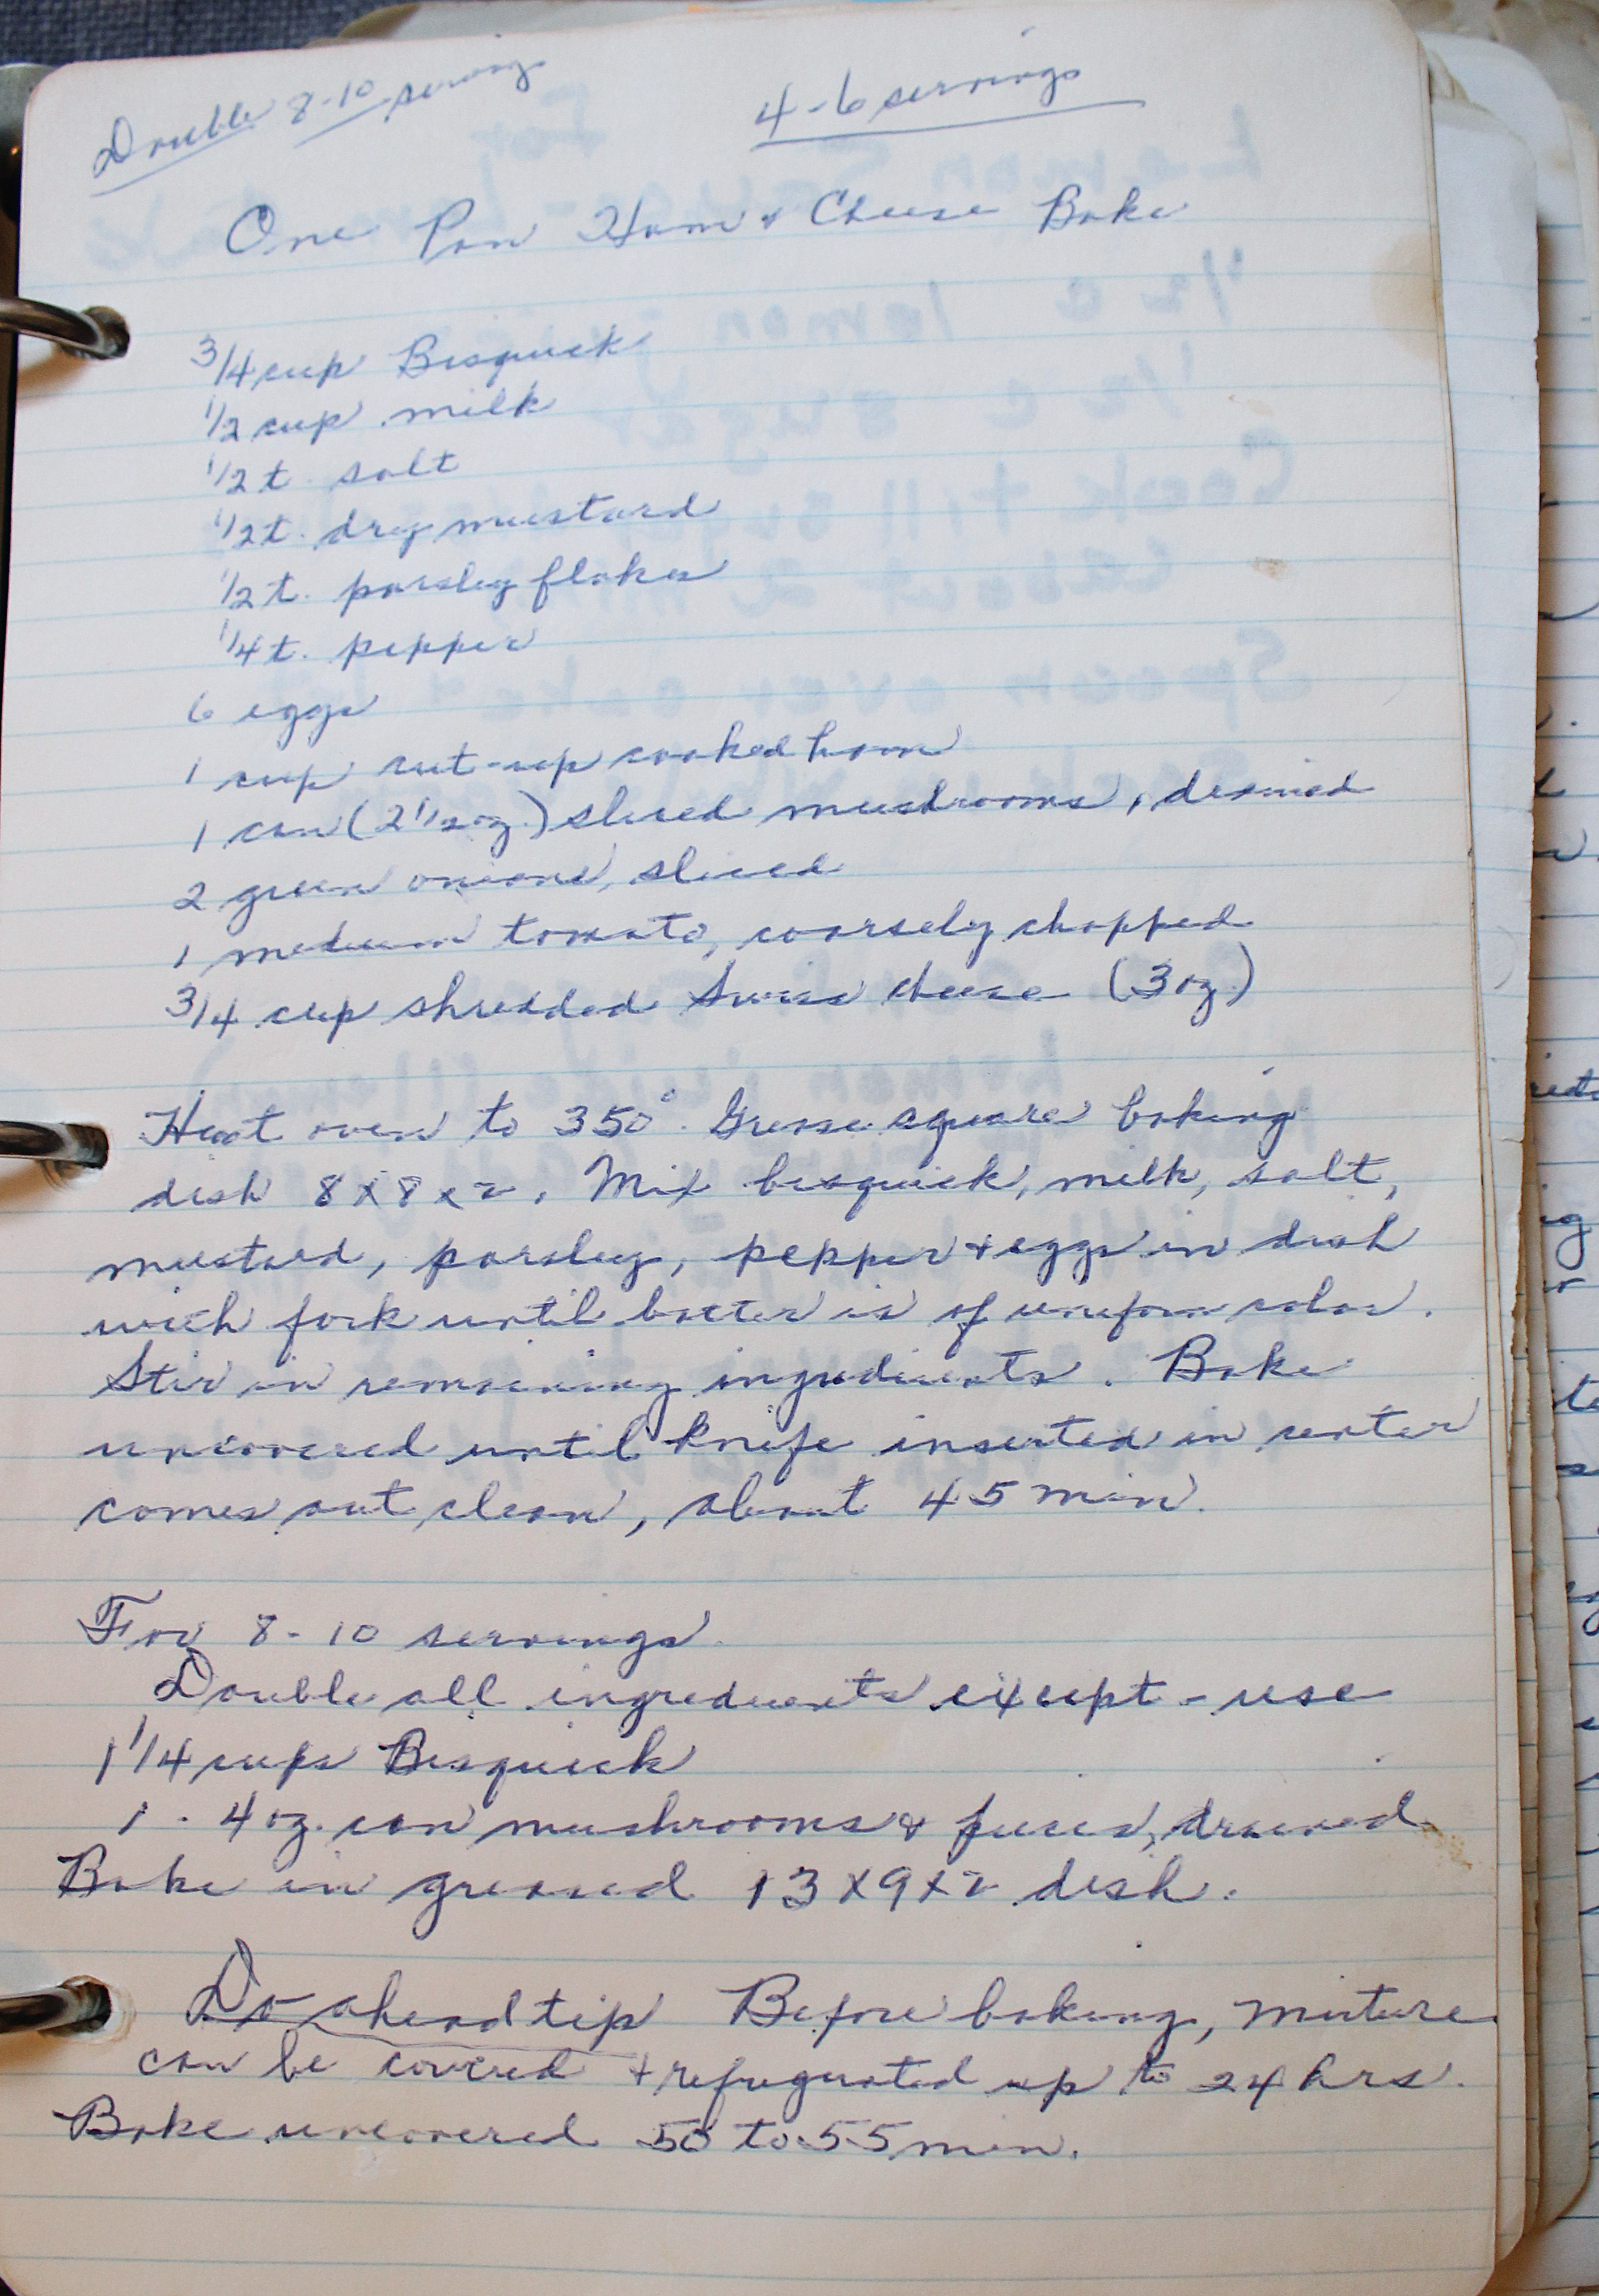
one pan ham cheese

One Pan Ham and Cheese
Print Recipe
  • CourseBreakfast, Main Dish
Servings Prep Time
4-6 20 minutes
Cook Time
45 minutes
Servings Prep Time
4-6 20 minutes
Cook Time
45 minutes
One Pan Ham and Cheese
Print Recipe
  • CourseBreakfast, Main Dish
Servings Prep Time
4-6 20 minutes
Cook Time
45 minutes
Servings Prep Time
4-6 20 minutes
Cook Time
45 minutes
Ingredients
  • 3/4 cup Bisquick
  • 1/2 cup milk
  • 1/2 tsp salt
  • 1/2 tsp dry mustard
  • 1/2 tsp parsley flakes
  • 1/4 tsp pepper
  • 6 eggs
  • 1 cup cooked ham cut up
  • 1 can (2 1/2 oz) sliced mushrooms drained
  • 2 green onions sliced
  • 1 medium tomato coarsely chopped
  • 3/4 cup shredded Swiss cheese
Servings:
Instructions
  1. Preheat oven to 350 degrees.
  2. Grease 8" x 8" x 2" square baking dish.
  3. Mix Bisquick, milk, salt, mustard, parsley, pepper, and eggs together in dish with fork until batter is a uniform color.
  4. Stir in remaining ingredients.
  5. Bake uncovered until a knife inserted in the center comes out clean, about 45 minutes.
Share this Recipe
 
Powered byWP Ultimate Recipe

November 26, 2016 by: Shannon and Aaron

One Pan Turkey ‘n Stuffing

One Pan Turkey and Stuffing Header

Happy Thanksgiving from Marguerite’s Cookbook! We hope everyone had a nice and relaxing holiday surrounded by the ones you love. We couldn’t make it home for Thanksgiving this year, so we had a Thanksgiving for two that Aaron made for us. You may have seen it on our Instagram.

We’re going to take a quick break from pies, but we’ve got our final one of the month coming later this week. So if you made more food than you could eat, or couldn’t send enough leftovers home with your dinner guests, we have a one pan turkey and stuffing recipe that’ll give you a nice twist on the same old leftovers. And spare you from some turkey sandwiches!

Here’s what Marguerite had to say:

one pan turkey recipe

As you can see, the only leftover from the meal you actually use is the turkey, but I find that it is the thing you have the most of and it sits in the refrigerator the longest. It is nice that this recipe includes “stuffing” without having to use any leftovers, or have another box of stuffing around. The Bisquick is a nice substitute for the dried bread crumbs in stuffing and it is a good way to hold onto all those seasonings in this one pan turkey and stuffing.

One Pan Turkey and Stuffing

This recipe is meant to be almost a full meal in itself. Marguerite suggests that this only serves six, which means everyone is supposed to take a sizable portion. Since there aren’t any vegetables in it, that could be a good option to pair with it to round out your meal. Because we know you’re still swimming in green beans and corn. Now on to taste, but first, an unpopular opinion. Turkey may honestly be my least favorite part of the Thanksgiving meal, as I live for all the sides. But this wasn’t bad. Aaron liked it of course. He found it to be an interesting twist and a nice way to switch up eating all that turkey. He especially liked it because Marguerite made so many different dishes with pre-cooked, leftover meat and it reminder him of her.

One Pan Turkey

We felt the best way to surround this one pan turkey and stuffing dish in our pictures was with photos of the people we are thankful for and missed seeing this Thanksgiving. If you try this recipe with your leftovers this weekend, we hope you enjoy it, but not as much as you enjoyed time with your friends and family.

One Pan Turkey n' Stuffing

One Pan Turkey 'n Stuffing
Print Recipe
  • CourseMain Dish
Servings Prep Time
6 10 minutes
Cook Time
30 minutes
Servings Prep Time
6 10 minutes
Cook Time
30 minutes
One Pan Turkey 'n Stuffing
Print Recipe
  • CourseMain Dish
Servings Prep Time
6 10 minutes
Cook Time
30 minutes
Servings Prep Time
6 10 minutes
Cook Time
30 minutes
Ingredients
  • 1 cup Bisquick
  • 1 1/4 cups milk
  • 3 eggs
  • 1 tsp parsley
  • 3/4 tsp ground sage
  • 3/4 tsp dried thyme
  • 1/2 tsp salt
  • 1/2 tsp poultry seasoning
  • 1/8 tsp pepper
  • 2 cups cooked turkey cut up
  • 2 Tbsp dried minced onion
Servings:
Instructions
  1. Preheat oven to 400 degrees. Grease casserole dish.
  2. Mix Bisquick, milk, eggs, and seasonings with a fork until batter is a uniform color. The batter will still be lumpy.
  3. Stir in remaining ingredients.
  4. Bake until golden brown and knife inserted in center comes out clean.
Share this Recipe
 
Powered byWP Ultimate Recipe

October 15, 2016 by: Shannon and Aaron

Broccoli Chowder Soup

chowdersoupheader

What’s better in cool fall weather than a nice warm bowl of soup? I’d say not many things are. Considering the fact that both of us came down with the flu this past week, soup was a much needed thing. This broccoli chowder soup is a delicious creamy treat to keep you warm this fall. If you liked our broccoli cheese soup, then you will really like this broccoli chowder soup!

Here’s what Marguerite had to say:

broccoli chowder soup recipe

You may notice that Marguerite calls for either three packages of frozen broccoli or one head of fresh broccoli. Aaron had a bit of trouble reading this recipe, and at first thought he was supposed to cook both frozen and fresh broccoli. He could try and blame it on the diminishing use of cursive writing these days, but it just wasn’t his day. After fixing that issue, this soup turned out great.

Broccoli Chowder Soup

Aaron was proud of his time management during this recipe, chopping ingredients efficiently while other ingredients cooked in the pot. That was, until he let the broth, milk, and ham boil over. He caught it quickly enough and turned the heat down before he burnt the milk. After he added the remaining ingredients, this broccoli chowder soup took shape right away.


Chowder Soup

I don’t particularly care for creamy soups, so I only had a few spoonfuls. It was very appetizing and just like a broccoli chowder soup should taste, just not my thing. Aaron really enjoyed it, and commented that he liked it more even more than the aforementioned broccoli cheese soup. Marguerite did us a favor and put both recipes on the same page, which made comparing them to each other easier. He thinks the chowder was better due to the increased milk/cream, decreased chicken broth, and how it was cooked up. The extra cheese didn’t hurt either.


Broccoli Chowder

This broccoli chowder soup will definitely warm Aaron’s stomach this fall. If you need a tasty soup to warm you up this season, Marguerite’s broccoli chowder soup can hit the spot.

Broccoli Chowder Soup
Print Recipe
  • CourseAppetizers and Sides
Servings
6
Cook Time
30 minutes
Servings
6
Cook Time
30 minutes
Broccoli Chowder Soup
Print Recipe
  • CourseAppetizers and Sides
Servings
6
Cook Time
30 minutes
Servings
6
Cook Time
30 minutes
Ingredients
  • 1 head fresh broccoli
  • 1 can chicken broth
  • 3 cups milk
  • 1 cup ham finely chopped
  • 2 tsp salt
  • 1/4 tsp pepper
  • 1 cup half & half
  • 1/2 lb grated cheese
  • 1/4 cup butter
Servings:
Instructions
  1. Cook broccoli in chicken broth until broccoli is tender.
  2. While broccoli is cooking, chop the ham.
  3. Once broccoli is tender, remove broccoli with a slotted spoon.
  4. Add milk, ham, salt, and pepper to chicken broth and bring to a boil. While these ingredients heat up, finely chop the broccoli.
  5. Once boiling, add broccoli, along with half & half, cheese, and butter.
  6. Stir together over low heat until all ingredients are incorporated.
Share this Recipe
 
Powered byWP Ultimate Recipe

September 3, 2016 by: Shannon and Aaron

Veal and Peppers

VealandPeppersHeader

Welcome back to Marguerite’s Cookbook! Or should I say welcome us back? Due to a few planned trips and unplanned moving into a new apartment, our kitchen was packed for up for quite a few weeks and we just couldn’t cook. But now we’re back! This week we have a delicious veal and peppers recipe that is a nice hearty meal to enjoy without the heartiness of high calories.

Here’s what Marguerite had to say:

VealandPeppersRecipe

As you can see, this recipe is all meat and veggies and a very small amount of calories.  Hooray, clean eating! It’s a nice balance to all the desserts in the cookbook.

VealandPeppers

As you may or may not be able to tell, the meat above is not veal. If you remember from our last veal recipe, we had trouble finding veal. Well, we had trouble again. But this time we decided to go in a little different direction. We got some choice beef, as well as some pork cutlets. It has been said that pork cutlets often resemble veal in some situations. We didn’t really know how we felt about that, but we decided to give it a try.

Porkandpeppers

Not as pretty a dish, especially when you are expecting that dark look of browned steak. Now on to taste . . .

We both agreed that both versions (beef and pork) of the veal and peppers were cooked a little too long. So with that in mind, we suggest cooking the meat covered for less than the 3o minutes Marguerite suggests. For such simple ingredients, this dish had plenty of flavor. Aaron felt that the peppers and onions that were cooked with the steak in the cast iron skillet were much better than the other vegetables. That is not surprising considering the differing quality of our cookware.

VealandPeppers

Overall, this veal and peppers recipe might be my favorite so far! It’s a great clean and simple option that is easy to make. We’re always trying to eat healthier and this is a great go to for clean eating.

VealPeppers


Veal and Peppers
Print Recipe
  • CourseMain Dish
Servings Prep Time
4 20 minutes
Cook Time
30-40 minutes
Servings Prep Time
4 20 minutes
Cook Time
30-40 minutes
Veal and Peppers
Print Recipe
  • CourseMain Dish
Servings Prep Time
4 20 minutes
Cook Time
30-40 minutes
Servings Prep Time
4 20 minutes
Cook Time
30-40 minutes
Ingredients
  • 1 lb veal cubed
  • 4 medium green peppers
  • 1 medium onion
  • 2 Tbs vegetable oil
  • 2 cups canned tomatoes
  • 1/2 tsp salt
  • pepper
  • 6 Tbs dry white wine
Servings:
Instructions
  1. Chop up onions and peppers. Put 1 T of vegetable oil in skillet and cook veggies until tender. Remove from pan and set aside.
  2. Add 1 T of vegetable oil and cubed veal. Cook until slightly browned.
  3. Add tomatoes, salt, pepper, and wine. Cover and cook over low heat for 20-30 minutes.
Share this Recipe
 
Powered byWP Ultimate Recipe

June 25, 2016 by: Shannon and Aaron

Swiss Steak

Swiss Steak

This recipe is the first of extra special recipes in Marguerite’s Cookbook where the recipe will call for a certain piece of cooking equipment and we will be privileged enough to use Marguerite’s personal cookware that was handed down to us! The cast iron skillet used in this recipe was a fixture in Marguerite’s kitchen for decades, and now can be one in ours as well.

Swiss Steak

As you will see in Marguerite’s instructions, this was another diet recipe. She even lists the calories per serving, although I have no idea if any of it is true! Here is what Marguerite had to say:

Swiss Steak Recipe

Looking through this recipe, there were a few things new to us again. While we were used to trimming fat off of meat before cooking it, neither of us had then cooked the fat down and used it as a greasing agent and to brown the meat a bit before cooking! Also, Marguerite’s shortened form of directions for herself added to the confusion at the start. This swiss steak looked delicious from the beginning and we were looking forward to it even more because it was a departure from our normal cuisine of pastas and baked chicken.

Swiss Steak

See, doesn’t that look great? Aaron was sure to heed Marguerite’s warning and went back to the stove many times during the two hours the steak cooked to make sure too much liquid didn’t evaporate. That didn’t even seem to remotely resemble an issue. We do think even though we only cooked it for two hours, it turned out a little dry. As Aaron has heard and learned from his family, every stove and oven cooks the same recipe differently! We used rather thin steaks though. Our tiny, old apartment stove doesn’t help, either.

Swiss Steak

If you couldn’t already tell, we both really enjoyed this swiss steak recipe. Even with the extra step of cooking down the fat from the meat, this is a simple recipe that I really think Aaron and I will want to use again and again!

Swiss Steak
Print Recipe
  • CourseMain Dish
Servings Prep Time
4 10 minutes
Cook Time
2 hours
Servings Prep Time
4 10 minutes
Cook Time
2 hours
Swiss Steak
Print Recipe
  • CourseMain Dish
Servings Prep Time
4 10 minutes
Cook Time
2 hours
Servings Prep Time
4 10 minutes
Cook Time
2 hours
Ingredients
  • 1 1/2 lbs steak
  • salt and pepper
  • 1 lb can of tomatoes
  • 1 medium onion sliced
  • 1/2 cup celery chopped
  • 1/4 tsp garlic salt
  • 3/4 tsp salt
  • pepper
Servings:
Instructions
  1. Remove fat. Cook fat in heavy skillet. Discard chunks.
  2. Season steak in a little salt and pepper. Brown lightly in fat. Pour off fat.
  3. Add remaining ingredients.
  4. Cover and cook over low heat 2 to 2 1/2 hours or until fork tender. Add water during cooking if too much liquid evaporates.
Share this Recipe
 
Powered byWP Ultimate Recipe

May 7, 2016 by: Shannon and Aaron

Oven French Fries

Oven French Fries Header

I don’t know about you, but one side dish Aaron and I could eat always and forever are french fries. From fast food to handmade, french fries are a delicious way to prepare potatoes. In case you haven’t noticed a trend on this blog, we’re potato obsessed. These oven french fries combined flavors we never would have paired together and resulted in my favorite recipe so far (I’m pretty sure Aaron’s too.) They would also go great with the Pittsburgh Ham Barbecue Sandwiches that we made last week!


It’s also another “guest” post. Marguerite noted below that she got this recipe from Madaline, who was a long time friend of her’s. Here’s what she had to say:

Oven French Fries Recipe

One thing we have found in cooking through Marguerite’s cookbook, is that both Aaron and I like paprika much more than either of us realized. It has been one of the main spices we’ve used in quite a number of dishes, and it is something we both really enjoy. Now salt is really what makes any french fries, good, am I right? But the addition of the paprika and the parmesan cheese really create a much more exciting set of flavors for these oven french fries. Also, butter. ‘Nough said.

Oven French Fries

The thing Aaron enjoyed about making these fries is that it didn’t require any special equipment, or having cooking grease to fry them in. And, to be honest, I think he really liked the idea of being able to make the fries any shape and size he wanted.

Oven French Fries

In the end, both that unique, “homemade” fry look, and the delicious flavors I mentioned before, made these oven french fries a huge success with both of us. We have already made them several times, and plan on making them any time we need to finish off a bag of potatoes! Not so good for our waistlines, but who cares?

Oven French Fries Recipe

Oven French Fries
Print Recipe
  • CourseAppetizers and Sides
Servings Prep Time
2 15 minutes
Cook Time
25 minutes
Servings Prep Time
2 15 minutes
Cook Time
25 minutes
Oven French Fries
Print Recipe
  • CourseAppetizers and Sides
Servings Prep Time
2 15 minutes
Cook Time
25 minutes
Servings Prep Time
2 15 minutes
Cook Time
25 minutes
Ingredients
  • 4 Potatoes
  • butter
  • salt
  • pepper
  • paprika
  • Parmesan cheese
Servings:
Instructions
  1. Slice raw potatoes 1/8" thick.
  2. Melt butter and dip each potato slice. Shake excess off and place on a cookie sheet.
  3. Sprinkle with salt, pepper, paprika, and parmesan cheese.
  4. Bake in oven for 20-30 minutes (or until tender) at 375 degrees.
Share this Recipe
 
Powered byWP Ultimate Recipe

February 27, 2016 by: Shannon and Aaron

Ham Cheese Strata

Ham and Cheese Strata

When we started this recipe, neither of us really knew what to expect.  But, I thought, “Bread and cheese and warm, maybe it’ll be like grilled cheese and I’ll love it!”  That’s not quite how it turned out, and since I love a good grilled cheese sandwich, was a little disappointed.

Ham and Cheese Strata

We really couldn’t discern a lot of details about what this recipe had in store for us from just what Marguerite wrote.  Take a look for yourself:

Original Ham and Cheese

It really started to make sense when Aaron called his mother to ask her opinion about part of the recipe.  After getting our question answered, Aaron asked her if she remembered having it.  She did remember.  Although not well, she did recall it tasting like and reminding her of quiche.  Of course, soaking the whole thing in an egg mixture, it does start to make sense as a breakfast dish once it is pointed out to you.  Upon further research, it turns out that the Strata is a layered casserole dish, whose most common modern variation is a brunch dish similar to a quiche or frittata!

Ham and Cheese Strata

I was not a fan, although I couldn’t tell you why exactly.  However, Aaron loves breakfast foods, and was pleasantly surprised that this dish tasted quiche-like.  He actually heated it up almost every morning the week we made it and had some for breakfast.  A few improvements he would make:

  • More Meat: The recipe had no instruction on the amount of ham to put in.  Aaron put in less than one pound and found it to be a pitiful amount, so we have suggested two pounds in the recipe
  • More Cheese: Because, why not?  But really, it lacked overall in cheesy-ness as well.

Ham and Cheese Strata

Aaron’s mom also told us this was a dish Marguerite would often prepare the night before an let saturate overnight (as the recipe suggests.)  All in all, this is a simple dish to make that you can prepare the night before, and then pop in the oven in the morning before the kiddos (or your husband or wife) wake up.  Enjoy!

Ham Cheese Strata
Print Recipe
Servings Prep Time
6-12 10 minutes
Cook Time Passive Time
1 hour 2-8 hours
Servings Prep Time
6-12 10 minutes
Cook Time Passive Time
1 hour 2-8 hours
Ham Cheese Strata
Print Recipe
Servings Prep Time
6-12 10 minutes
Cook Time Passive Time
1 hour 2-8 hours
Servings Prep Time
6-12 10 minutes
Cook Time Passive Time
1 hour 2-8 hours
Ingredients
  • 12 slices bread with or without crusts (your choice)
  • 6 slices American cheese
  • 2 lbs ham diced
  • dried minced onion
  • 5 eggs slightly beaten
  • 3 1/4 cups milk
  • 1/2 tsp salt
  • dash pepper
Servings:
Instructions
  1. Arrange six slices of bread in a 9 x 13 pan.
  2. Cover with slices of American cheese.
  3. Scatter diced ham over each slice.
  4. Sprinkle a little dried minced onion over each slice.
  5. Cover with six more slices of bread.
  6. Mix slightly beaten eggs with milk. Add salt and pepper. Pour over sandwiches.
  7. Refrigerate at least two hours or even overnight.
  8. Bake 1 hour at 350 degrees. Let set 10 minutes before serving.
Share this Recipe
 
Powered byWP Ultimate Recipe

February 20, 2016 by: Shannon and Aaron

Scalloped Potatoes

Scalloped Potatoes

“Potatoes, mash em, boil em, stick em in a stew”

Potatoes of any kind are one way to both Samwise Gamgee and Aaron’s hearts. This scalloped potatoes recipe also involves cream and paprika, so I’m pretty sure it’s the way to anyone’s heart.

Scalloped Potatoes

We have our first guest post here on Marguerite’s Cookbook!

Let me explain.  There are handfuls of recipes in Marguerite’s cookbook that she added from the kitchens of other people in her life.  We decided the authors of this recipe would be a great place to introduce this feature.  The ladies who gave Marguerite this recipe were her Aunt Florence and Aunt Estella.  They were younger sisters of her father, and they were both good cooks whose cooking made it into Marguerite’s cookbook a number of times.  Now, back to the scalloped potatoes.


Here’s what Florence and Estella had to say (in their handwriting):

Potatoes REcipe

We actually attempted this recipe twice.  The only differences between the two times we made this were that the second time we did not skin the potatoes, and we added more paprika to the top of the dish.  I did not notice a major difference in the taste with or without the skins, but Aaron did prefer it without the potato skins.

Scalloped Potatoes

Now, other than the time consuming processes of skinning and thinly slicing the potatoes, this is an extremely simple recipe.  When arranging the layers, you could take your time and arrange the potato slices in a neat and orderly pattern.  We chose to just toss them in and let them fall however they wanted!

Scalloped Potatoes

The first time we made these potatoes was over the holidays with our parents.  They all enjoyed them too.  We had them the second time just the two of us and had them with a few different meals.  The final verdict: these scalloped potatoes are a delicious addition to any meal.

Thanks Florence and Estella!


Scalloped Potatoes
Print Recipe
Servings Prep Time
4-6 30 minutes
Cook Time
75 minutes
Servings Prep Time
4-6 30 minutes
Cook Time
75 minutes
Scalloped Potatoes
Print Recipe
Servings Prep Time
4-6 30 minutes
Cook Time
75 minutes
Servings Prep Time
4-6 30 minutes
Cook Time
75 minutes
Ingredients
  • 4 cups potatoes, thinly sliced
  • 1 small onion, sliced
  • 1 can cream of mushroom soup
  • 1/2 cup milk
  • dash pepper
  • paprika
  • butter
Servings:
Instructions
  1. Blend one cup of cream of mushroom soup with 1/2 to 3/4 cup milk and a dash of pepper.
  2. In buttered 1 1/2 qt. casserole dish arrange 4 cups thinly sliced potatoes, 1 small onion sliced, and sauce - alternating ingredients.
  3. Dot the top with butter, sprinkle with paprika.
  4. Cover and bake at 375 degrees for one hour. Uncover and bake 15 minutes more.
Share this Recipe
 
Powered byWP Ultimate Recipe

February 13, 2016 by: Shannon and Aaron

Basil Burgers

Basil Burgers

A flavorful burger in the middle of winter? Why not!

As excited as we are to try these again in the summer, these basil burgers were a great meal to enjoy on a cold, Chicago night. We also live in an apartment and have no outdoor space to grill, so trying these in the summer won’t make a huge difference.

Here is what Marguerite had to say:

Basil Burgers Original

Last week I mentioned we hosted our parents for a “try our blog food” dinner. Technically, my mother hosted and we cooked because we live 500ish miles away from our parents and needed a place to host while we were in town. In addition to the zucchini bread, the basil burgers were on the menu for the main course. Again, total hit. That was a huge compliment especially from my dad who is the grill master.

Basil Burgers

These burgers have a nice hint of basil which compliments the onion flavor. Neither Aaron nor myself is a huge fan of heavy onion, but paired with the ground beef and turkey it packed a positive punch.

The addition of parmesan cheese “made it” for Aaron. He loved how that flavor worked with the basil and felt like it added that something special to the burgers.

I loved how the basil burgers were 50% beef and 50% turkey, making them just a little leaner and  healthier.

Basil Burgers

When we made these for ourselves, we cooked them in a skillet on the stove. For our parents, we used my mother’s George Foreman grill. We also have one at our place, but forgot to use it until after dinner was ready. Both methods of cooking worked well and there wasn’t a noticeable difference in the flavor, however the grilled burgers had a more consistent texture. Which is to say they were less charred on the outside. If you prefer a more blackened burger, go for the skillet!

Basil Burger

Again, I have a feeling we’ll be throwing this recipe into the regular dinner rotation.

Basil Burgers
Print Recipe
A simple yet flavorful burger recipe.
Servings Prep Time
8 Burgers 20 minutes
Cook Time
10-15 minutes
Servings Prep Time
8 Burgers 20 minutes
Cook Time
10-15 minutes
Basil Burgers
Print Recipe
A simple yet flavorful burger recipe.
Servings Prep Time
8 Burgers 20 minutes
Cook Time
10-15 minutes
Servings Prep Time
8 Burgers 20 minutes
Cook Time
10-15 minutes
Ingredients
  • 1 egg slightly beaten
  • 2/3 cup chopped onion
  • 1/2 cup Parmesan cheese
  • 1/4 cup fresh basil OR
  • 1 Tbsp dried basil
  • 1/4 cup ketchup
  • garlic
  • 1/4 tsp salt
  • 1/4 tsp pepper
  • 1 lbs ground beef
  • 1 lbs ground turkey
  • 8 Hamburger buns
  • 8 slices tomato
Servings: Burgers
Instructions
  1. Combine and mix well the following ingredients: Egg, onion, parmesan cheese, basil, ketchup, garlic, salt, and pepper.
  2. Add the ground beef and ground turkey and mix well.
  3. Cook.
Share this Recipe
 
Powered byWP Ultimate Recipe

January 30, 2016 by: Shannon and Aaron

Breaded Veal Cutlets

Breaded Veal Cutlets

As far as easy dinners go, these veal cutlets definitely make the list.

In an attempt to be real adults, we’re always on the lookout for “real” food to make for dinner. By real food we mean basically anything that isn’t EasyMac. This veal recipe is one to add to our regular dinner rotation and not just as part of our adventure in cooking through Marguerite’s book. Few ingredients, lots of flavor, and a quick prep time equate to a perfect meal for us and this veal brings it.

Veal Cutlets

Here is what Marguerite had to say:

IMG_0262

Another reason we love this recipe is because it could be very easy to try with other kinds of meats. Veal is pricey and we usually have other meats in our freezer for everyday use. Basically any kind of beef cut would compliment this recipe well, as well as chicken. Pork perhaps? We’ll have to try a few and report back.

Veal Cutlet Recipe

The preparation of the meat was very simple, which is a huge factor for us when making dinner every night. It was also super flavorful, despite the meat being a little tough. That, of course, had to do with the meat we selected, and not the recipe itself.  All-in-all, another success!

Breaded Veal

The only issue we ran into with this dish was actually finding veal cutlets. Hence why the meat we picked was so tough. We went to 3 grocery stores before we found anything, and even then the selection was not so fabulous. So if anyone is aware of a good butcher in the Chicago area, let us know!


Breaded Veal Cutlets


Breaded Veal Cutlets
Print Recipe
  • CourseMain Dish
Servings Prep Time
4 People 10 minutes
Cook Time
1 hr 15 minutes
Servings Prep Time
4 People 10 minutes
Cook Time
1 hr 15 minutes
Breaded Veal Cutlets
Print Recipe
  • CourseMain Dish
Servings Prep Time
4 People 10 minutes
Cook Time
1 hr 15 minutes
Servings Prep Time
4 People 10 minutes
Cook Time
1 hr 15 minutes
Ingredients
  • 16 oz veal
  • skim milk
  • bread crumbs
  • 2 tomatoes
  • onion flakes
  • salt
  • pepper
  • 1 tbsp sugar
  • margarine
Servings: People
Instructions
  1. Salt and pepper veal to taste.
  2. Dip in skim milk then dip in break crumbs.
  3. Grease baking dish well with margarine and place veal in dish.
  4. Grease skillet well with margarine.
  5. Stew tomatoes with onion flakes, sugar, salt, pepper, and margarine.
  6. Put over veal and back for one hour and 15 minutes at 325 degrees. Cover tightly.
Share this Recipe
 
Powered byWP Ultimate Recipe

Hey There!

We're Aaron and Shannon, the cooks behind Marguerite’s Cookbook. We are a husband and wife cooking/blogging team who love food, fun, and family.

Give us a follow

Twitter

Sign up for our monthly newsletter and receive exclusive content from us in your inbox once a month.

  • Policies
  • Contact

© 2025 · Fun Genesis WordPress Theme by, Pretty Darn Cute Design