Marguerites Cookbook

A cooking blog all about making vintage recipes from a cookbook we inherited from our grandmother

  • Home
  • Recipes
    • Main Dishes
    • Appetizers and Sides
    • Desserts
    • Breakfast
  • About
  • Contact

April 30, 2016 by: Shannon and Aaron

Pittsburgh Ham Barbecue Sandwiches

Pittsburgh Ham Barbecue Sandwiches

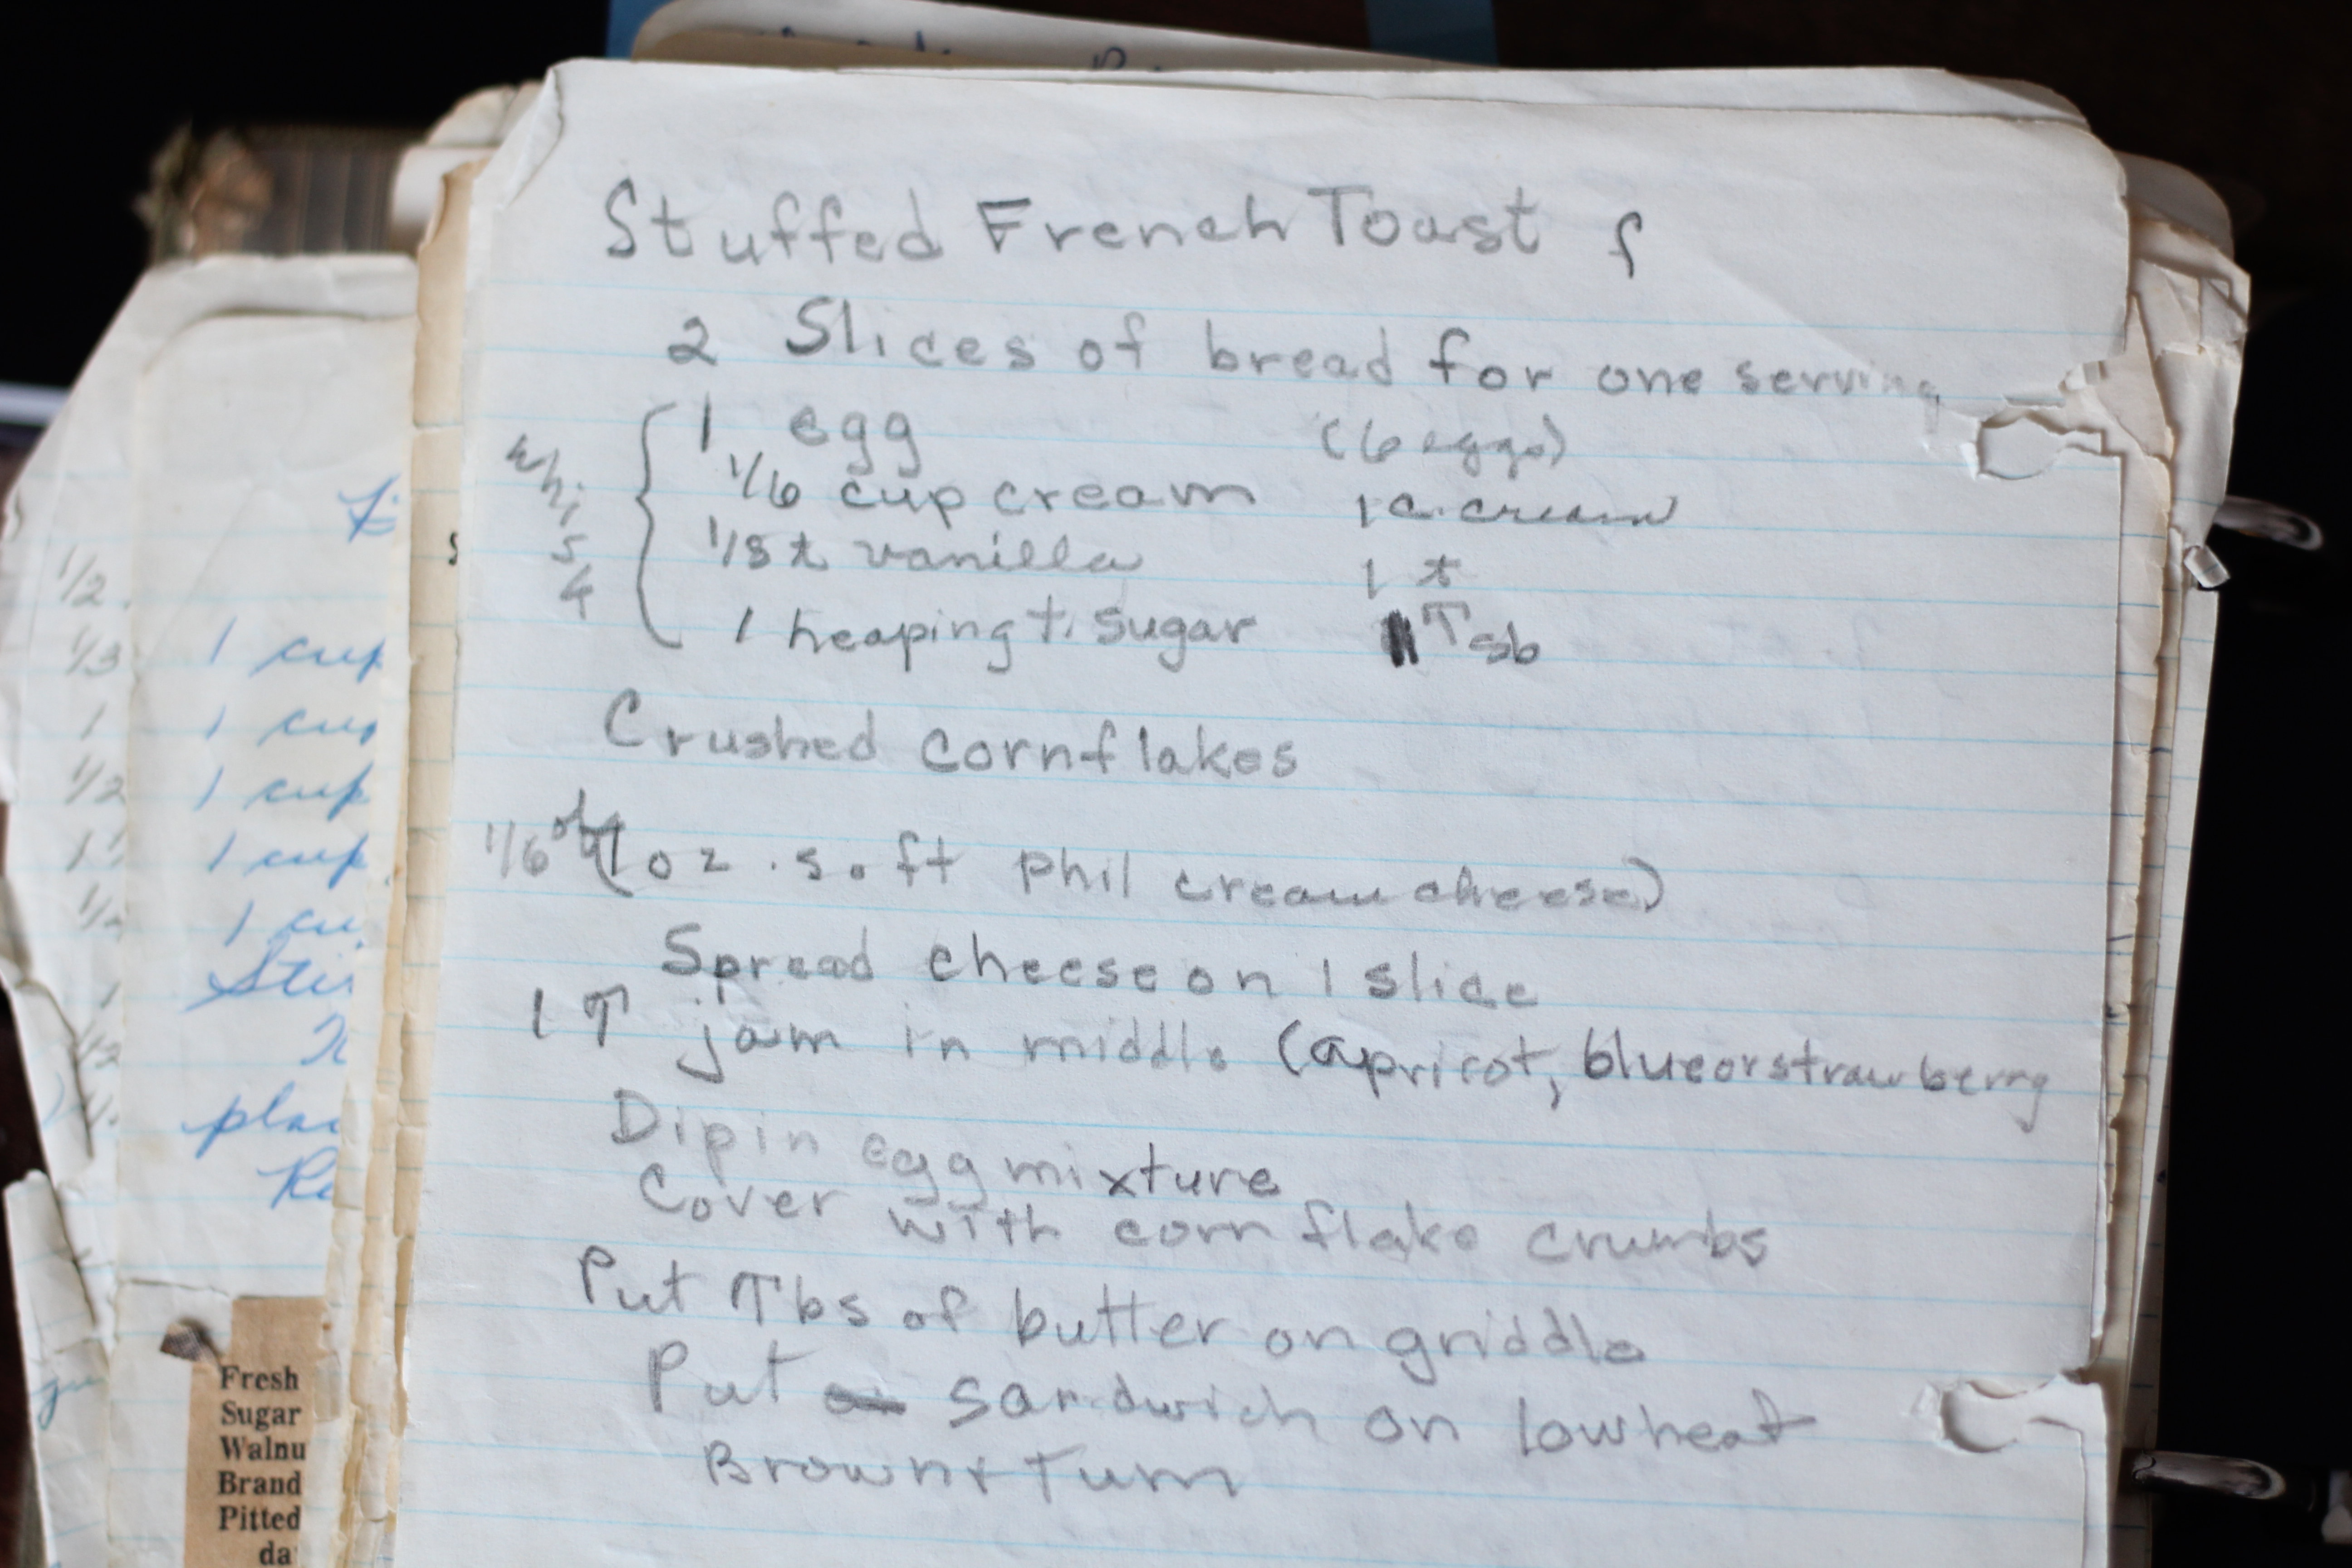
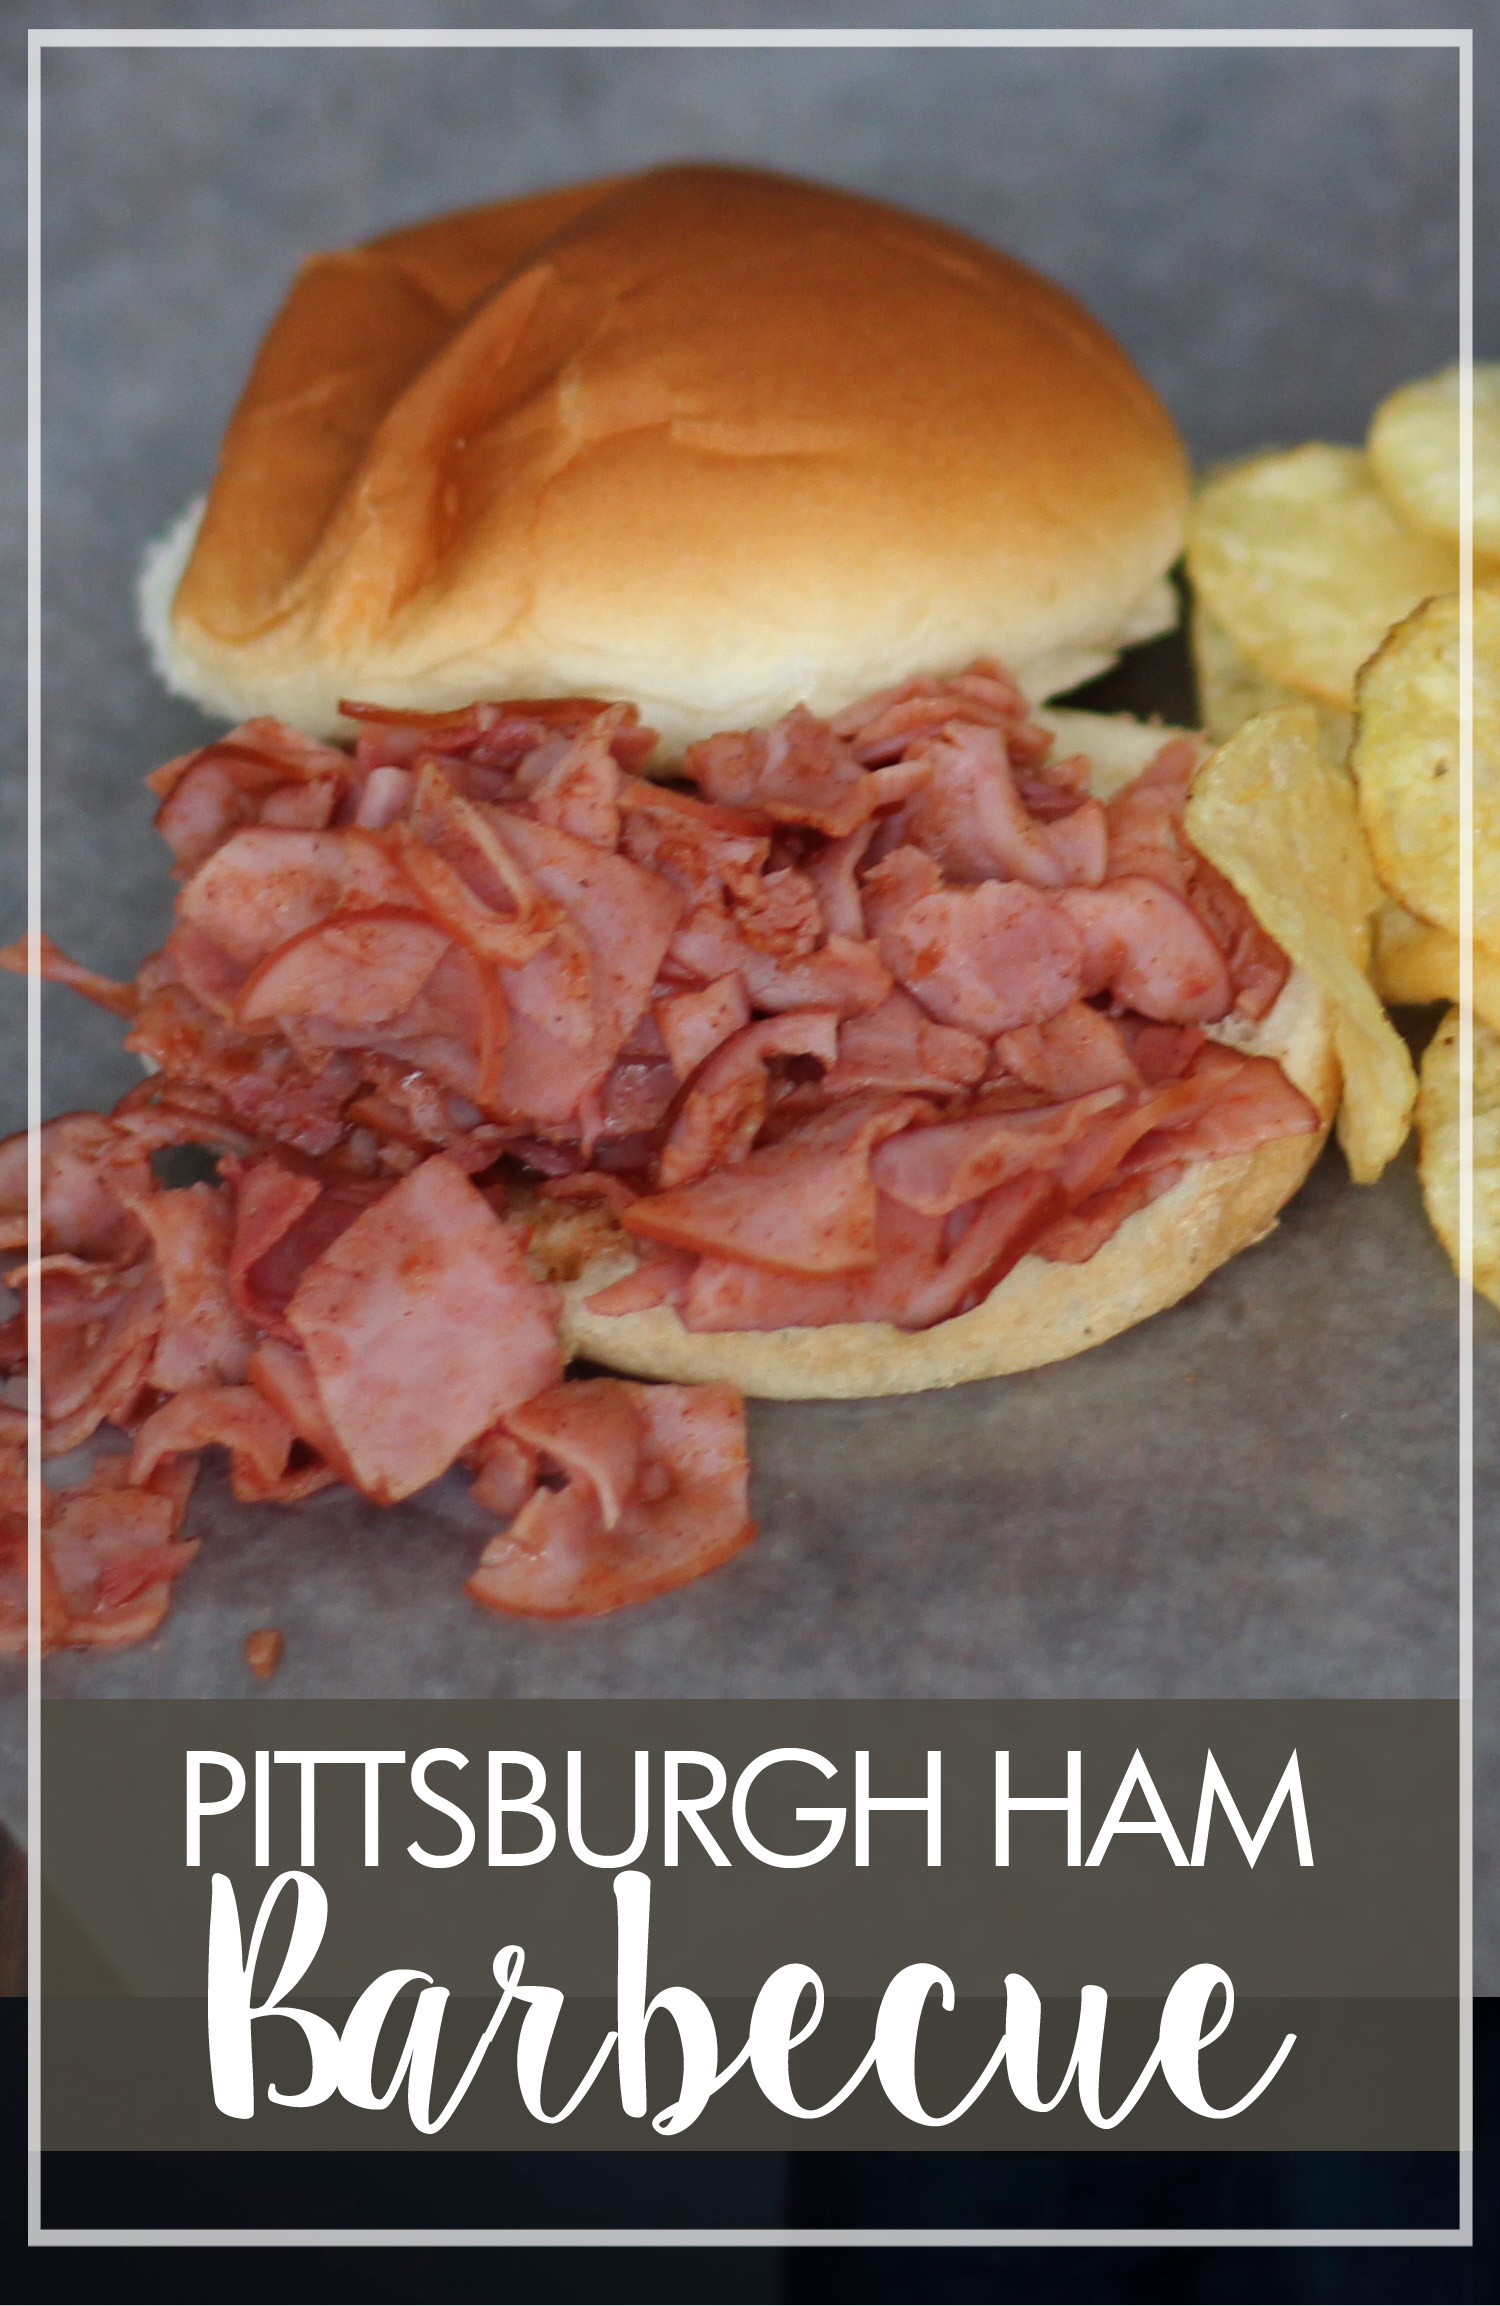
Chipped chopped ham is a Pittsburgh culinary tradition and one of those unique regional things you just can’t find anywhere else. So the fact that we made this recipe from Chicago was a little difficult. Oh? You’re not familiar with the term “chipped chopped ham?” Allow me to explain…

Pittsburgh Ham Barbecue

According to Isaly’s, the premier deli meat supplier in Pittsburgh, chopped ham is made from ham chunks and seasonings, all ground together and then smushed into a loaf. Then, it’s sliced super thin, making it both chipped and chopped. We found thin deli meat very easily, but we could not find chopped ham! We totally could have had some shipped to us here in Chicago, but we have poor planning skills, so we had to settle with ye olde thin ham.

Here is what Marguerite had to say:

Ham Sandwich recipe

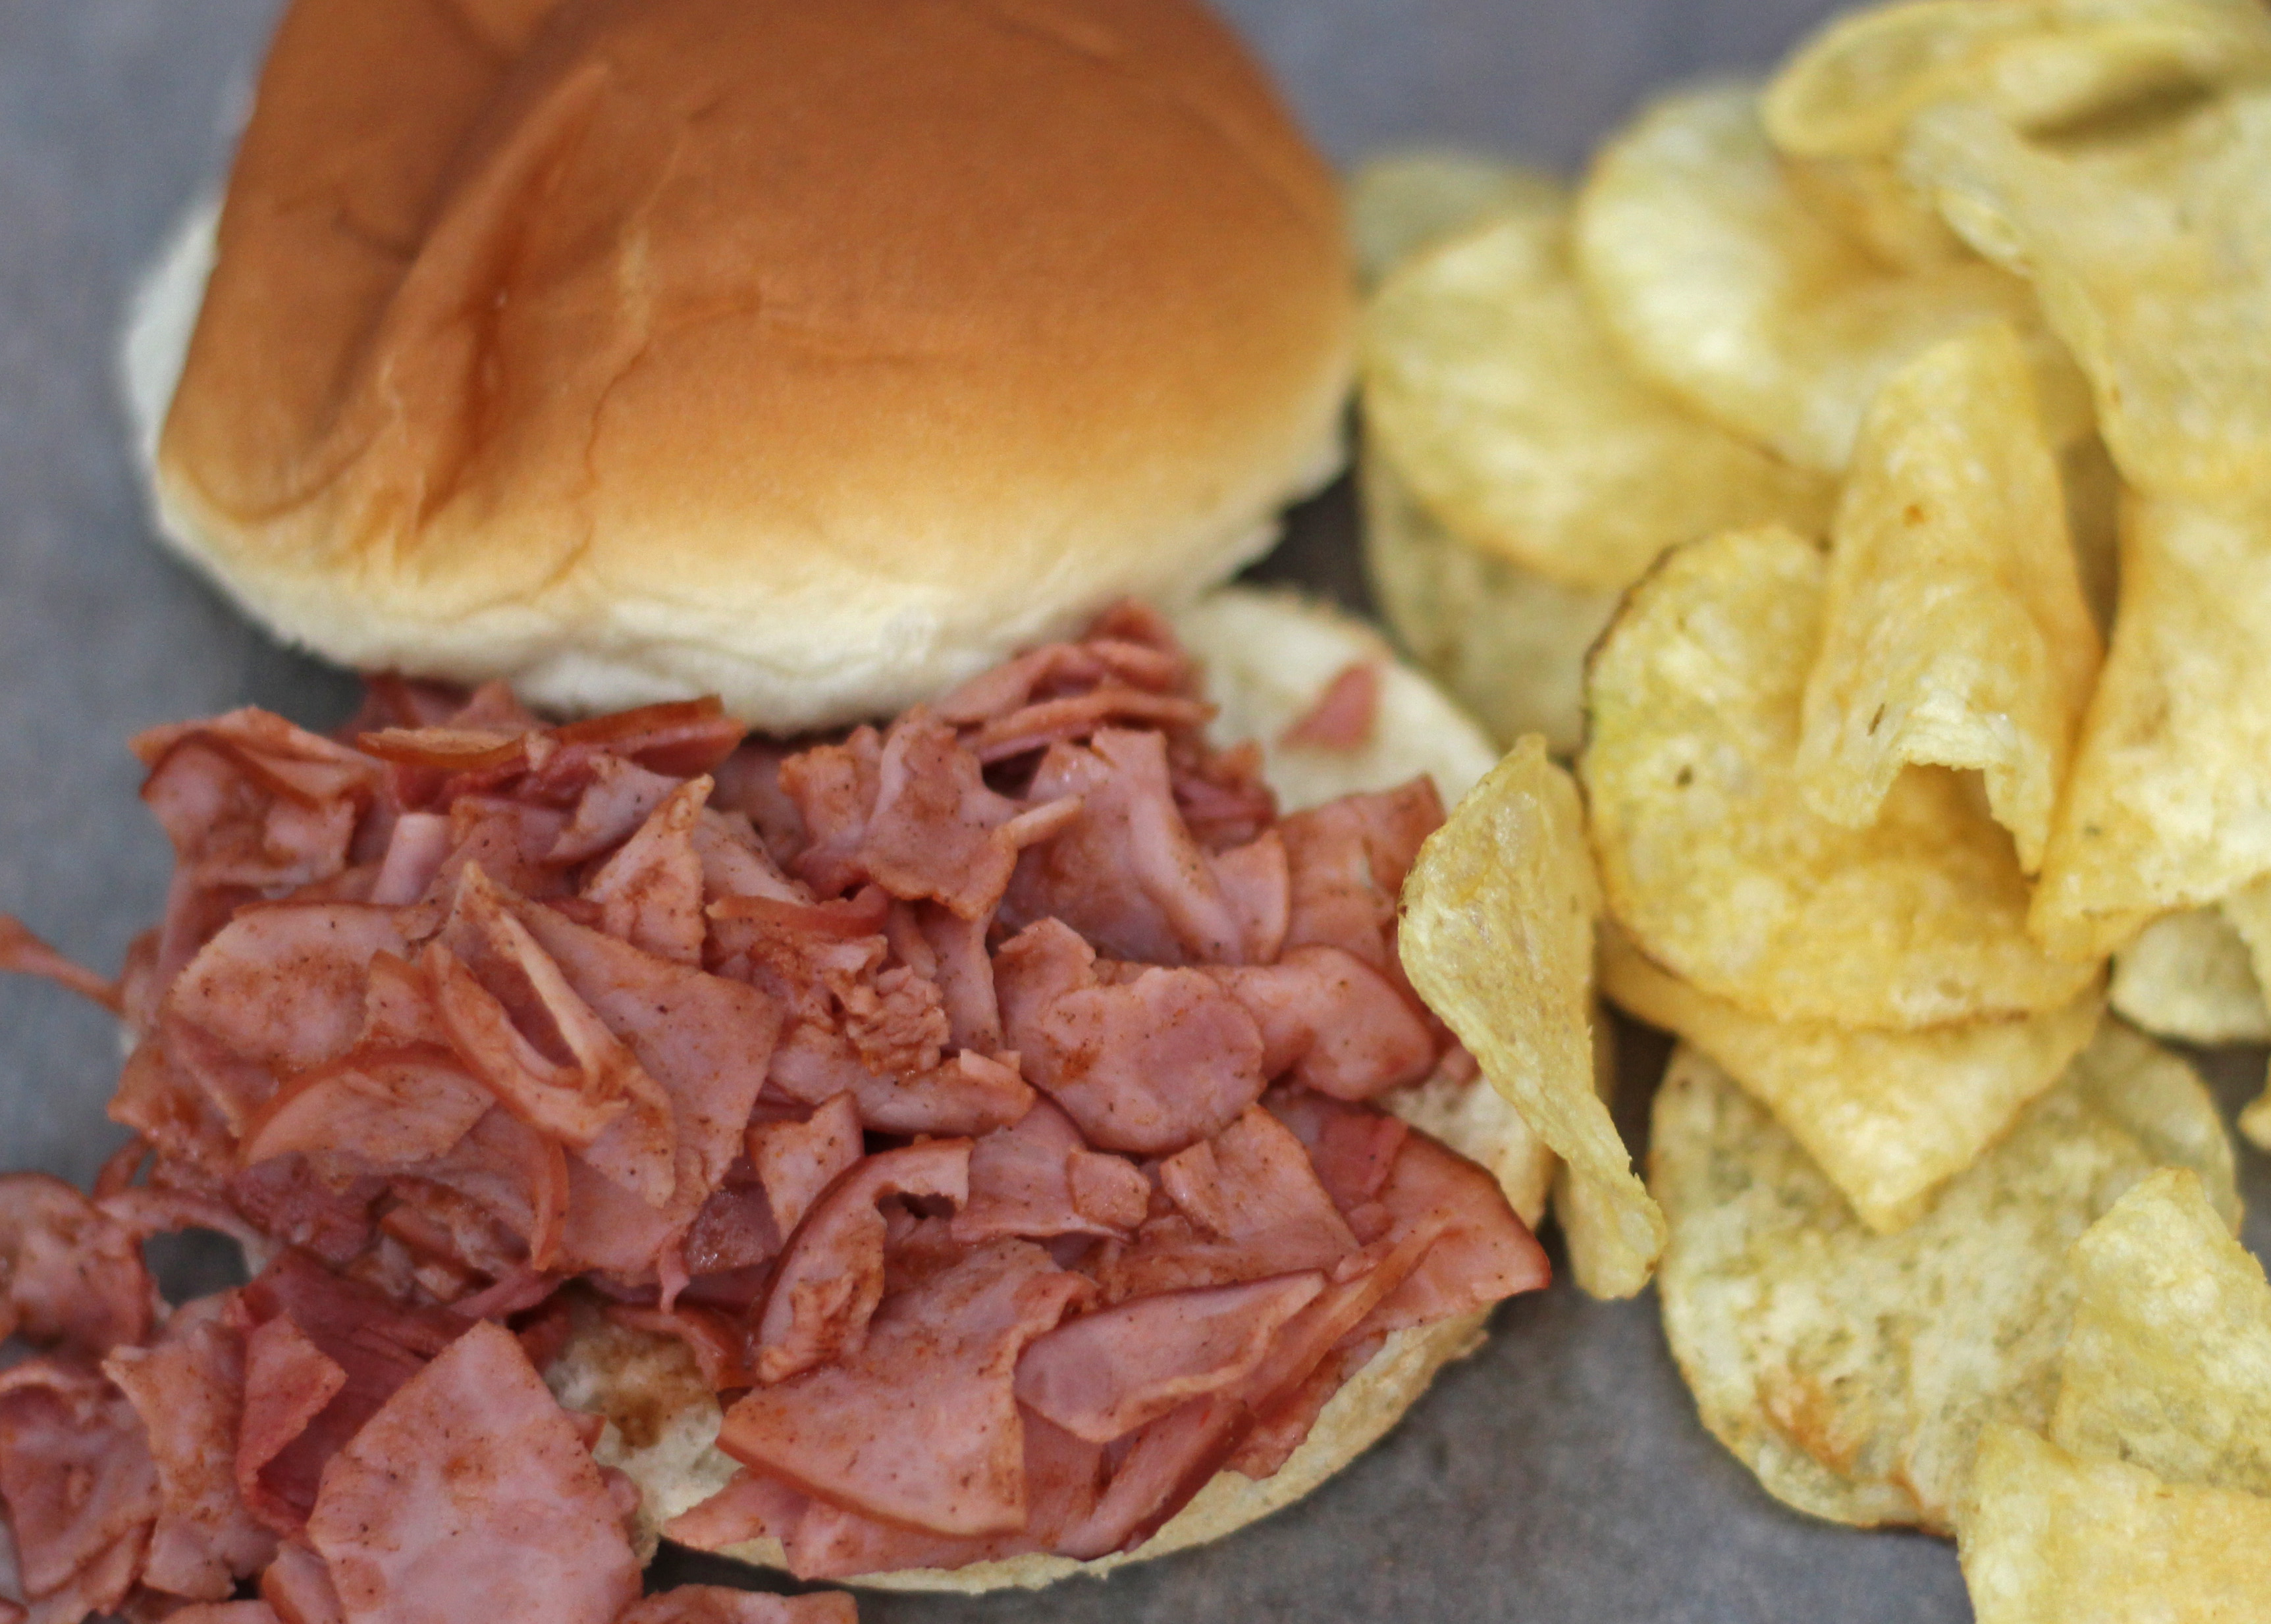
Though it wasn’t in the instructions, Aaron decided to cube the ham. Cubing it certainly made it easier to “stuff” the buns more and get more meat on the sandwiches. I highly recommend this extra step.

Pittsburgh Ham Sandwiches

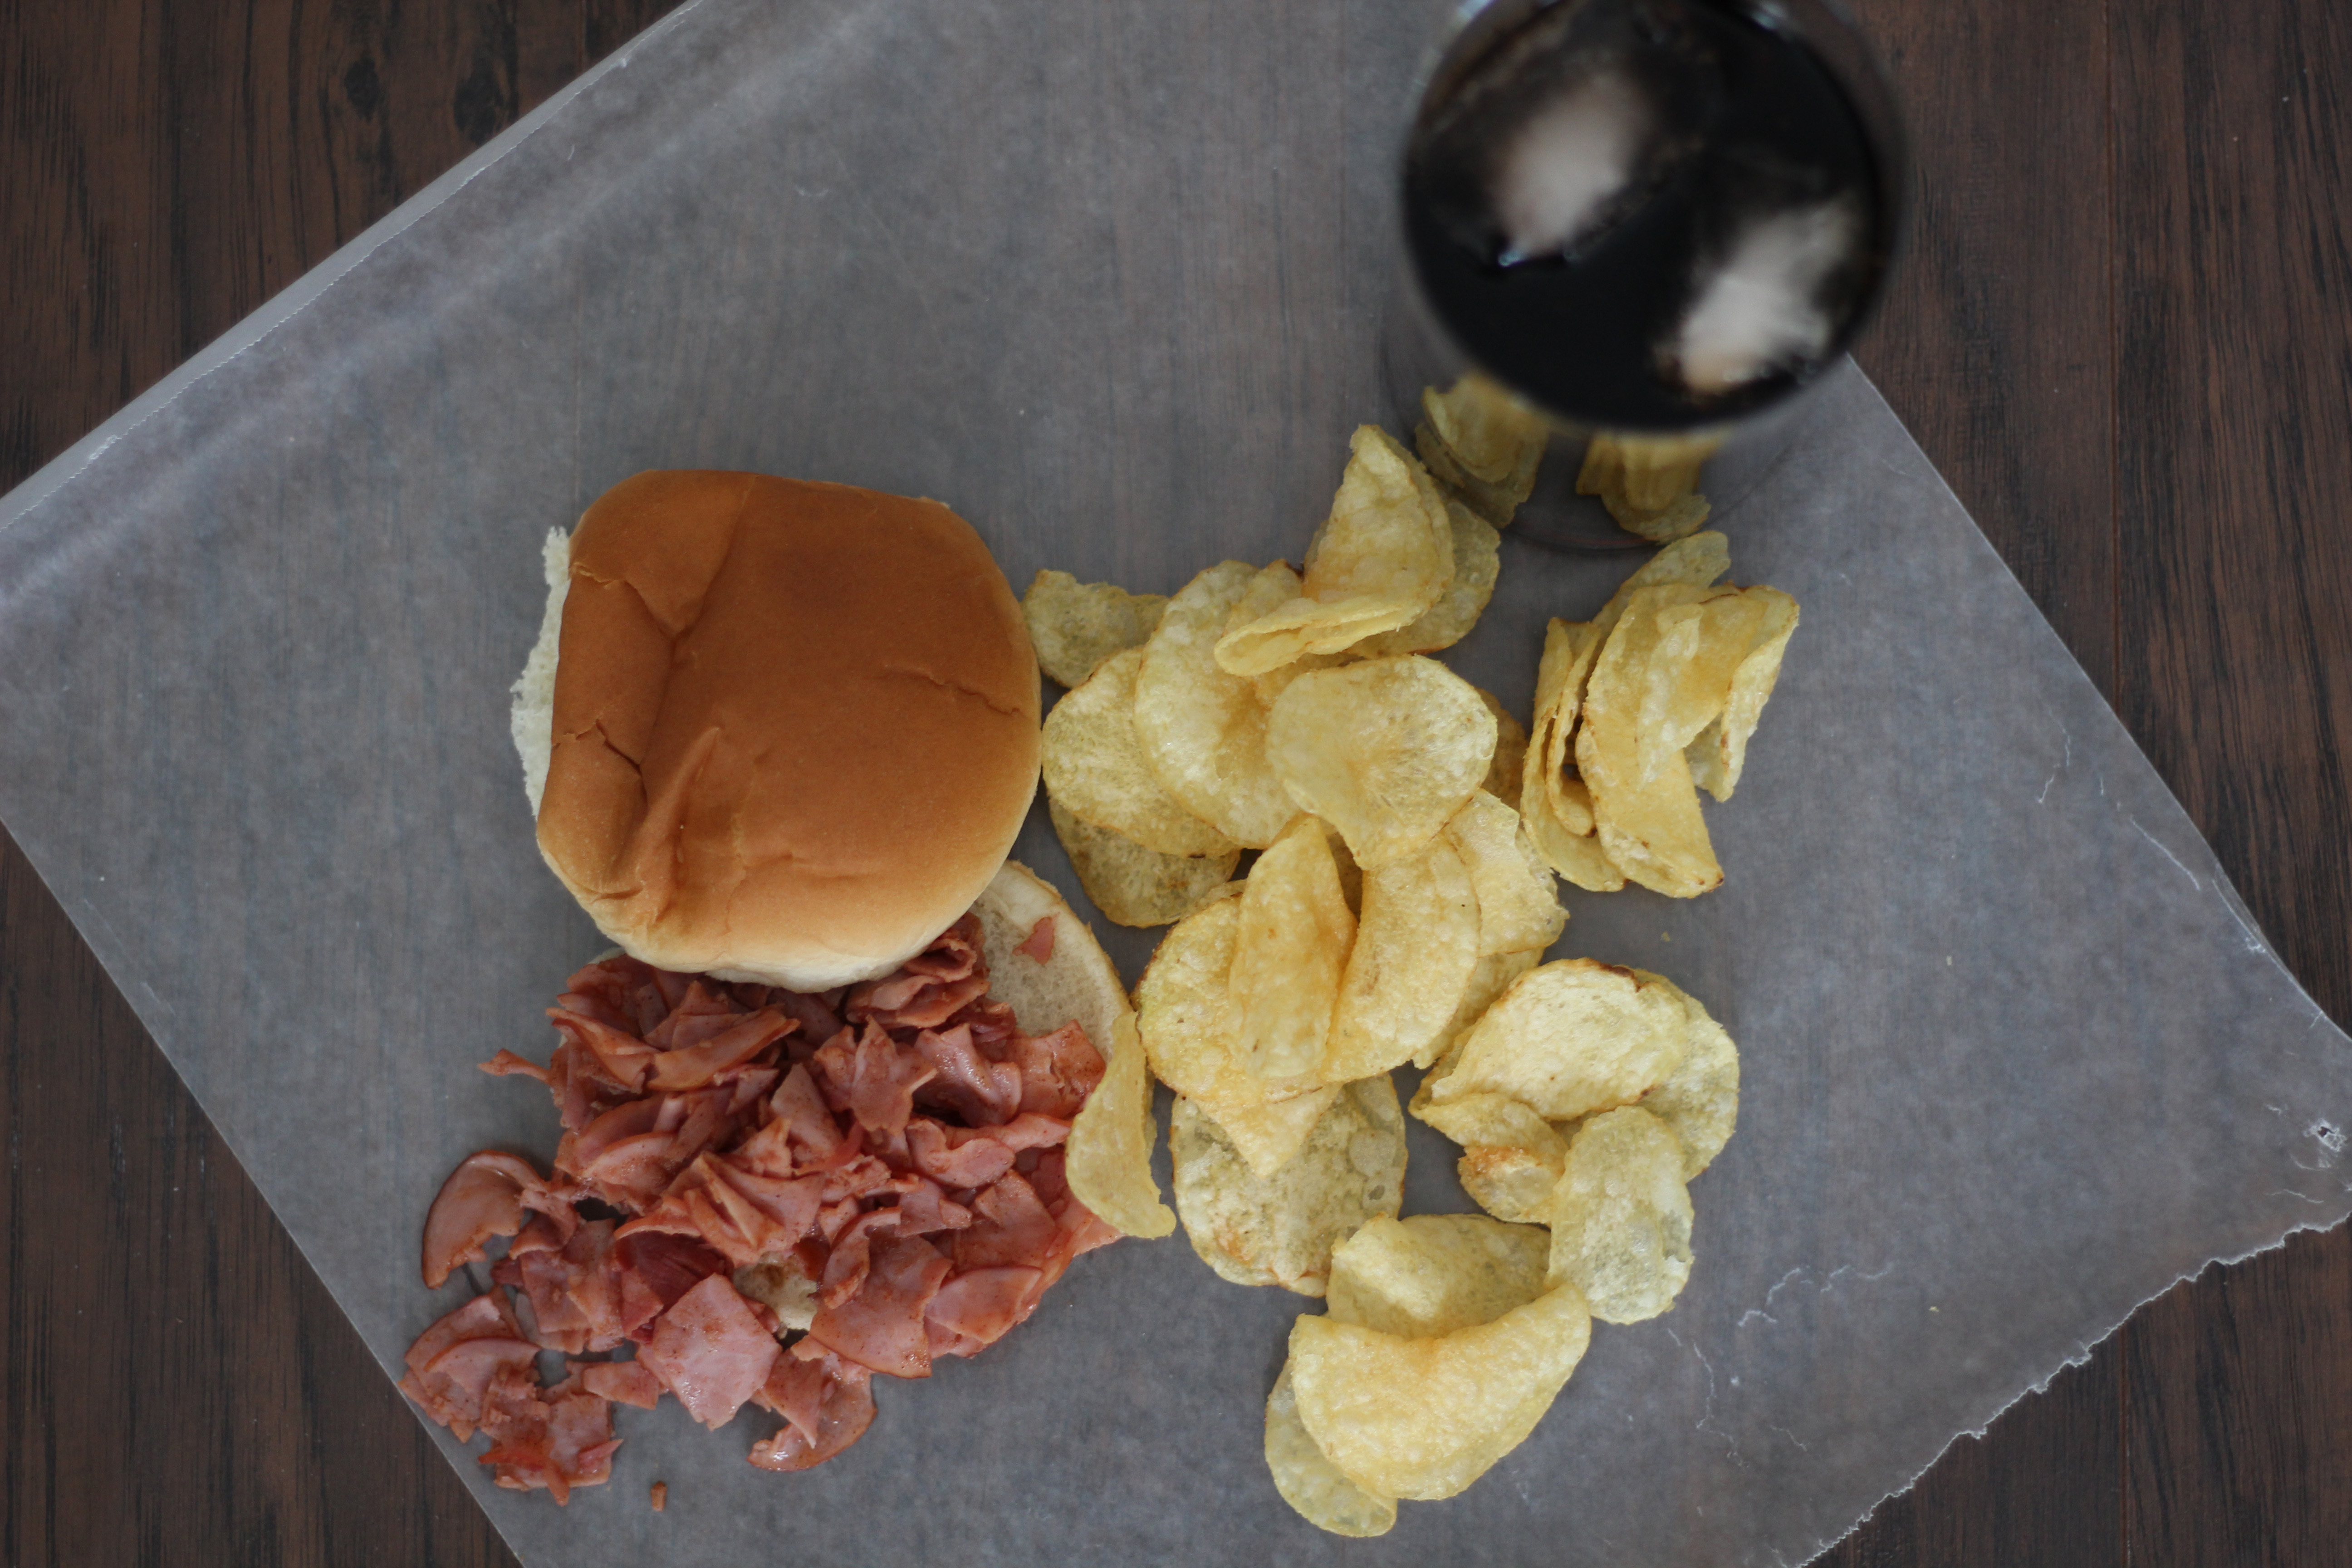
For as simple as the sauce recipe was, it certainly packed a lot of flavor. We we’re both huge fans of these ham barbecue sandwiches and we’re planning on making them frequently (and maybe ordering some chipped chopped ham from Pittsburgh.) Serving them with some potato chips and Pepsi was *muah*

Pittsburgh Ham Barbecue Sandwiches

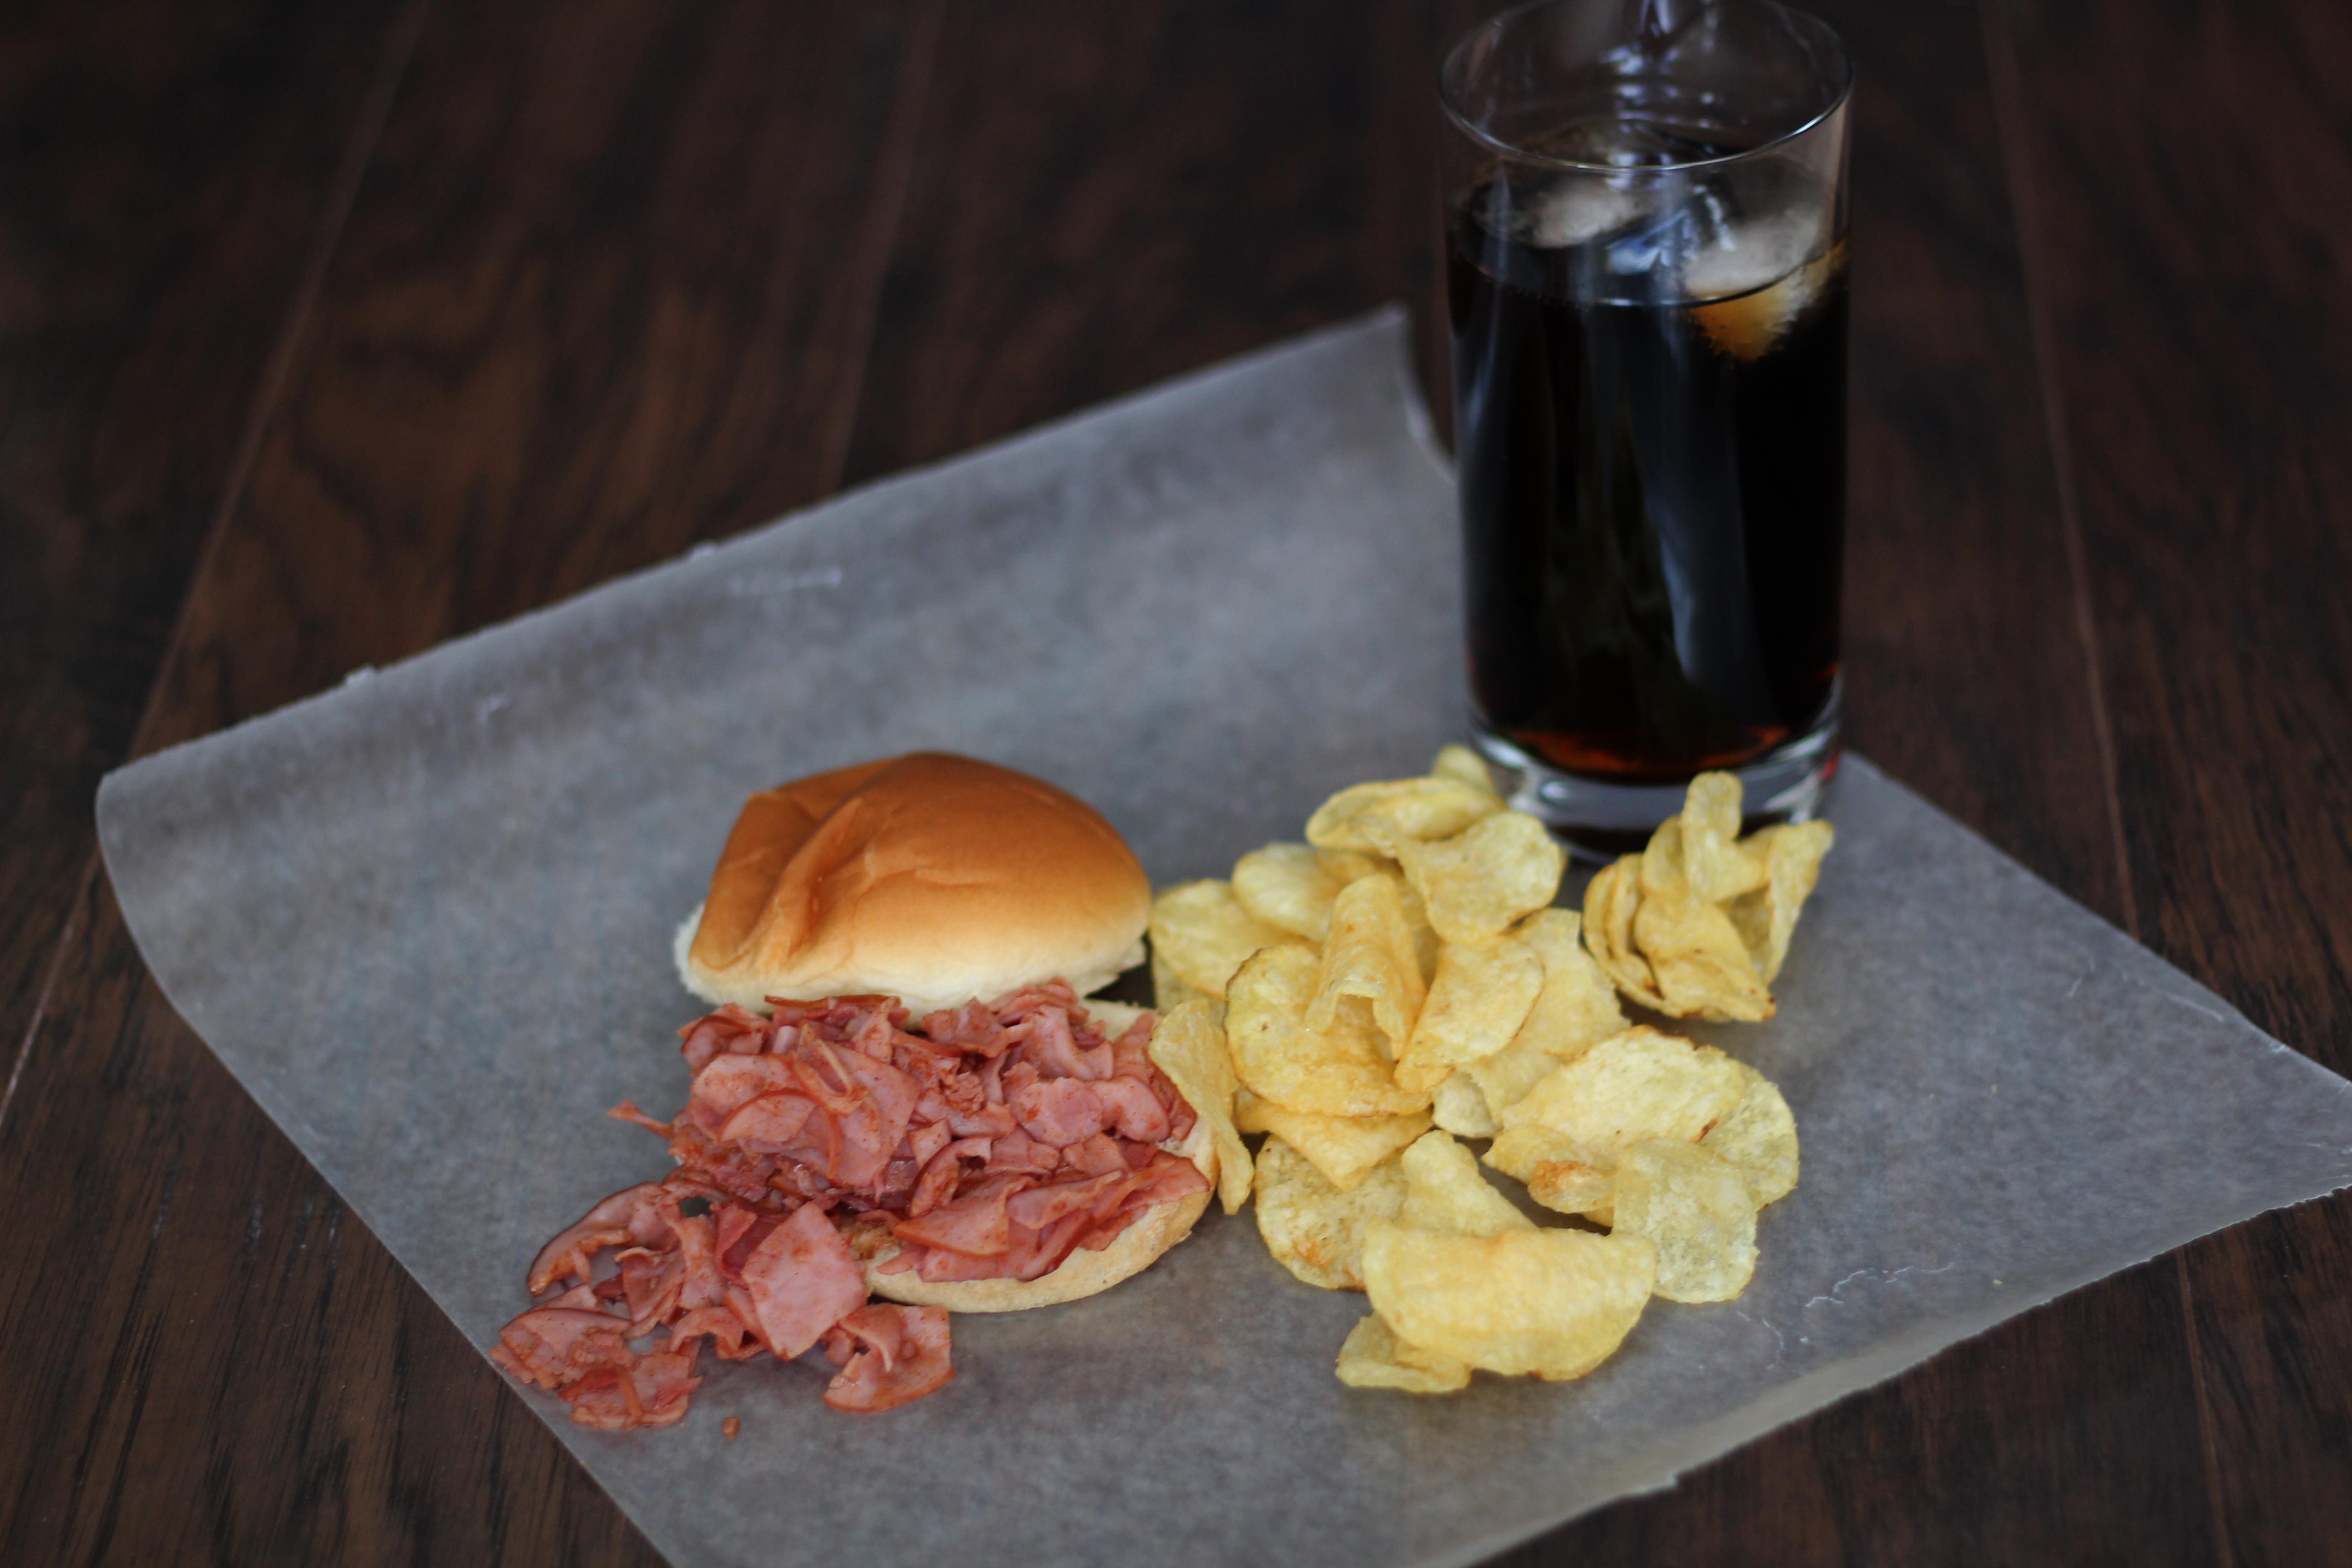
Her note about purchasing “good buns” for the sandwiches was ignored by us and boy was it a mistake. The barbecue sauce makes the buns beyond soggy. If you’re going to make this, get good buns. Also, it’s very important to use Heinz ketchup in the sauce. Again, it’s a Pittsburgh thing…

Pittsburgh Barbecue Sandwiches

If you’re outside of the Pittsburgh area and don’t want to ship chipped chopped ham in (I totally don’t blame you if you don’t) the regular, thin sliced ham you can pick up in the deli section worked just fine for us. Now go enjoy some ham n’at!


Pittsburgh Ham Barbecue Sandwiches
Print Recipe
  • CourseMain Dish
Servings Prep Time
8 sandwhiches 5 minutes
Cook Time
25 minutes
Servings Prep Time
8 sandwhiches 5 minutes
Cook Time
25 minutes
Pittsburgh Ham Barbecue Sandwiches
Print Recipe
  • CourseMain Dish
Servings Prep Time
8 sandwhiches 5 minutes
Cook Time
25 minutes
Servings Prep Time
8 sandwhiches 5 minutes
Cook Time
25 minutes
Ingredients
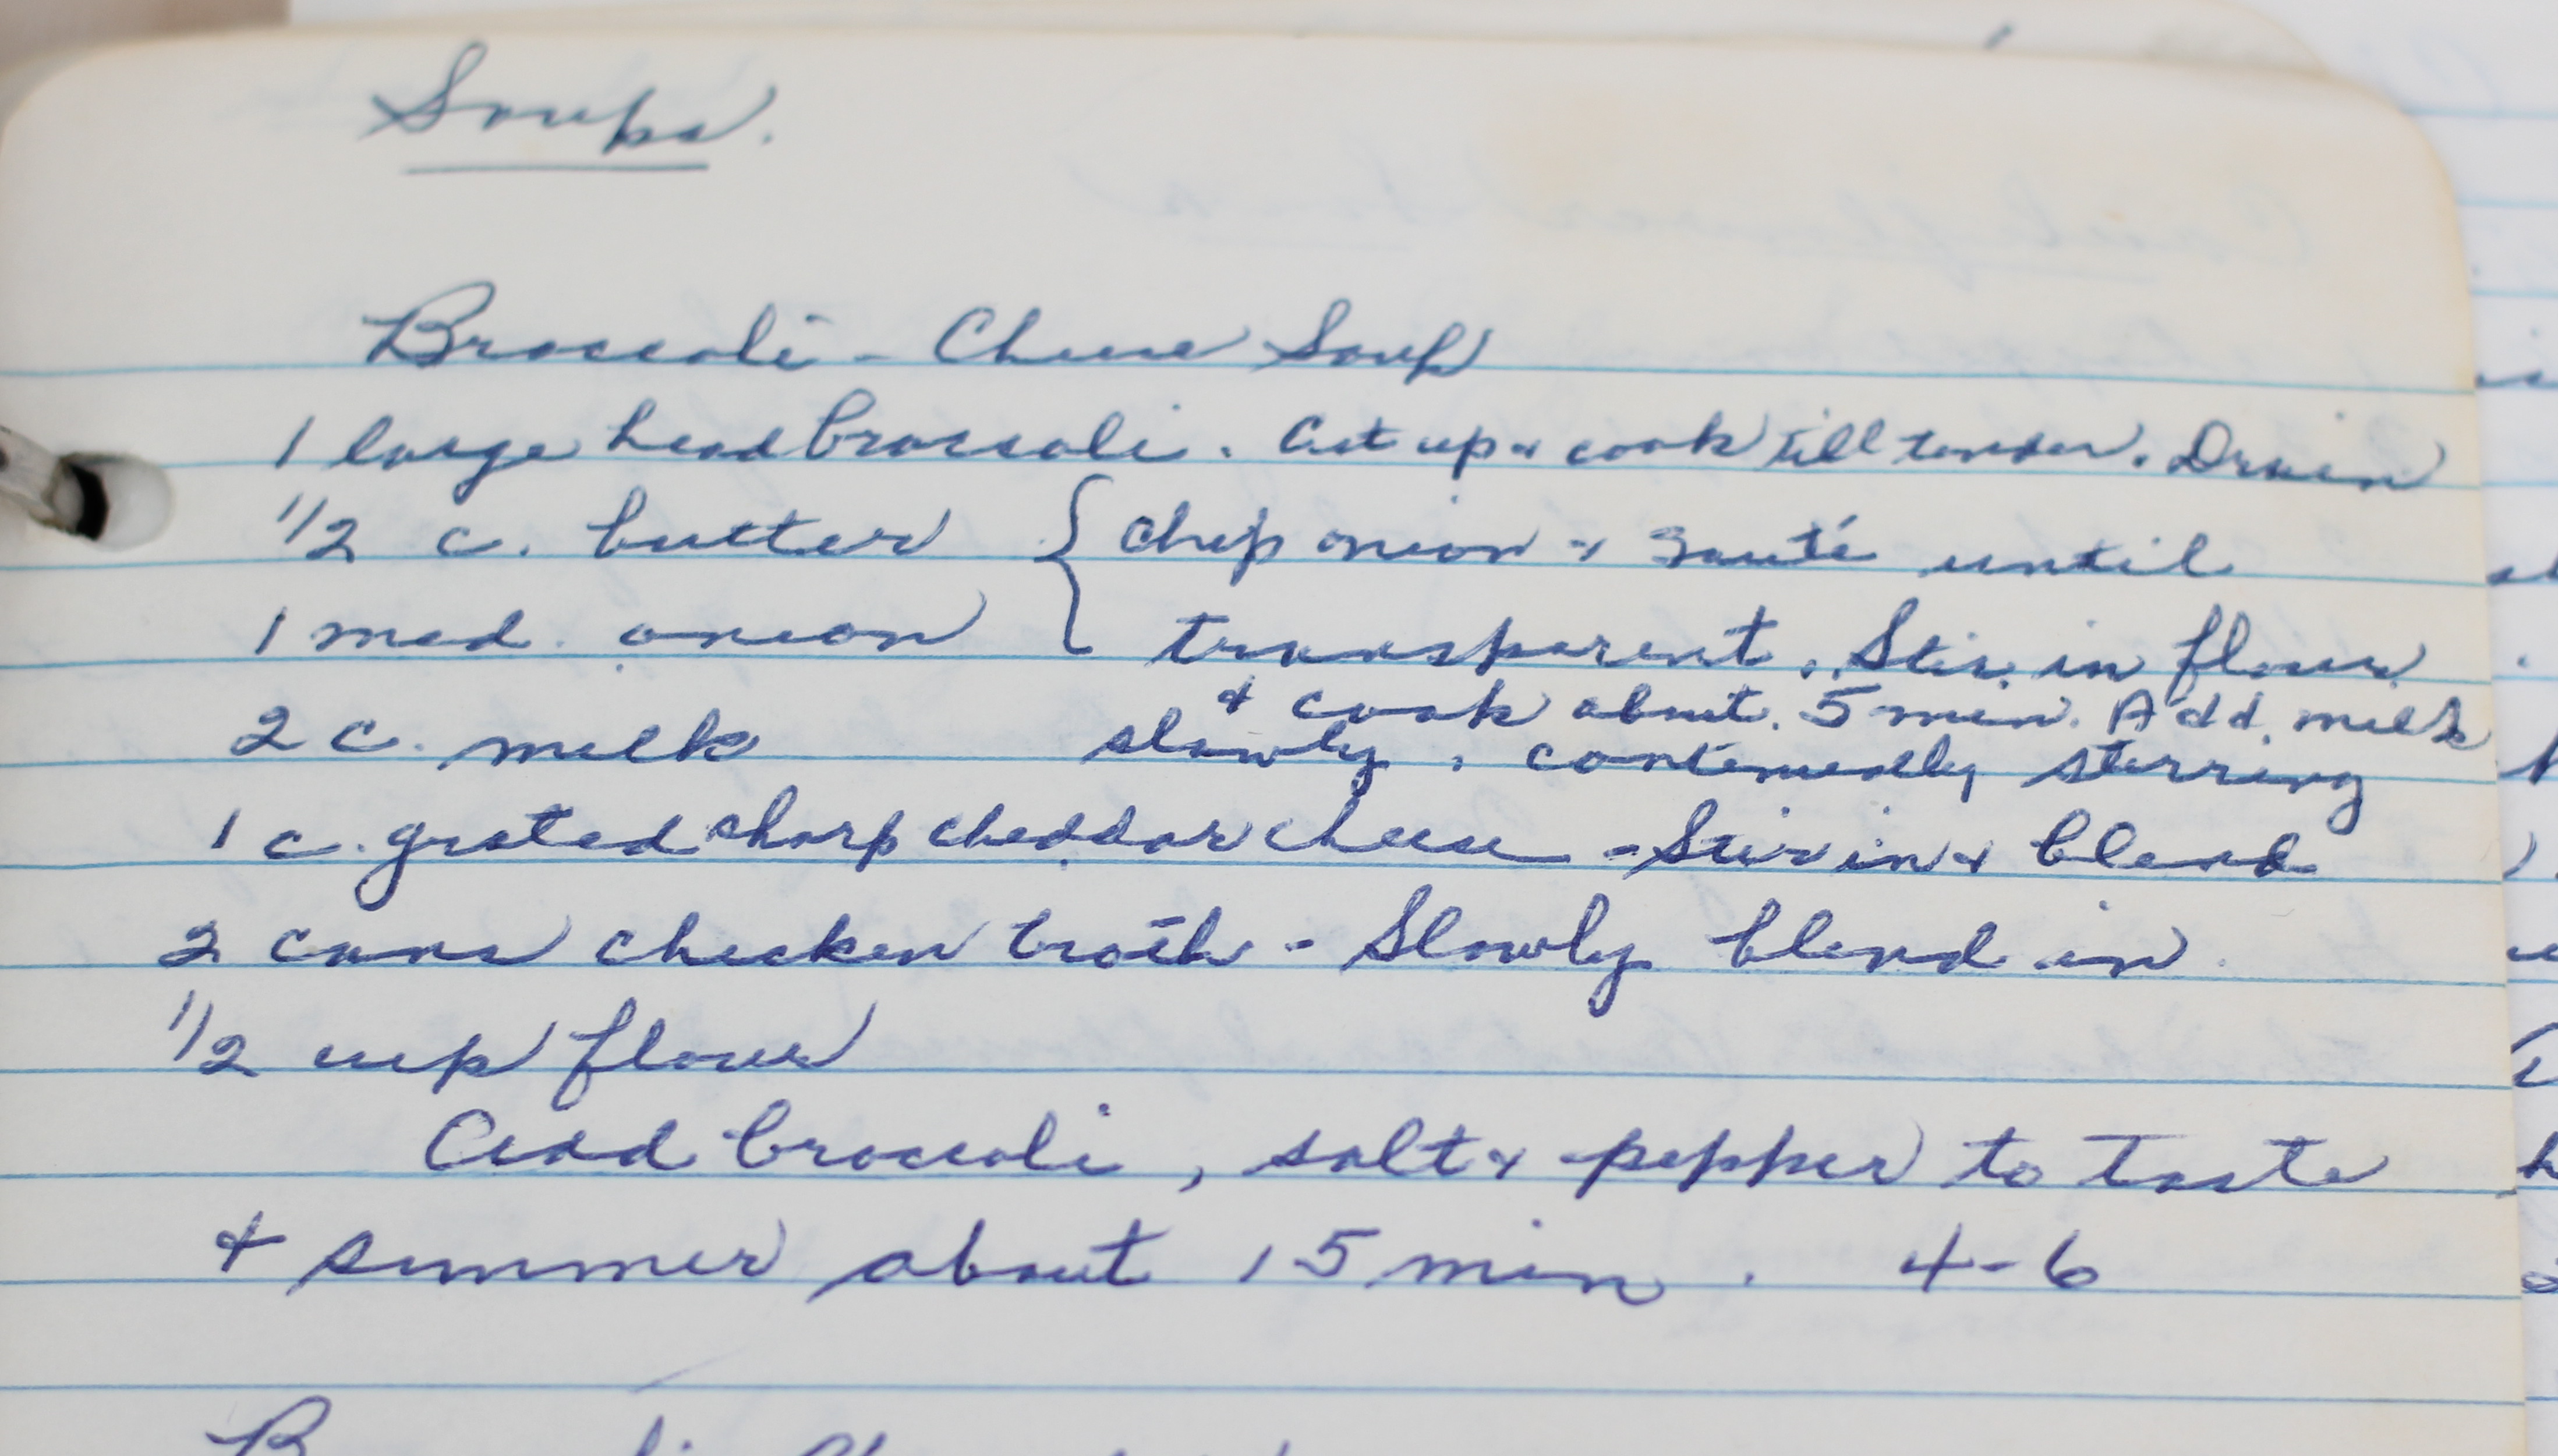
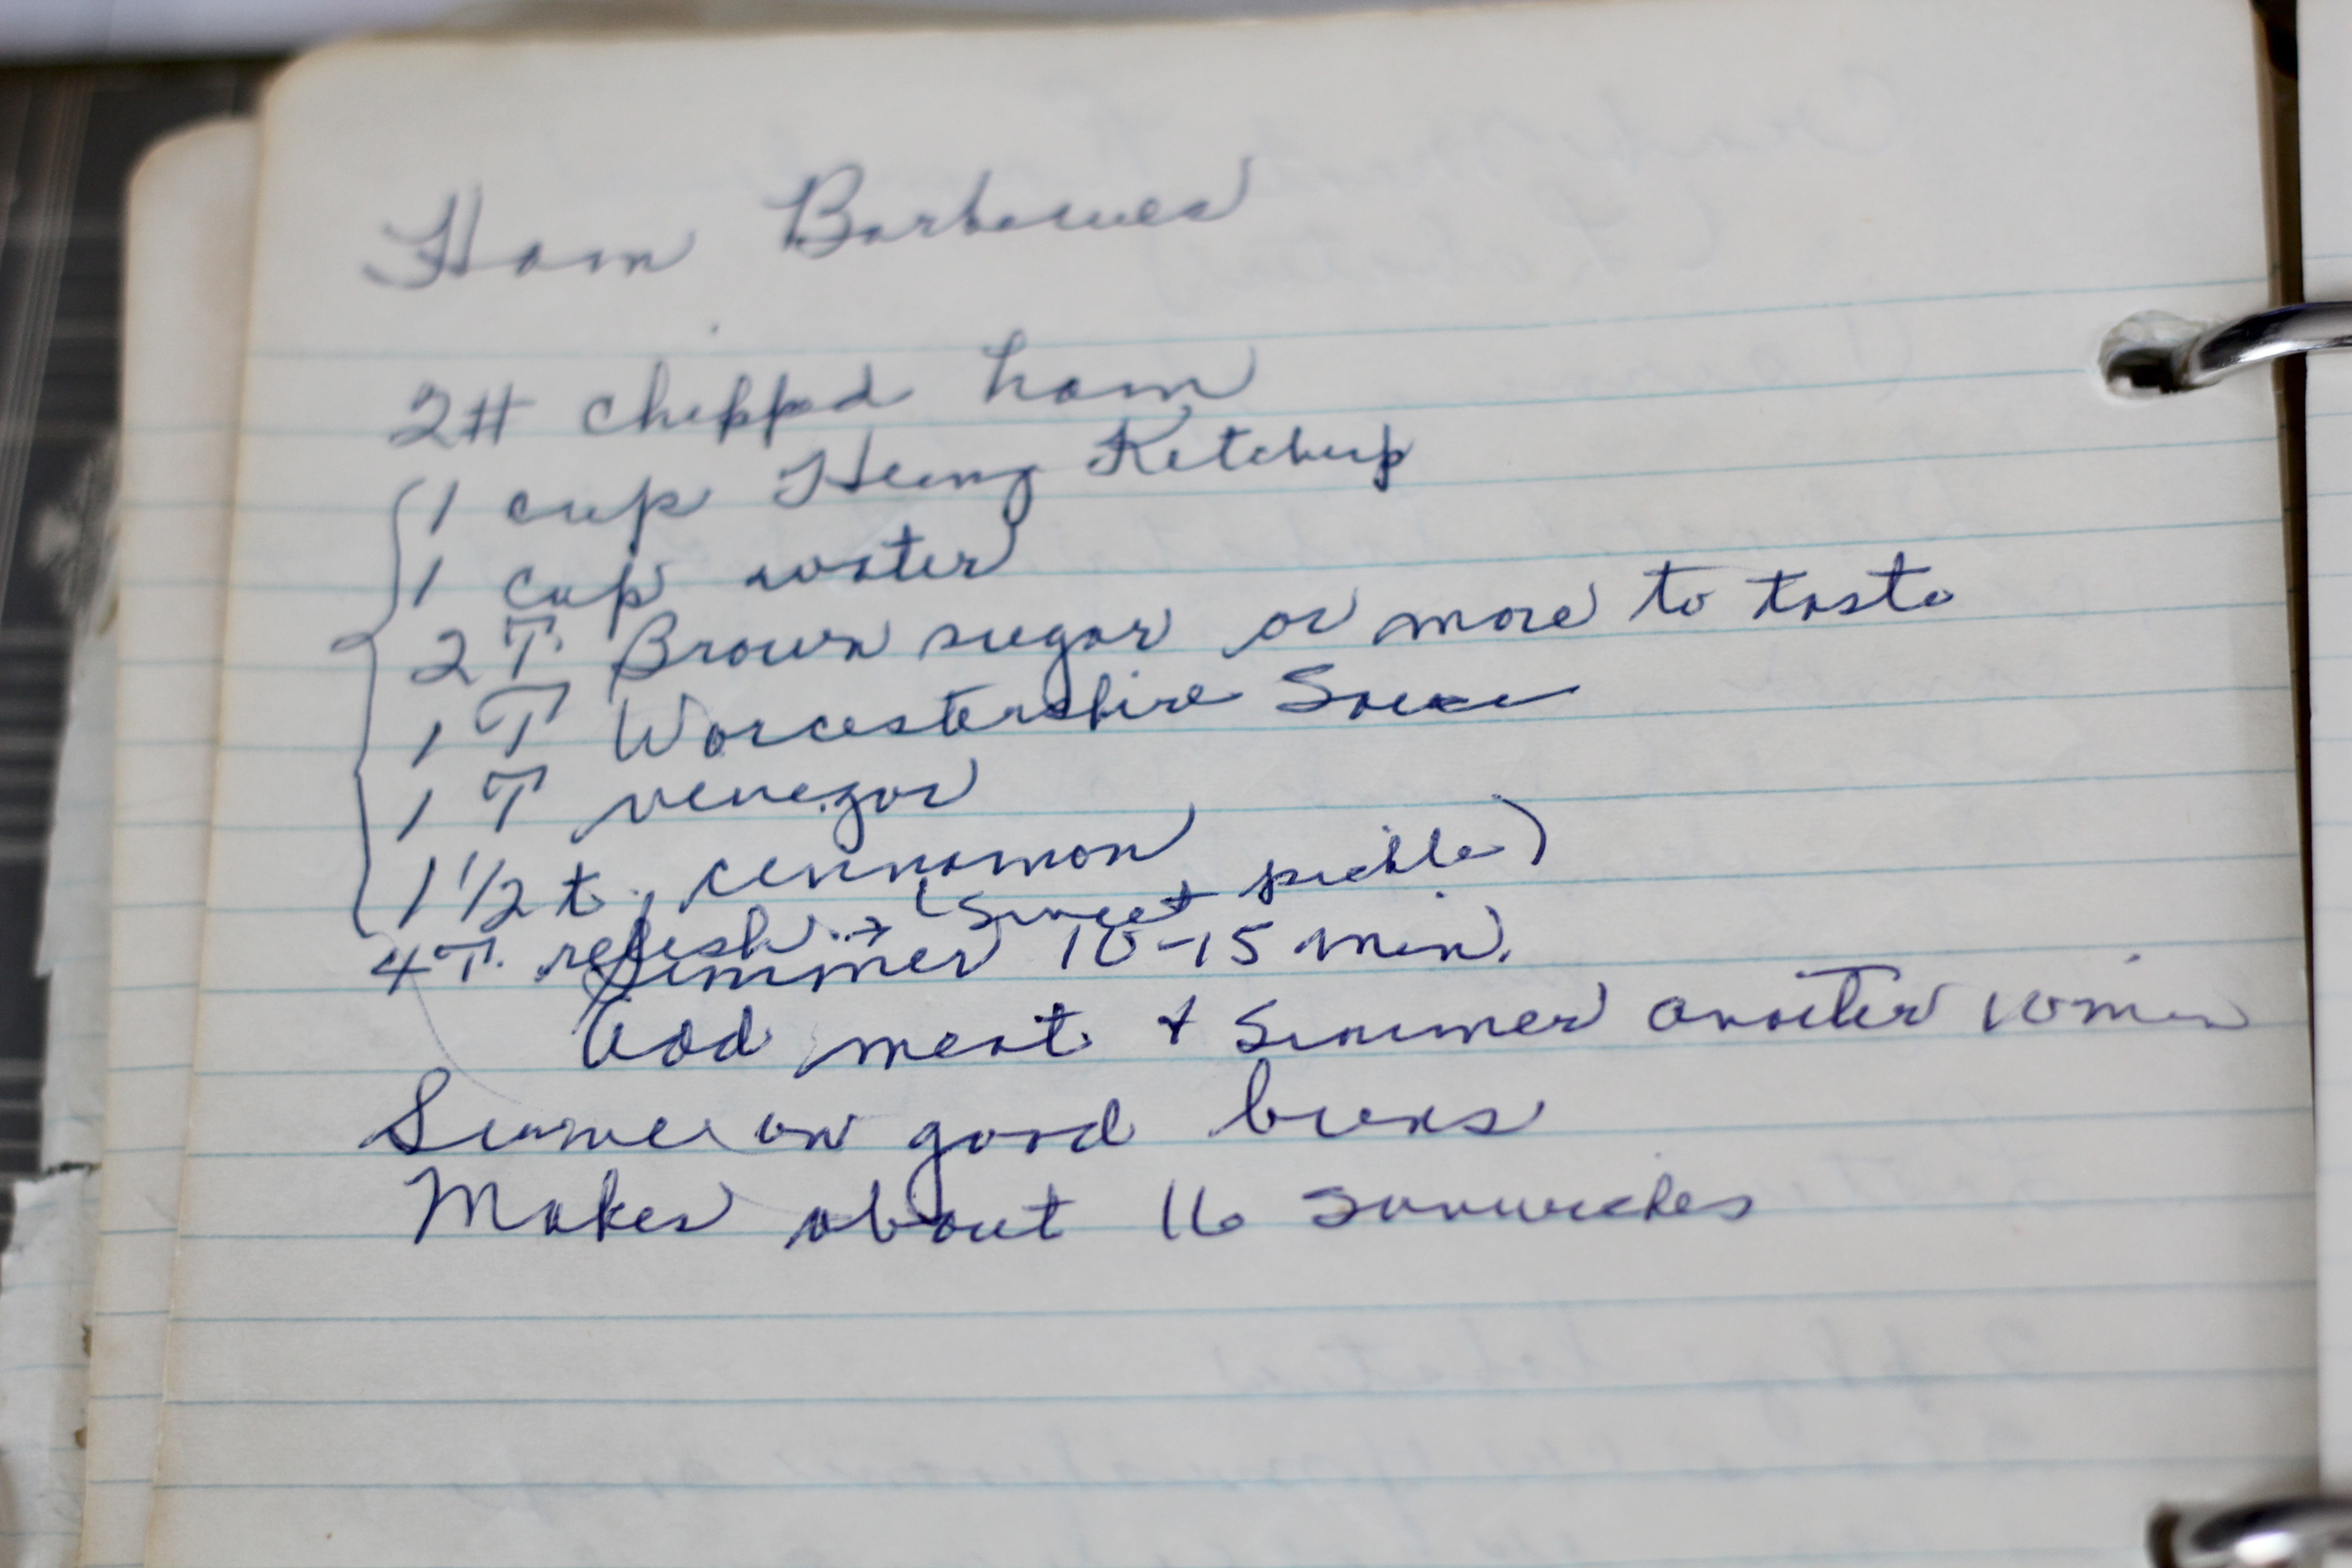
  • 1 lb chipped chopped ham
  • 1/2 cup Heinz Ketchup
  • 1/2 cup water
  • 1 tbsp brown sugar
  • 1/2 tbsp Worcestershire sauce
  • 1/2 tbsp vinegar
  • 3/4 tsp cinnamon
  • 8 sandwich buns
Servings: sandwhiches
Instructions
  1. Combine the ketchup, water, brown sugar, Worcestershire sauce, vinegar, and cinnamon.
  2. Put the barbecue mixture into a saucepan and simmer for 10-15 minutes.
  3. Add the meat and simmer another 10 minutes.
  4. Serve on sandwich buns.
Share this Recipe
 
Powered byWP Ultimate Recipe

April 23, 2016 by: Shannon and Aaron

Cheesecake Recipe

Cheesecakeheader

I love cheesecake. Aaron’s mom makes great cheesecake, so I lucked out marrying into a family of great cheesecake. That being said, I was really excited to try out Marguerite’s cheesecake recipe!

Cheesecake Recipe

Here is what Marguerite’s cheesecake recipe looks like:

Cheesecake Recipe

Preparing the ingredients for the crust was a very time consuming process! It took us a full thirty minutes to crush up regular whole graham crackers into crumbs small enough for the crust. We did want to try to make it exactly as Marguerite would, so we went through all that trouble. What we did find out, as you can see, is that 20 graham crackers made a very thick crust.

Cheesecake Recipe Piece

Even though the crust was thick, it was delicious! The addition of walnuts and cinnamon in the crust made for a delicious extra boost of flavor that really complemented the plain flavor of the cheesecake.

Cheesecake Recipe

My other favorite thing about cheesecake is having strawberries with it. So we made some sugared strawberries to go on top of our cheesecake. At that point I was itching to have some of this cheesecake. And let me tell you, I was not disappointed! It was simply delicious. Aaron really enjoyed it too (is there anything he doesn’t enjoy though?)

Cheesecake Recipe

Our first attempt at cheesecake did not come without some difficulties. The cheesecake cracked across the top, and parts of the sides browned a little more than other parts. We consulted with our cheesecake expert, Aaron’s mom, and she let us know what she thought happened. First of all, even though Marguerite’s instructions said so, Aaron’s mom thought it was a little too high of a temperature in the oven.  She would suggest a lower temperature for a longer length of time. She also thought we could have over beaten our batter, could have had some difficulties due to it being the inaugural run of our spring form pan, or it could have been due to using an electric oven instead of gas. Regardless, this cheesecake was delicious and we will be making it again, probably halving the crust so it’s not as thick. Hope you enjoy it too!

Cheesecake Recipe

Cheesecake Recipe
Print Recipe
  • CourseDesserts
Servings Prep Time
1 Cheesecake 45 minutes
Cook Time Passive Time
35 minutes 5 hours
Servings Prep Time
1 Cheesecake 45 minutes
Cook Time Passive Time
35 minutes 5 hours
Cheesecake Recipe
Print Recipe
  • CourseDesserts
Servings Prep Time
1 Cheesecake 45 minutes
Cook Time Passive Time
35 minutes 5 hours
Servings Prep Time
1 Cheesecake 45 minutes
Cook Time Passive Time
35 minutes 5 hours
Ingredients
Crust
  • 20 graham crackers crumbs
  • 1/4 cup chopped walnuts
  • 1/2 tsp cinnamon
  • 1/2 cup butter melted
Filling
  • 3 eggs
  • 2 8 oz packages cream cheese softened
  • 1 cup sugar
  • 1/4 tsp salt
  • 2 tsp vanilla
  • 3 cups sour cream
Servings: Cheesecake
Instructions
Crust
  1. Mix graham cracker crumbs, chopped walnut and cinnamon. Add melted butter.
  2. Press into spring form pan.
Filling
  1. Combine all the filling ingredients except the sour cream. Mix until smooth.
  2. Add sour cream.
  3. Pour into crust.
Baking Instructions
  1. Bake at 375 degrees for 35 minutes.
  2. Let cool in the oven with the door open for one hour.
  3. Chill for at least four to five hours.
Share this Recipe
 
Powered byWP Ultimate Recipe

April 16, 2016 by: Shannon and Aaron

Salmon Balls

Salmon Balls

Like I said a few posts ago, if there is food everyone likes some version of, it is probably potatoes. Baked, mashed, fried – you name it – they’re delicious. So any recipe with potatoes in it is bound to be good. The salmon balls were no exception.

Salmon Balls

Here is what Marguerite had to say:

Salmon Balls

The most difficult part of this recipe was definitely preparing the canned salmon. We had never worked with canned salmon before, and neither of us really enjoyed it. Getting the bits of skin and bones out was a long and messy process. Other than that, it was a pretty simple recipe with just a few ingredients.

Salmon Balls

As you can see, the salmon balls are not the largest. For that reason we feel that they are best served as appetizers before a meal. I really like salmon, it is one of my favorite fish. I thought the combination of salmon with breading tasted good, and like I said before, who doesn’t love potatoes in a dish? Aaron also enjoyed them, referring to them as “a simple version of crab cakes.” Next time we try these I would prefer to try and use fresh salmon, as we felt the canned salmon did not taste as good as fresh.

Salmon Balls

We hope the next time you are looking for an interesting yet simple party food or appetizer, you keep these salmon balls in mind!

Salmon Balls
Print Recipe
  • CourseAppetizers and Sides
Servings Prep Time
4-6 20 minutes
Cook Time
30 minutes
Servings Prep Time
4-6 20 minutes
Cook Time
30 minutes
Salmon Balls
Print Recipe
  • CourseAppetizers and Sides
Servings Prep Time
4-6 20 minutes
Cook Time
30 minutes
Servings Prep Time
4-6 20 minutes
Cook Time
30 minutes
Ingredients
  • 1 cup instant potatoes
  • 3/4 cup water
  • 7 3/4 oz canned salmon drained, boned, and flaked
  • 2 eggs
  • 1 tsp salt
  • 1/4 cup bread crumbs seasoned
Servings:
Instructions
  1. Boil the water and add the instant potatoes.
  2. After draining, boning, and flaking the salmon, combine with the two eggs and salt.
  3. Stir the salmon mixture into the instant potatoes until fluffy.
  4. Shape into 4-6 balls (they will be sticky.)
  5. Roll the balls in bread crumbs.
  6. Bake at 375 for 30 minutes.
Share this Recipe
 
Powered byWP Ultimate Recipe

April 9, 2016 by: Shannon and Aaron

Sesame Bread

*This post may contain affiliate links or sponsored content. While we always try to provide our readers with great content, occasionally we will work with sponsors when their brands and products mesh with what our blog is about and what our readers want. These affiliates help to keep the blog up and running.*

SesameBreadheader

There are a few things that Aaron and the rest of Marguerite’s family can remember as a constant during Sunday dinners. One of them was fresh Mancini’s bread and the other was Pillsbury crescent rolls. While Aaron doesn’t remember this exactly, the twist (pun intended) on the standard Pillsbury Crescents Rolls is a great change of pace.


Sesame Bread

Here is what Marguerite had to say:

SesameBread

Making these sesame bread twists was very simple. Some of the directions seemed strange, however. Neither of us had ever beaten an egg in a pie pan and then used the pie pan as prep space. For two still relatively unexperienced cooks, twisting the dough and rolling it through the egg was difficult. The beauty of sprinkling sesame seeds is that the randomness has a sort of perfection to it, so no need to be a master chef.

Sesame Bread

The one thing we had trouble with was the length of time we took to bake the sesame bread. Its unclear whether or not we baked them too long, which is likely, or that the issues had to do with the small and inexpensive electric oven we have. Either way, they turned out beautifully and were delicious to boot. Aaron liked them as well, and is eager to make them again sometime. We hope you enjoy them, too.

Sesame Bread


Sesame Bread
Print Recipe
  • CourseAppetizers and Sides
Servings Prep Time
12 Twists 20 minutes
Cook Time
10 minutes
Servings Prep Time
12 Twists 20 minutes
Cook Time
10 minutes
Sesame Bread
Print Recipe
  • CourseAppetizers and Sides
Servings Prep Time
12 Twists 20 minutes
Cook Time
10 minutes
Servings Prep Time
12 Twists 20 minutes
Cook Time
10 minutes
Ingredients
  • 1 pkg Pillsbury crescent rolls
  • 1 egg
  • 4 Tbsp sesame seeds
Servings: Twists
Instructions
  1. Preheat oven to 400 degrees.
  2. Beat egg slightly in pie pan.
  3. Unroll dough in four rectangles. Press two rectangles together.
  4. Cut into six strips lengthwise. Twist each strip. Repeat.
  5. Roll in egg, then in seeds on wax paper.
  6. Place 1 1/2 inches apart on greased cookie sheet.
  7. Bake 10 minutes or until golden brown.
Share this Recipe
 
Powered byWP Ultimate Recipe

April 2, 2016 by: Shannon and Aaron

Rice and Broccoli Casserole

Rice and Broccoli Casserole

Now I like broccoli, rice, and especially cheese as much as the next person, but I can’t say I particularly love them all mixed together. However, this rice and broccoli casserole was not a bad way to mix them.  This particular casserole was introduced to Marguerite by an elementary school colleague, Sylvia Camp.

ricecasserole

Here is what Marguerite’s cookbook had to say:

Casserole

As you can see, this rice and broccoli casserole is another extremely simple recipe which includes quite a few of the same ingredients that a lot of Marguerite’s recipes employed. Casseroles were a staple of hers. This must have made making any number of different recipes easy depending on what she had on hand.  Mixing all these “cream of” soups together went a little better for us than it did for our Chicken and Broccoli Casserole.

ricecasserole

Like I mentioned earlier, I am not a huge fan of casseroles. This one was just okay, in my opinion. Aaron also enjoys carbs and cheese, and at times only wishes to tolerate vegetables. He had this rice and broccoli casserole along with our protein of choice for a few meals, but he didn’t necessarily feel the urge to go up for seconds. For two people who, outside of Marguerite’s meals, were used to having a pile of vegetables next to a pile of starch, this was a clever change of pace. Aaron found some value in a casserole as a different way to prepare these accompanying food groups, and will likely want to try this again with some improvements.

ricecasserole

Rice and Broccoli Casserole
Print Recipe
  • CourseMain Dish
Prep Time
20 minutes
Cook Time
20 minutes
Prep Time
20 minutes
Cook Time
20 minutes
Rice and Broccoli Casserole
Print Recipe
  • CourseMain Dish
Prep Time
20 minutes
Cook Time
20 minutes
Prep Time
20 minutes
Cook Time
20 minutes
Ingredients
  • 2 packages broccoli cook as directed
  • 1 cup rice cook as directed
  • 1/2 cup chopped onion
  • 1 cup cream of mushroom soup
  • 1 cup cream of celery soup
  • 1 cup cheddar cheese soup
Servings:
Instructions
  1. Butter the bottom of a casserole dish.
  2. Put cooked rice in casserole dish.
  3. Sauté onions in butter until light brown.
  4. Mix the onions with the cooked and drained broccoli and the three different soups.
  5. Pour the mixture on top of the rice.
  6. Bake at 350 degrees for 20 minutes.
Share this Recipe
 
Powered byWP Ultimate Recipe

March 26, 2016 by: Shannon and Aaron

Peanut Butter Fudge

Peanut Butter Fudge

Aaron only has two weaknesses in the world: peanut butter and back scratches. While this blog can’t guarantee the latter, Marguerite’s Cookbook can come through when it comes to peanut butter. This light and airy peanut butter fudge recipe is a great change up from the typical fudge recipe, but more on that later.

Peanut Butter Fudge

This recipe is another guest post from one of Marguerite’s oldest friends. Florence Zieger was a fellow teacher, neighbor, and friend to Marguerite for years. They were the same age, and she lived to 97! Flo was another healthy and interesting woman, who drove, wore high heels regularly, and owned a business well into her nineties.  Here is what Flo had to say:

Peanut Butter Fudge

As with most of the recipes in Marguerite’s cookbook, there are very few empirical directions in the cooking and baking portion of the recipes. We gathered from the internet that around 2 & 1/2 minutes is the proper time to boil the sugar and milk. The only other change we made to the recipe was that we lined the pan with parchment paper instead of buttering the pan.

Peanut Butter Fudge

After making this recipe, Aaron wasn’t the only one loving peanut butter. I thought this peanut butter fudge was delicious!  It was light and airy, not heavy like most fudge recipes turn out. I found myself not being able to eat too much of it because it was so sweet. It was a huge hit with Aaron of course, and to keep him from eating it all, he took most of it into work. The fudge got rave reviews there as well. Looks like we will be making this one again soon!

Peanut Butter Fudge

Peanut Butter Fudge
Print Recipe
  • CourseDesserts
Servings Prep Time
1 9 x 13 pan 20 minutes
Passive Time
2 hours
Servings Prep Time
1 9 x 13 pan 20 minutes
Passive Time
2 hours
Peanut Butter Fudge
Print Recipe
  • CourseDesserts
Servings Prep Time
1 9 x 13 pan 20 minutes
Passive Time
2 hours
Servings Prep Time
1 9 x 13 pan 20 minutes
Passive Time
2 hours
Ingredients
  • 2 cups sugar
  • 2/3 cup milk
  • 1 tsp vanilla
  • 1 cup peanut butter
  • 7 oz marshmallow cream OR 1 container
Servings: 9 x 13 pan
Instructions
  1. Combine sugar and milk and bring to a boil over medium heat. Boil for two and a half minutes while stirring constantly. Remove from heat.
  2. Add vanilla, peanut butter, and marshmallow cream.
  3. Beat until creamy.
  4. Pour into pan.
  5. Refrigerate. Cut when cool.
Share this Recipe
 
Powered byWP Ultimate Recipe

March 19, 2016 by: Shannon and Aaron

Stuffed French Toast

Stuffed French Toast


I am not a fan of breakfast food. Ron Swanson, if he were a real person and not a character, would not like me. I generally find breakfast food to be way too heavy to consume that early in the morning and it makes me feel all kinds of sluggish. However, this stuffed french toast might inspire me to make an exception to my dislike of breakfast food.

Stuffed French Toast

Here is what Marguerite had to say:

Stuffed French Toast

It is very convenient that Marguerite wrote the dipping mixture in simple amounts so they can be multiplied for each serving you’re making.  While crushing the corn flakes was a little tedious, this whole recipe was simple to make.  Putting the layers of bread, cream cheese, jam, and corn flakes together took almost no time at all and then it was time for a delicious breakfast!

Stuffed French Toast

And a delicious breakfast it was!  Delicious and sweet, although sweet does not even begin to describe this stuffed french toast recipe. Seriously, it was like eating cake for breakfast.  I really enjoyed that the flavors of the french toast, the sweetness of the cream cheese and the jam, and the crunch of the corn flakes mixed together so well.

Stuffed French Toast

Aaron also really liked the stuffed french toast.  While he also thought they were sweet and were a nice combination of flavors, he enjoys sweet things more than I do.  He gobbled them up with his coffee and was very content afterwards.  If you would prefer a more simple french toast, you could just go for the plain dipped kind, it’s good on its own too!  Happy Breakfast-ing!

Stuffed French Toast

Stuffed French Toast
Print Recipe
Servings Prep Time
1 (2 slices of bread per serving) 10 minutes
Cook Time
10 minutes
Servings Prep Time
1 (2 slices of bread per serving) 10 minutes
Cook Time
10 minutes
Stuffed French Toast
Print Recipe
Servings Prep Time
1 (2 slices of bread per serving) 10 minutes
Cook Time
10 minutes
Servings Prep Time
1 (2 slices of bread per serving) 10 minutes
Cook Time
10 minutes
Ingredients
  • 2 slices bread Texas Toast for thicker French Toast
  • 1 egg
  • 1/6 cup cream
  • 1/8 tsp vanilla
  • 1 tsp sugar heaping tsp
  • Philadelphia Cream Cheese soft
  • Jam any flavor you'd like
  • cornflakes crushed
Servings: (2 slices of bread per serving)
Instructions
  1. Whisk egg, cream, vanilla, and sugar together to make dip mixture.
  2. Spread cream cheese on one slice of bread. Add Jam. Close Sandwich.
  3. Dip in mixture.
  4. Cover with crushed cornflakes.
  5. Put 1 Tbsp of butter on griddle. Put Sandwich on low heat. Brown and turn.
Share this Recipe
 
Powered byWP Ultimate Recipe

March 12, 2016 by: Shannon and Aaron

Broccoli Cheese Soup

Broccoli Cheddar Soup

We’re in what looks like our last week of winter weather here in Chicago, and nothing quite shakes off those winter blues like a hot bowl of Broccoli Cheese soup. There’s just something comforting about the look of a nice big bowl of soup, isn’t there?

Broccoli Cheddar Soup

Aaron enjoys when Marguerite’s recipes have the instructions jammed on the right half of the page alongside the list of ingredients. It is so unlike the typical recipe format and that unique style seems distinctly “Marguerite” to him. Here is what she had to say this time:

BroccoliCheeseSoupRecipe

Another characteristic of some of Marguerite’s recipes is that they are usually only as detailed as she needed to remember how they went. We often have to read the entire recipe at least once through to make sure we don’t come upon any surprises. In this recipe, we noticed it made the most sense to sauté the onion in the big pot to begin with. This soup was so creamy, cheesy, and very easy to make. I’m not a huge fan of creamy soups, but I really liked this one.

broccoli cheese soup

Aaron felt it was a little too thin in consistency and would have liked more of a cheesy flavor. I think next time we try this, we’ll add more than just cheddar to really make it cheesy.

Broccoli Cheddar Soup

We hope you enjoy the creamy and cheesy goodness of this very simple soup!

Broccoli Cheese Soup
Print Recipe
  • CourseAppetizers and Sides
Servings Prep Time
4-6 30 minutes
Cook Time
15 minutes
Servings Prep Time
4-6 30 minutes
Cook Time
15 minutes
Broccoli Cheese Soup
Print Recipe
  • CourseAppetizers and Sides
Servings Prep Time
4-6 30 minutes
Cook Time
15 minutes
Servings Prep Time
4-6 30 minutes
Cook Time
15 minutes
Ingredients
  • 1 large head broccoli
  • 1/2 cup butter
  • 1 medium onion
  • 2 cups milk
  • 1 cup grated sharp cheddar cheese
  • 2 cans chicken broth
  • 1/2 cup flour
  • salt and pepper to taste
Servings:
Instructions
  1. Cut up and cook broccoli until tender. Drain.
  2. Chop onion and saute in butter until transparent. (You will want to do this in the pot your soup will end up in.)
  3. Stir in flour and cook about five minutes.
  4. Add milk slowly, stirring continuously.
  5. Stir in and blend grated cheese.
  6. Slowly blend in chicken broth.
  7. Add broccoli and salt and pepper.
  8. Simmer about 15 minutes.
Share this Recipe
 
Powered byWP Ultimate Recipe

March 5, 2016 by: Shannon and Aaron

Grilled Flounder

Grilled Flounder

This is a great flounder recipe that can be either baked or grilled. We choose to do a baked version of this recipe, but it can be made on a Foreman or a regular grill.

Grilled Flounder

Here is what Marguerite had to say:

Grilled Flounder

One of the best parts of this grilled flounder recipe is how few ingredients it takes to make the sauce. Simplicity is always a plus for us. Aaron was surprised that cocktail sauce plus mustard equaled barbecue flavor, however he hates flounder. He wants to try it again on another white fish. I want to try it again on a grill.

Grilled Flounder

This grilled flounder has a nice, tangy consistency to it. It’s the perfect flavor for a summer meal and definitely one we’ll try again as the weather warms up.

Grilled Flounder

Grilled Flounder
Print Recipe
  • CourseMain Dish
Servings Prep Time
4 4 oz 10 minutes
Cook Time
20 minutes
Servings Prep Time
4 4 oz 10 minutes
Cook Time
20 minutes
Grilled Flounder
Print Recipe
  • CourseMain Dish
Servings Prep Time
4 4 oz 10 minutes
Cook Time
20 minutes
Servings Prep Time
4 4 oz 10 minutes
Cook Time
20 minutes
Ingredients
  • 3 Tbsp cocktail sauce
  • 3 Tbsp water
  • 1 tsp lemon juice
  • 1/2 tsp prepared mustard
  • 2 tsp minced onion
  • 1/4 tsp salt
  • 1 pound flounder
Servings: 4 oz
Instructions
  1. Lay fish in baking dish.
  2. Mix other ingredients and spread on fish.
  3. Bake 20 minutes at 450 degrees.
Share this Recipe
 
Powered byWP Ultimate Recipe

February 27, 2016 by: Shannon and Aaron

Ham Cheese Strata

Ham and Cheese Strata

When we started this recipe, neither of us really knew what to expect.  But, I thought, “Bread and cheese and warm, maybe it’ll be like grilled cheese and I’ll love it!”  That’s not quite how it turned out, and since I love a good grilled cheese sandwich, was a little disappointed.

Ham and Cheese Strata

We really couldn’t discern a lot of details about what this recipe had in store for us from just what Marguerite wrote.  Take a look for yourself:

Original Ham and Cheese

It really started to make sense when Aaron called his mother to ask her opinion about part of the recipe.  After getting our question answered, Aaron asked her if she remembered having it.  She did remember.  Although not well, she did recall it tasting like and reminding her of quiche.  Of course, soaking the whole thing in an egg mixture, it does start to make sense as a breakfast dish once it is pointed out to you.  Upon further research, it turns out that the Strata is a layered casserole dish, whose most common modern variation is a brunch dish similar to a quiche or frittata!

Ham and Cheese Strata

I was not a fan, although I couldn’t tell you why exactly.  However, Aaron loves breakfast foods, and was pleasantly surprised that this dish tasted quiche-like.  He actually heated it up almost every morning the week we made it and had some for breakfast.  A few improvements he would make:

  • More Meat: The recipe had no instruction on the amount of ham to put in.  Aaron put in less than one pound and found it to be a pitiful amount, so we have suggested two pounds in the recipe
  • More Cheese: Because, why not?  But really, it lacked overall in cheesy-ness as well.

Ham and Cheese Strata

Aaron’s mom also told us this was a dish Marguerite would often prepare the night before an let saturate overnight (as the recipe suggests.)  All in all, this is a simple dish to make that you can prepare the night before, and then pop in the oven in the morning before the kiddos (or your husband or wife) wake up.  Enjoy!

Ham Cheese Strata
Print Recipe
Servings Prep Time
6-12 10 minutes
Cook Time Passive Time
1 hour 2-8 hours
Servings Prep Time
6-12 10 minutes
Cook Time Passive Time
1 hour 2-8 hours
Ham Cheese Strata
Print Recipe
Servings Prep Time
6-12 10 minutes
Cook Time Passive Time
1 hour 2-8 hours
Servings Prep Time
6-12 10 minutes
Cook Time Passive Time
1 hour 2-8 hours
Ingredients
  • 12 slices bread with or without crusts (your choice)
  • 6 slices American cheese
  • 2 lbs ham diced
  • dried minced onion
  • 5 eggs slightly beaten
  • 3 1/4 cups milk
  • 1/2 tsp salt
  • dash pepper
Servings:
Instructions
  1. Arrange six slices of bread in a 9 x 13 pan.
  2. Cover with slices of American cheese.
  3. Scatter diced ham over each slice.
  4. Sprinkle a little dried minced onion over each slice.
  5. Cover with six more slices of bread.
  6. Mix slightly beaten eggs with milk. Add salt and pepper. Pour over sandwiches.
  7. Refrigerate at least two hours or even overnight.
  8. Bake 1 hour at 350 degrees. Let set 10 minutes before serving.
Share this Recipe
 
Powered byWP Ultimate Recipe
  • « Previous Page
  • 1
  • …
  • 3
  • 4
  • 5
  • 6
  • Next Page »

Hey There!

We're Aaron and Shannon, the cooks behind Marguerite’s Cookbook. We are a husband and wife cooking/blogging team who love food, fun, and family.

Give us a follow

Twitter

Sign up for our monthly newsletter and receive exclusive content from us in your inbox once a month.

  • Policies
  • Contact

© 2025 · Fun Genesis WordPress Theme by, Pretty Darn Cute Design