Marguerites Cookbook

A cooking blog all about making vintage recipes from a cookbook we inherited from our grandmother

  • Home
  • Recipes
    • Main Dishes
    • Appetizers and Sides
    • Desserts
    • Breakfast
  • About
  • Contact

July 16, 2016 by: Shannon and Aaron

Cherry Parfait Pie

Cherry Parfait Pie Header

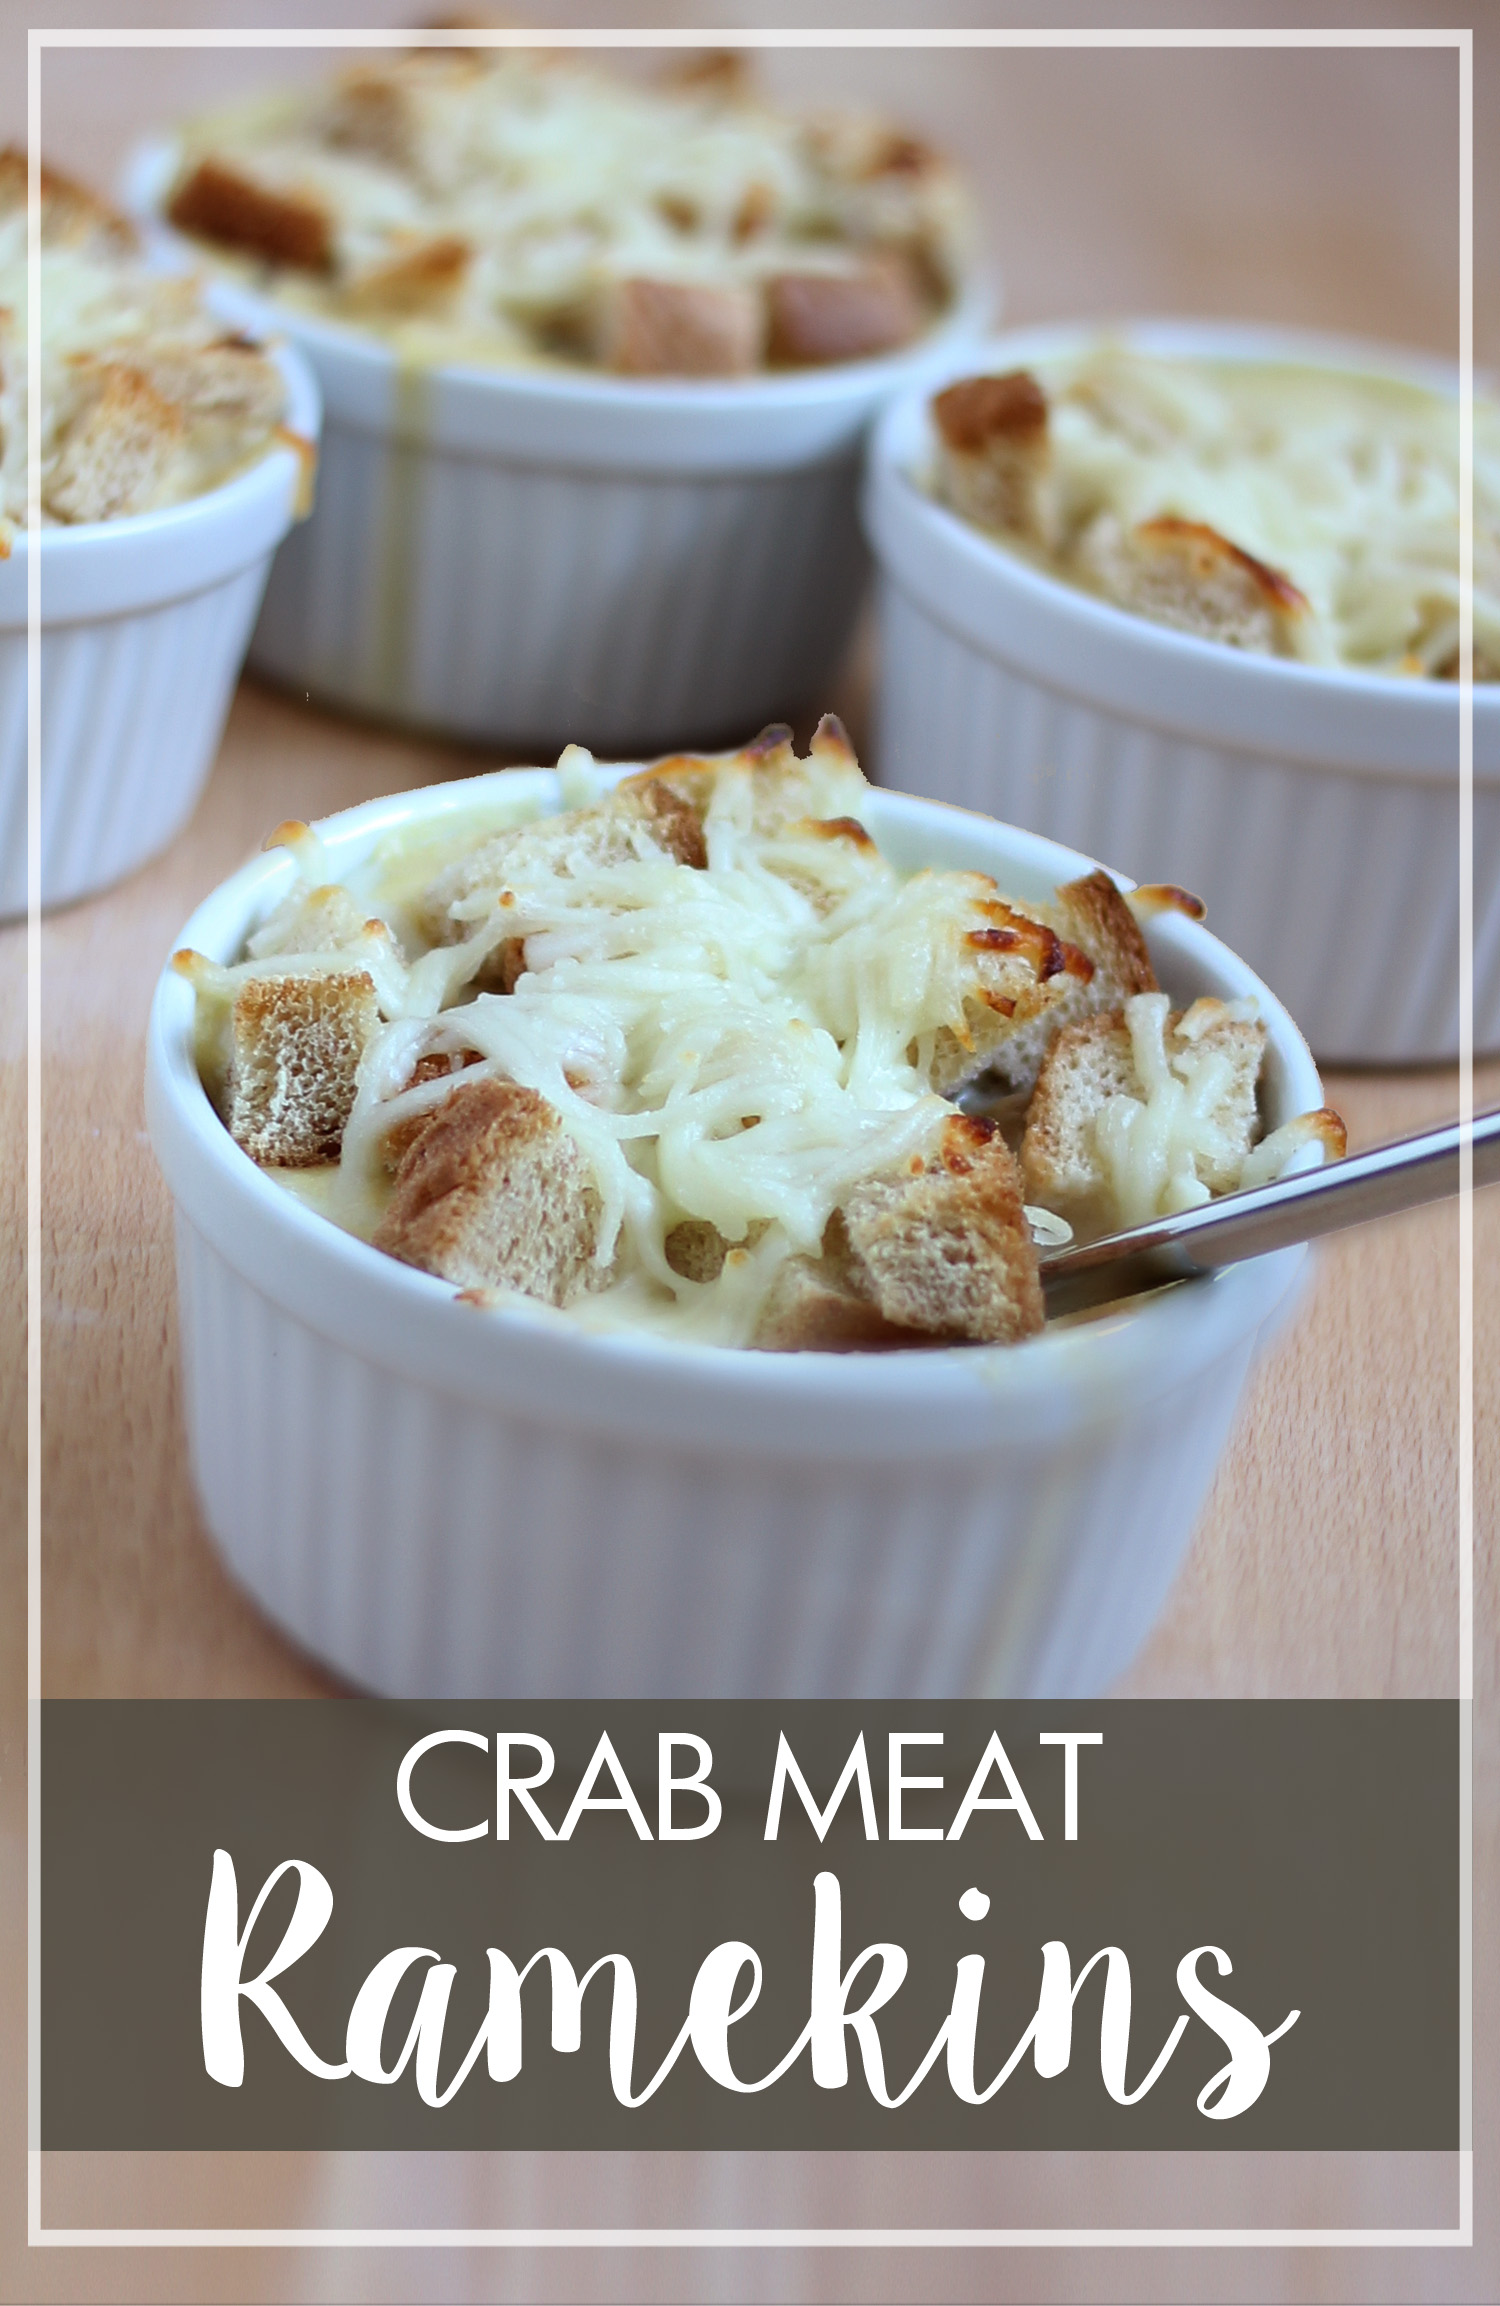
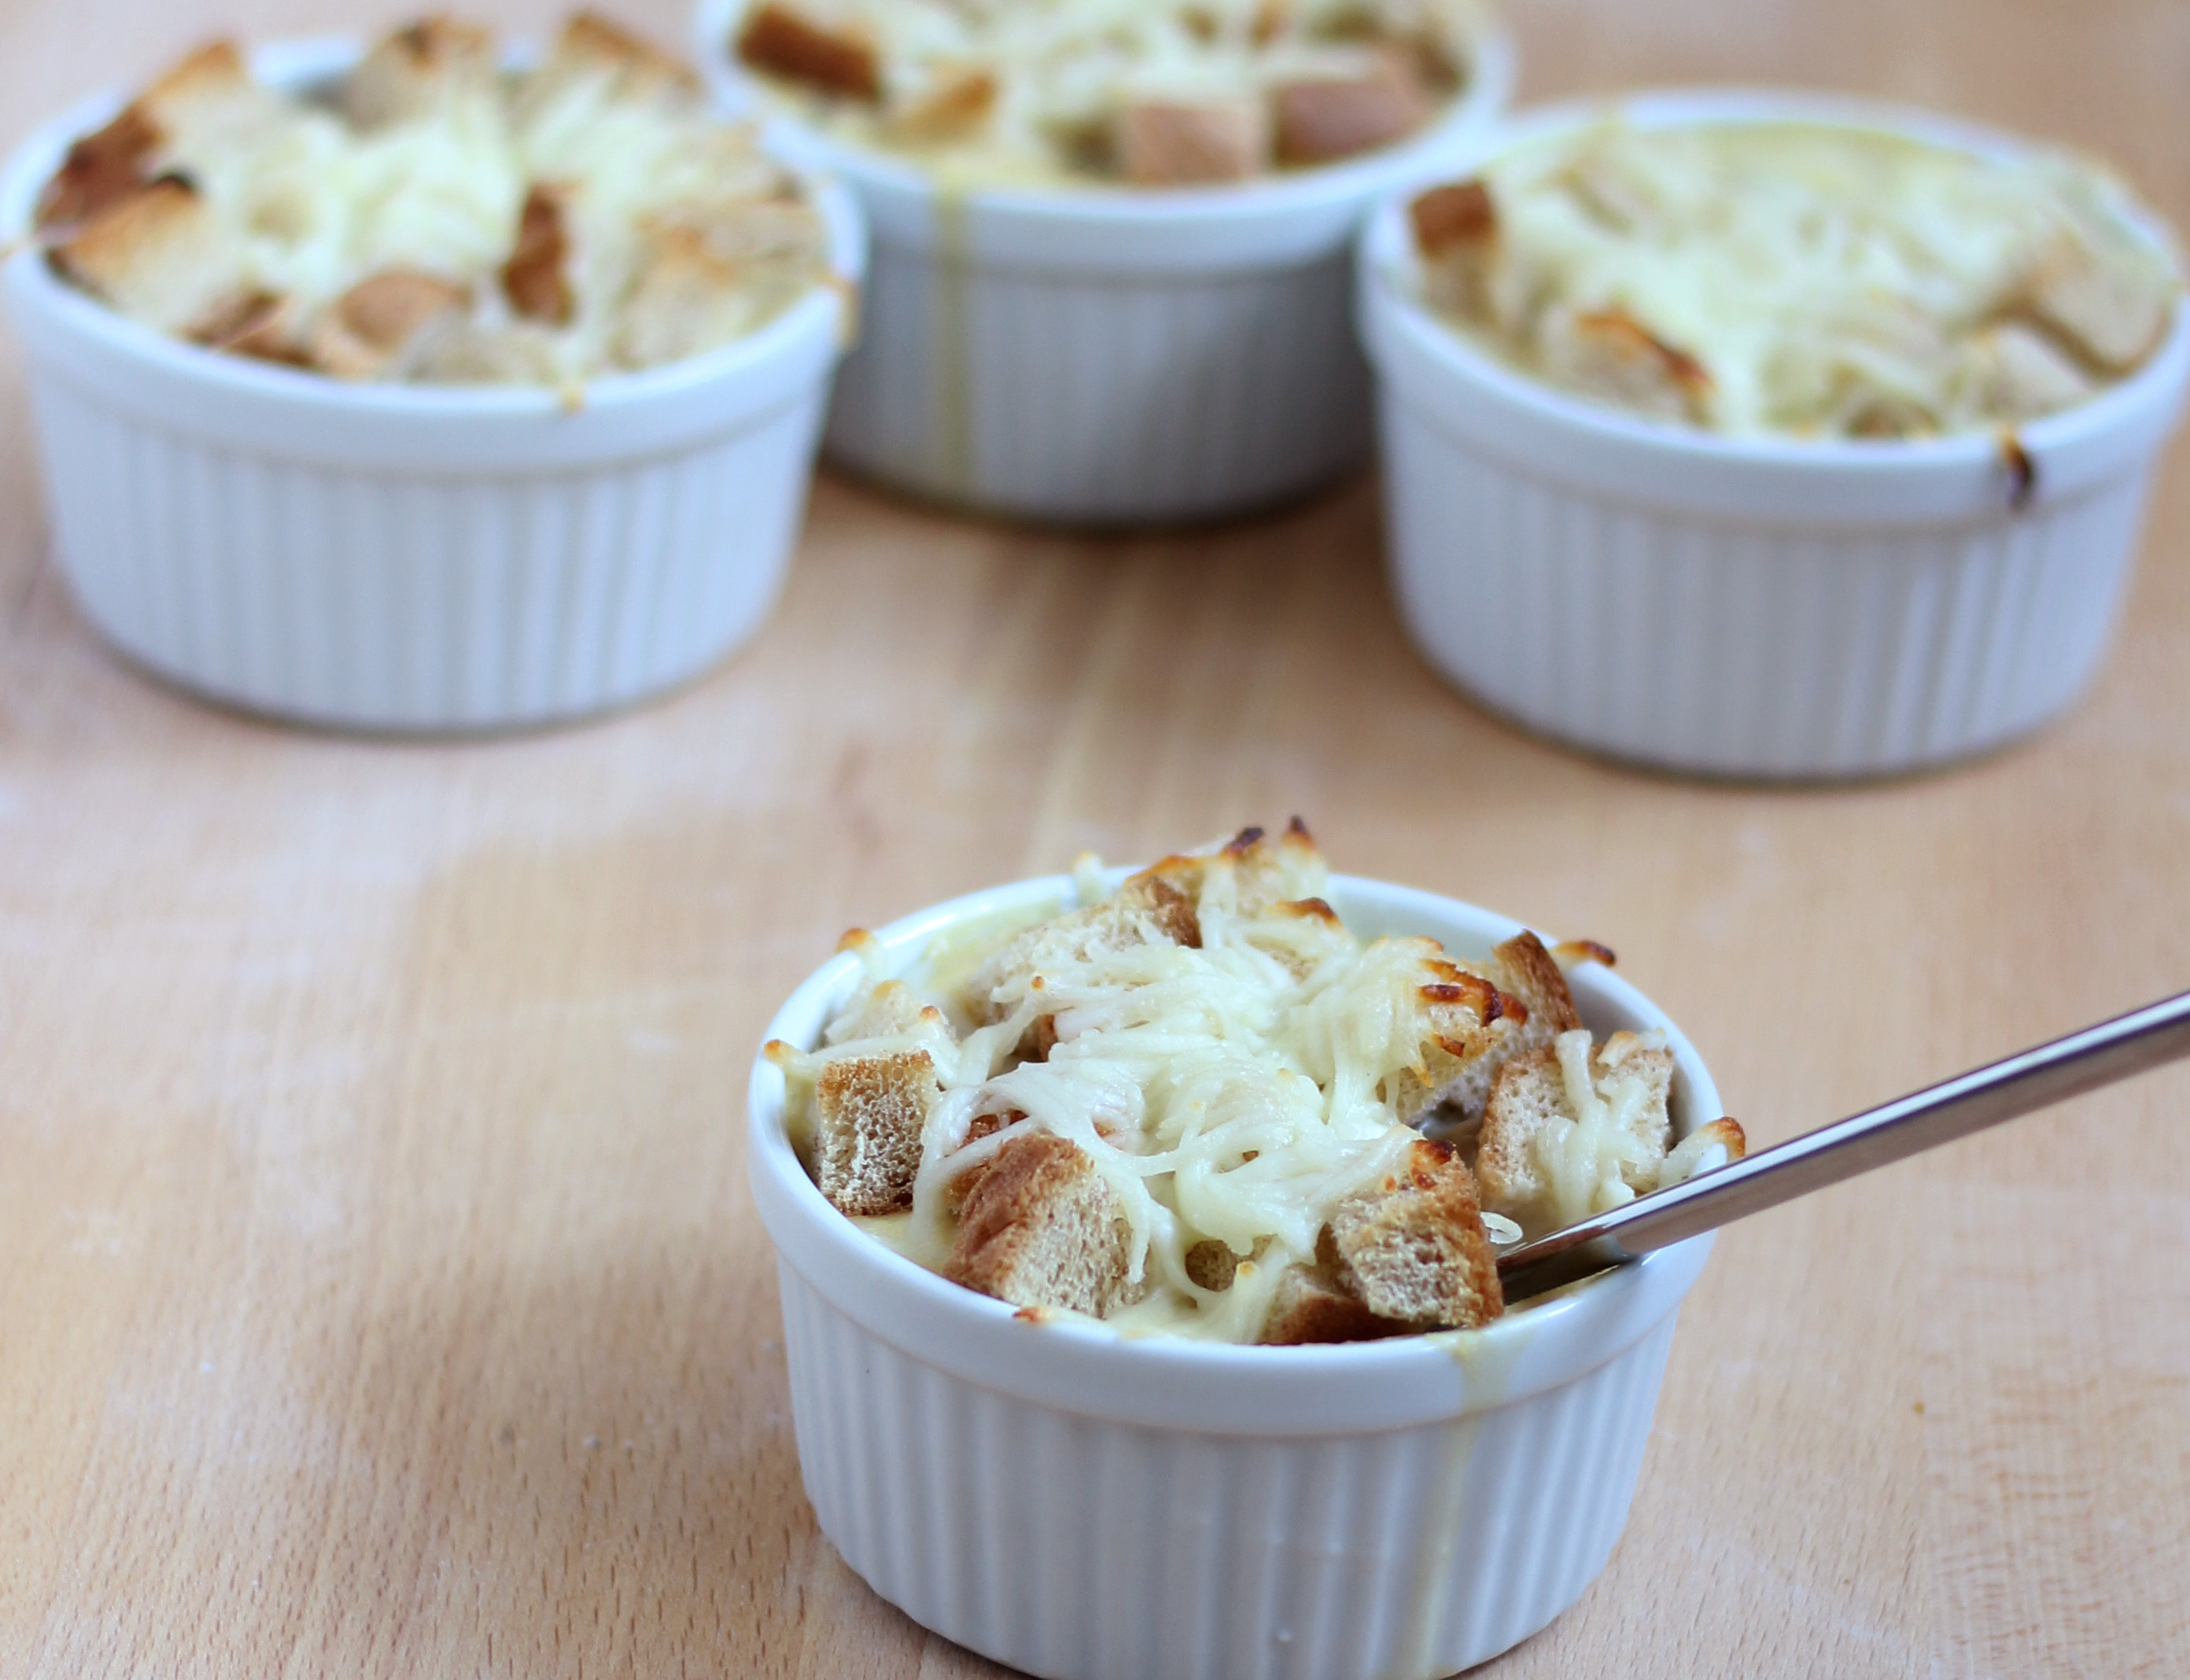
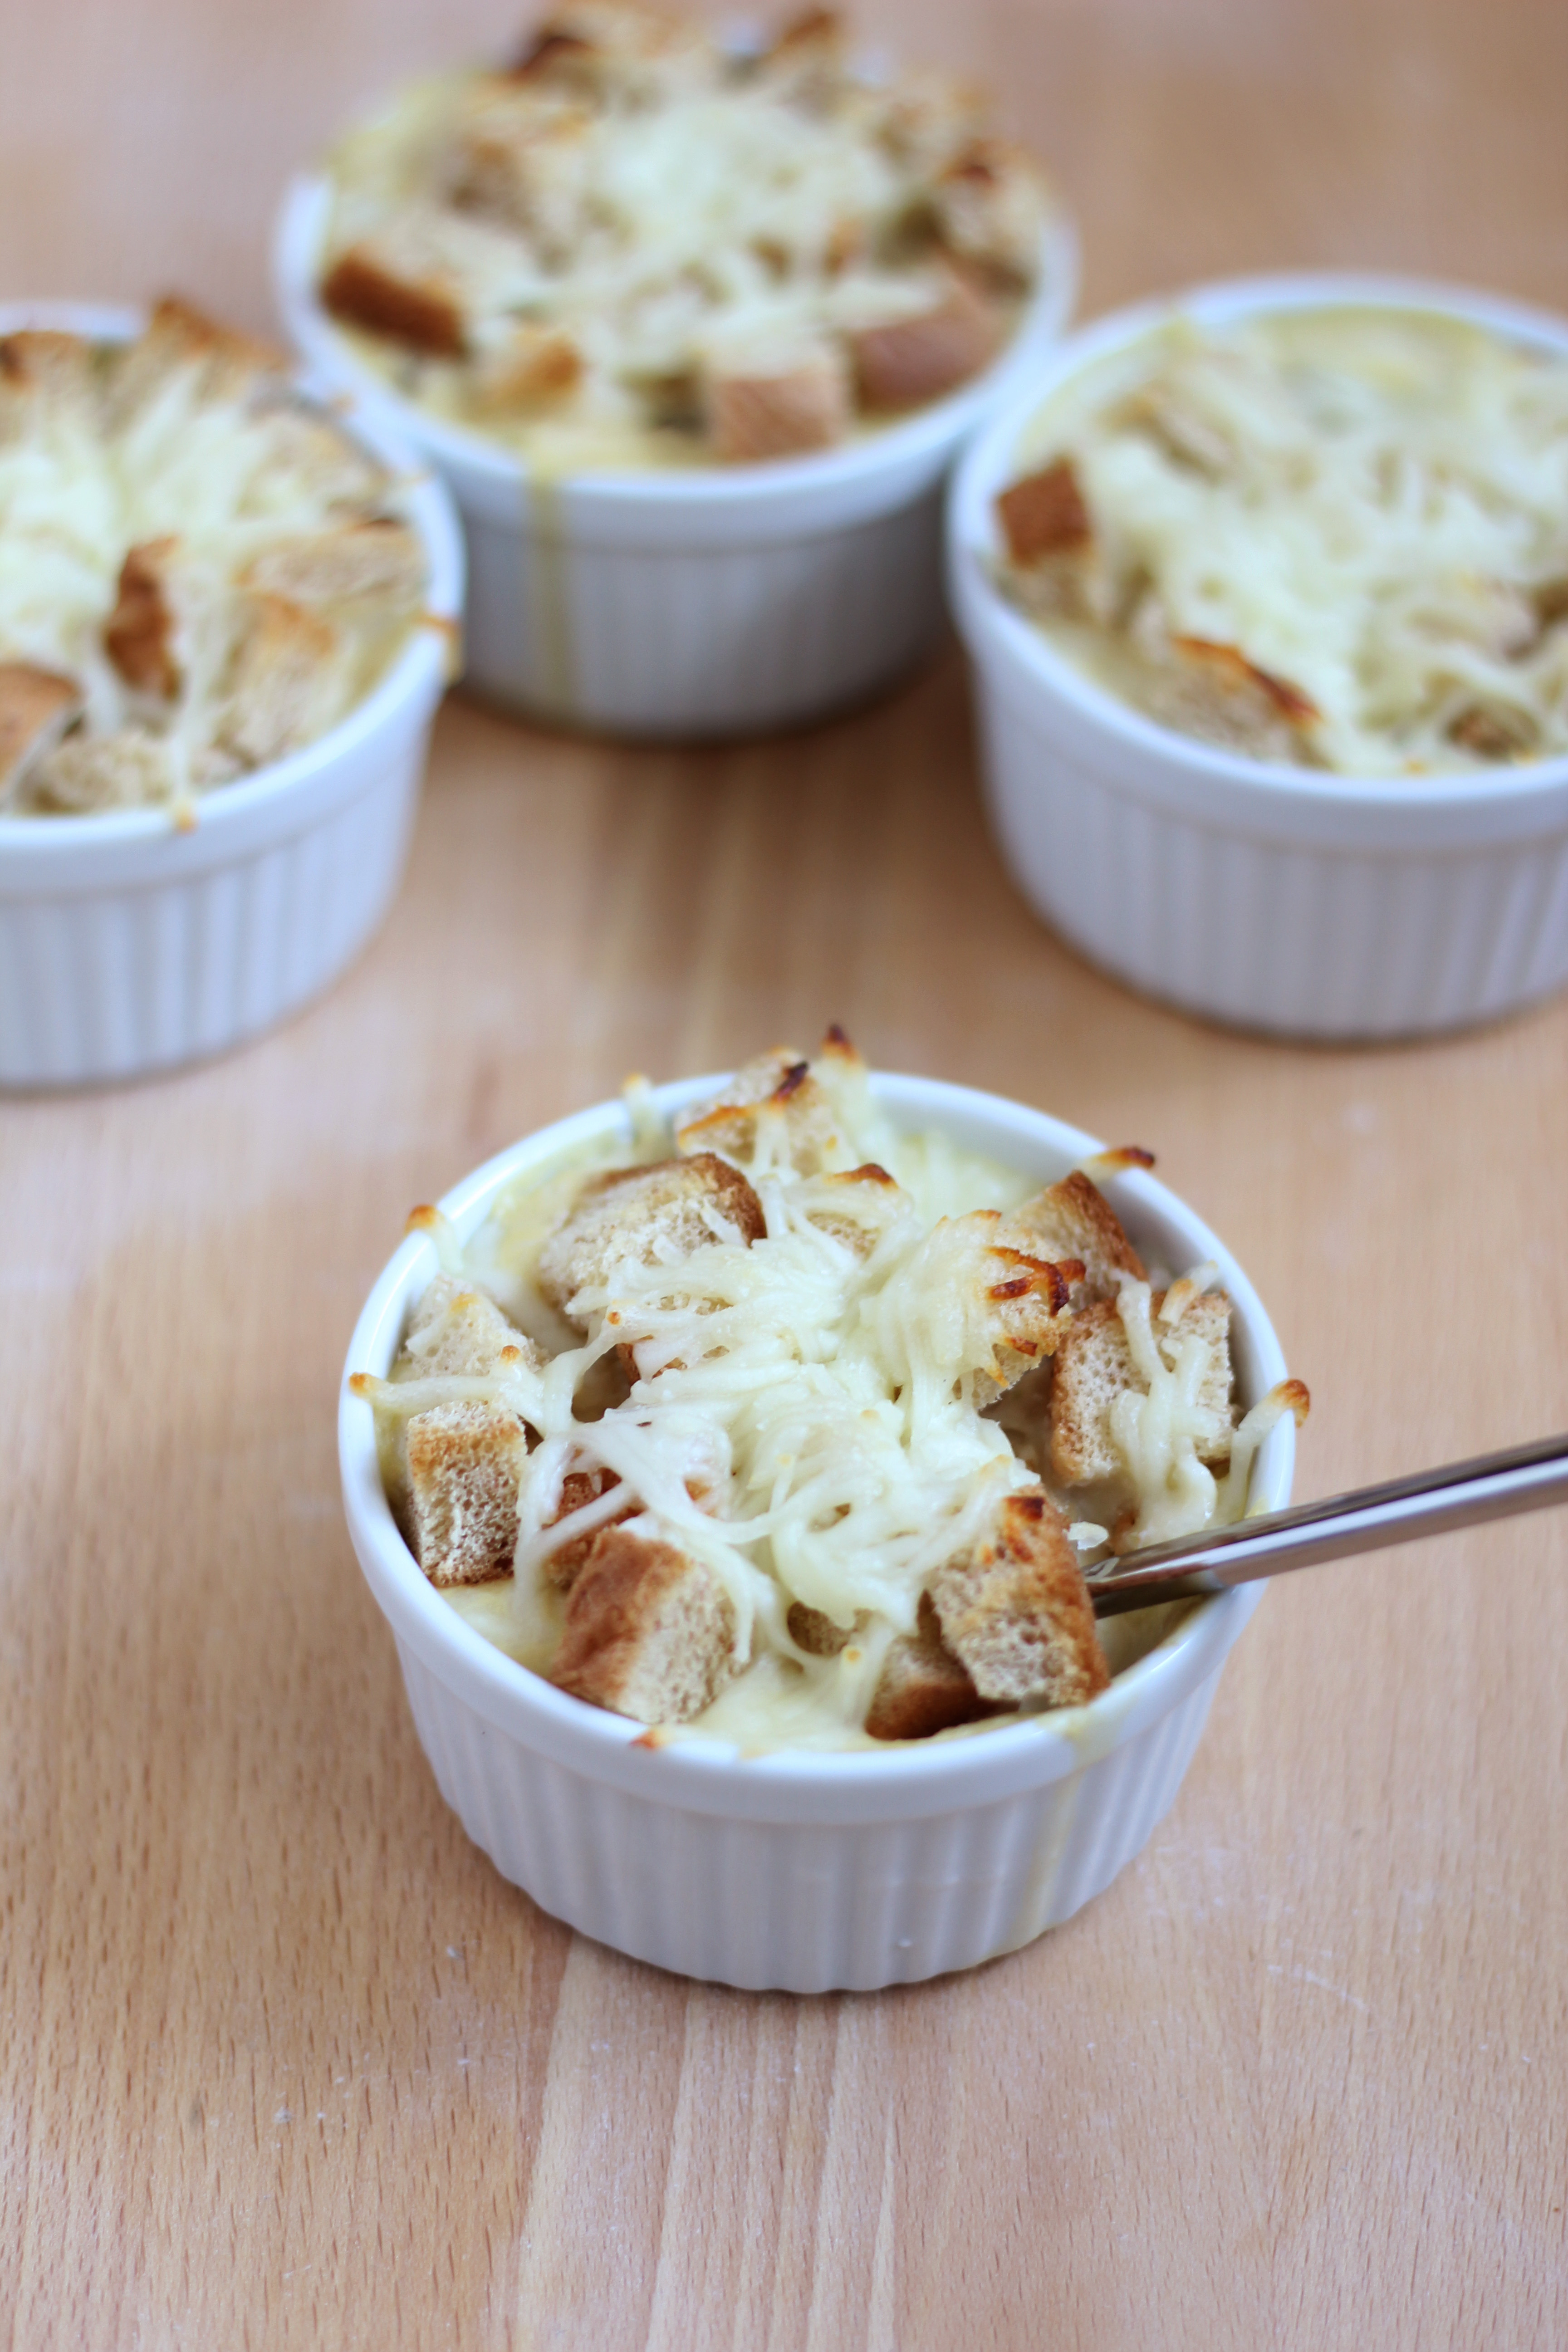
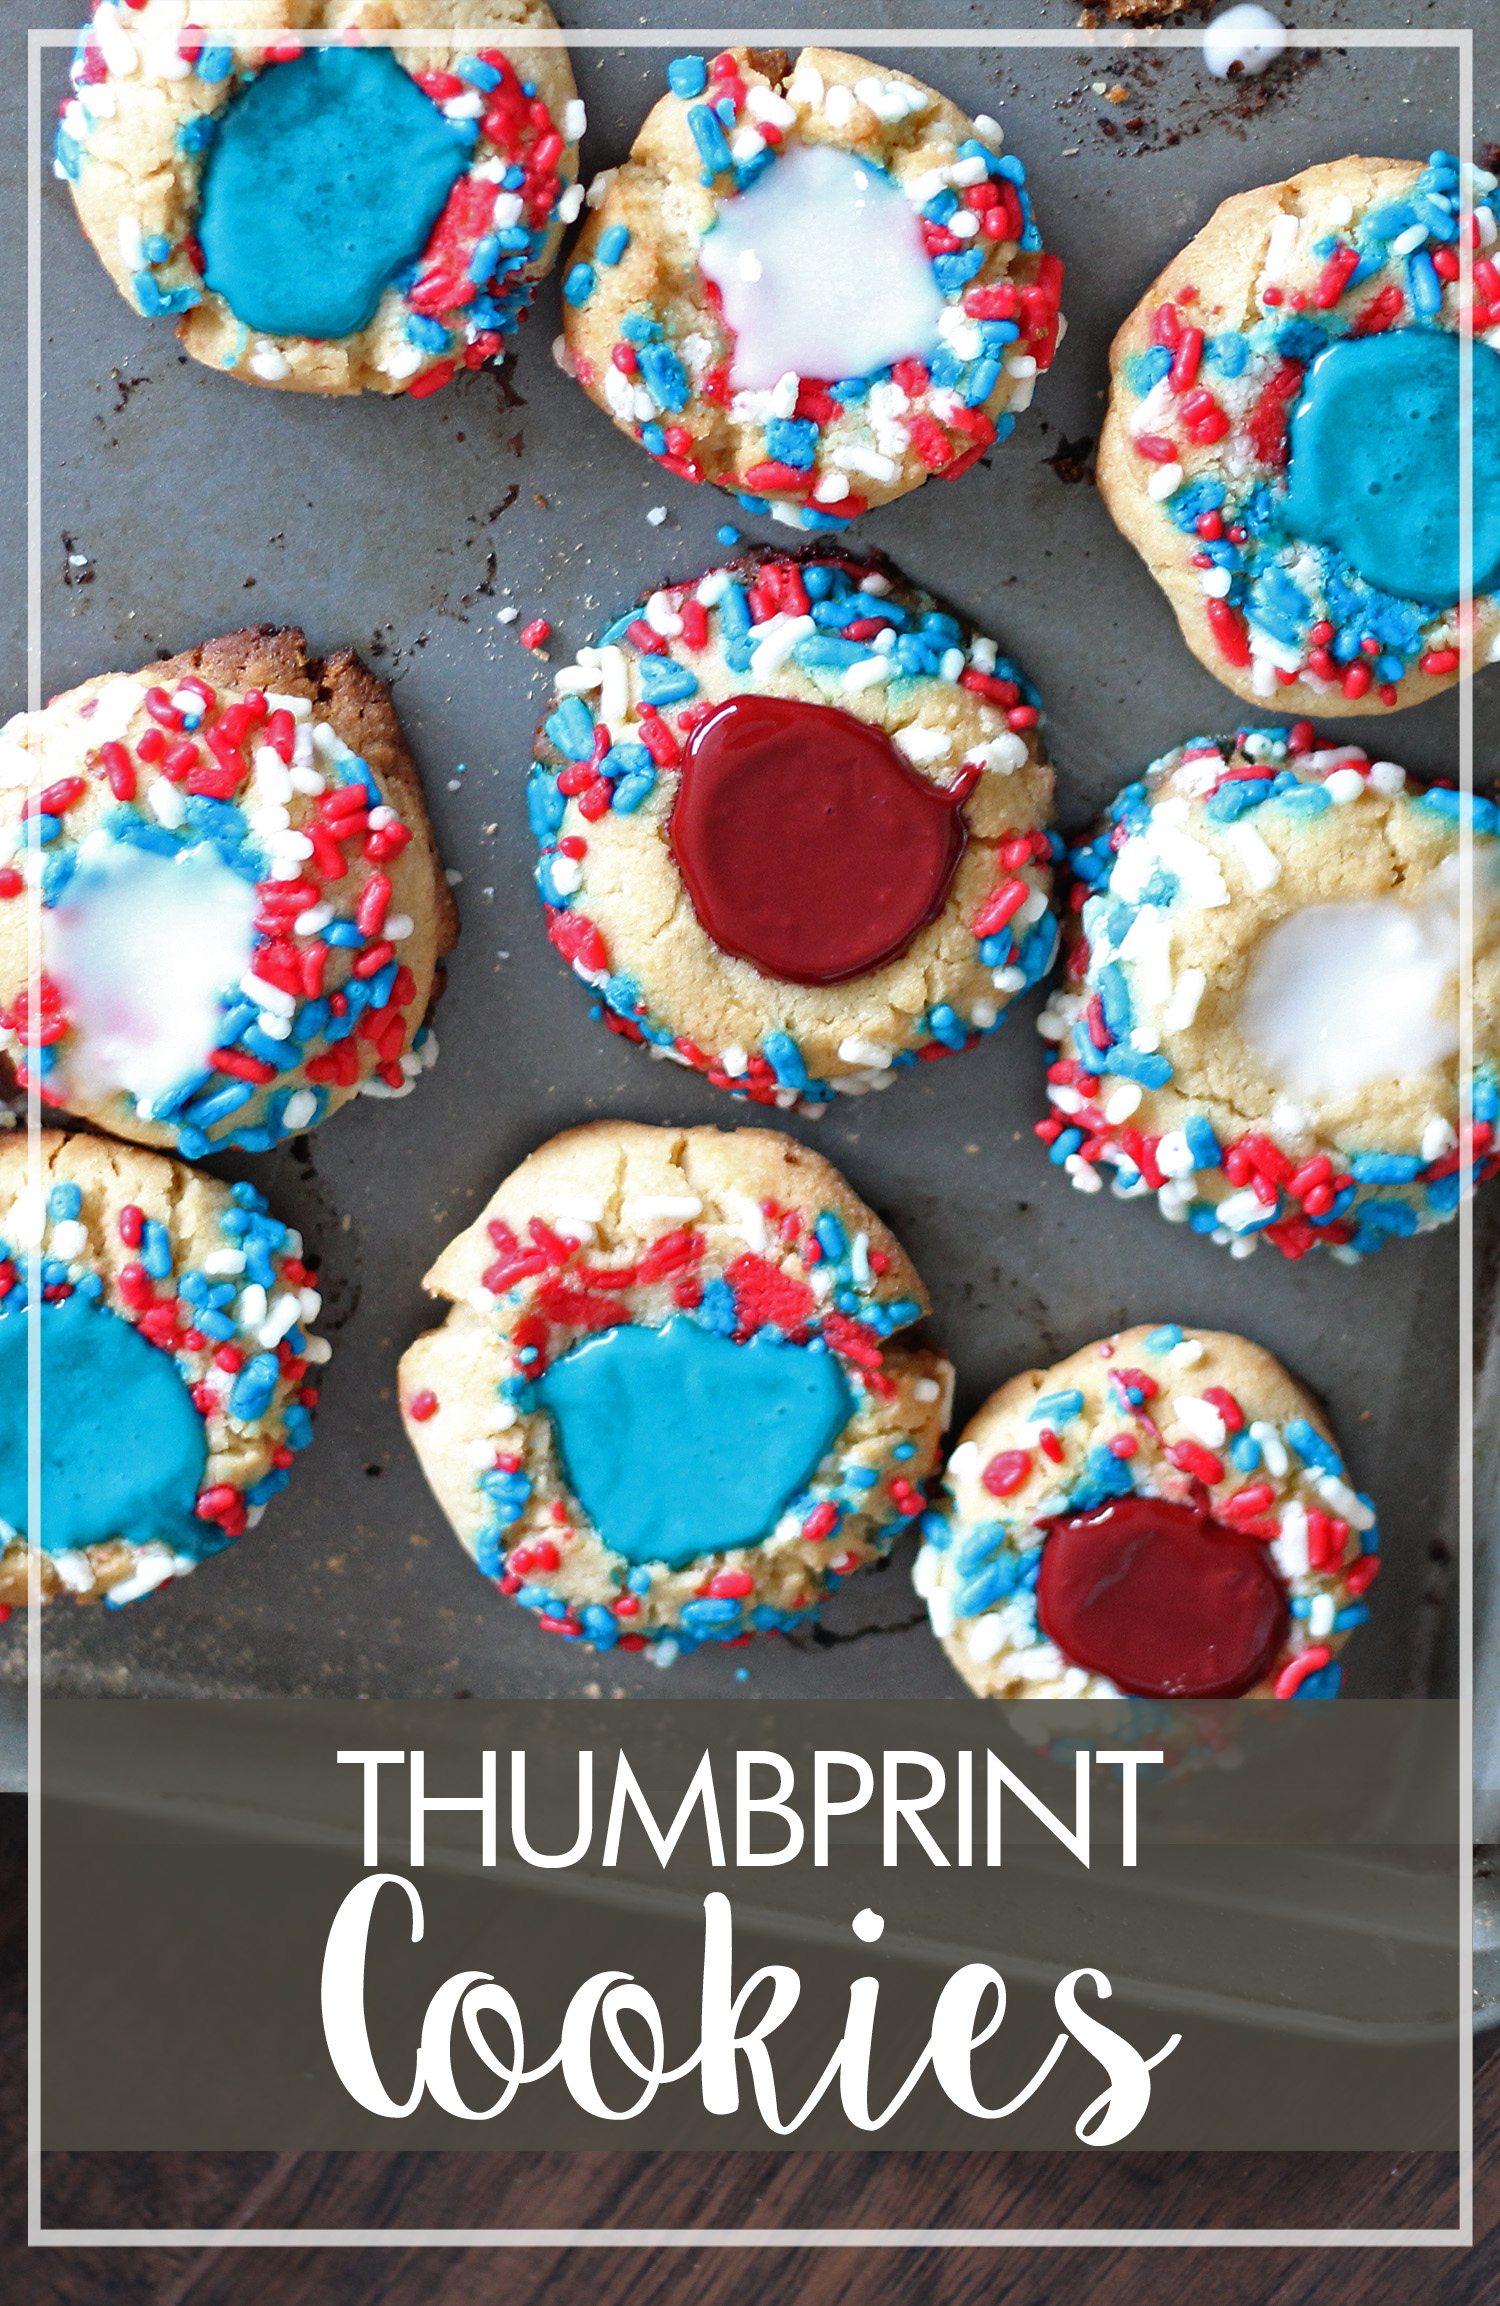
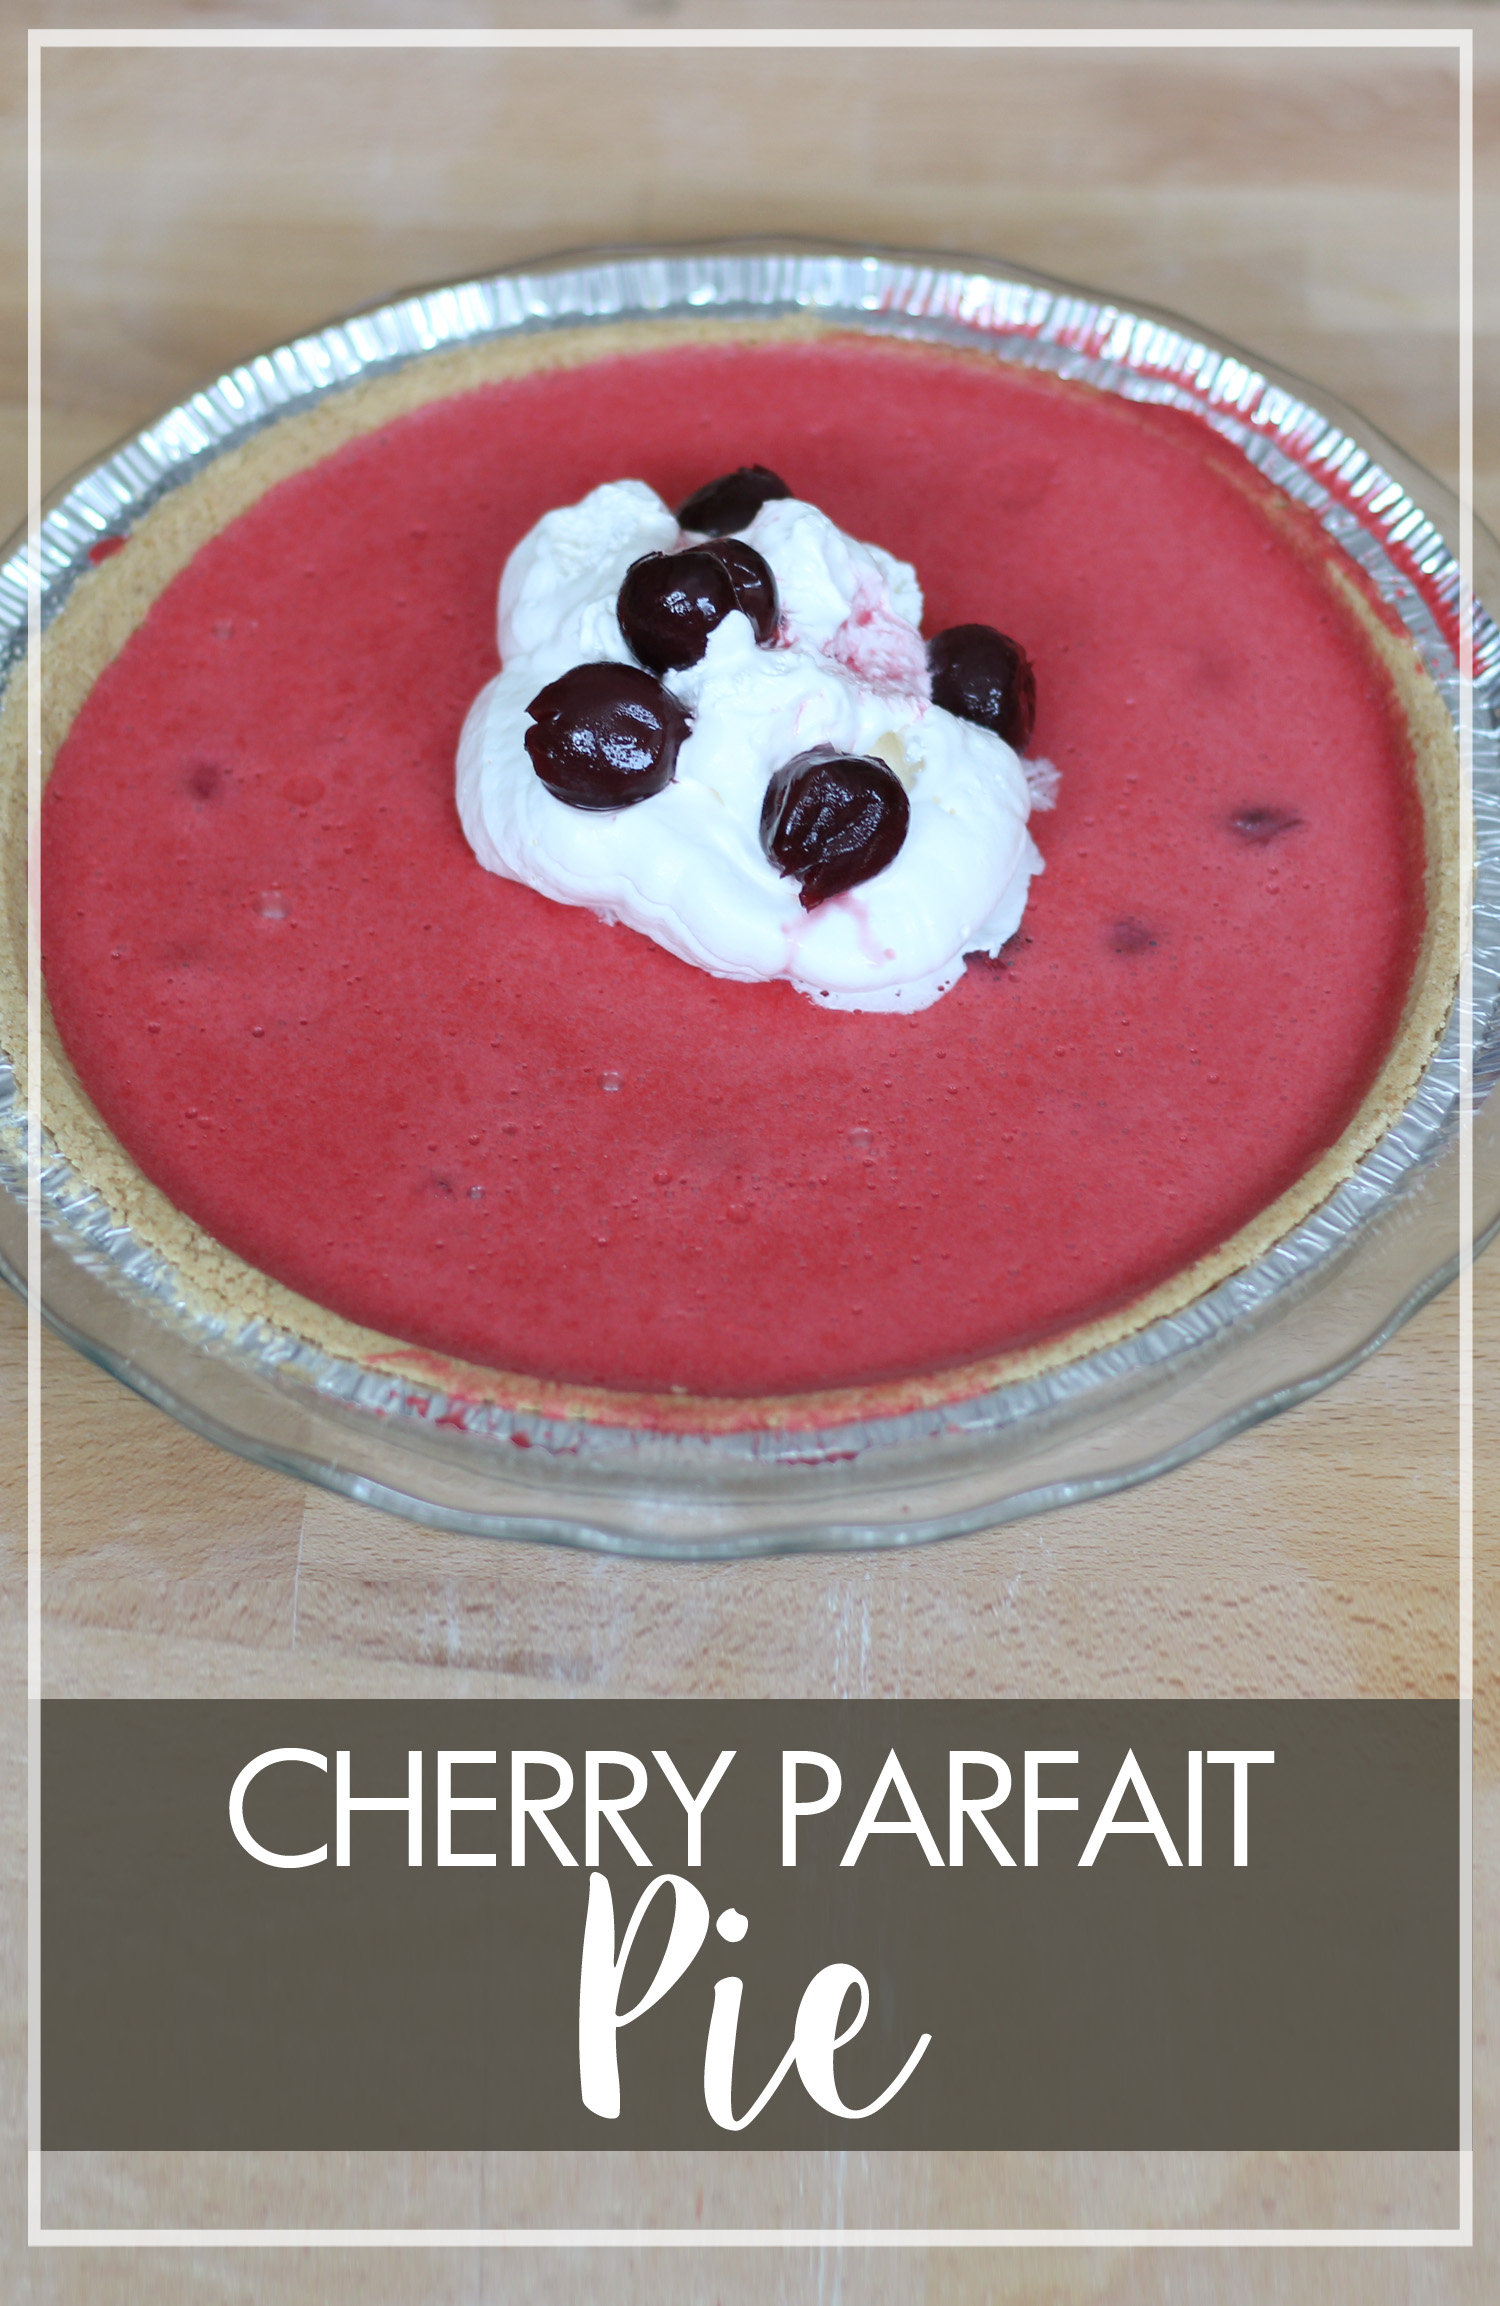
One fun fact about me is that I don’t really care for pie, which is not a good trait to have with the amount of pies in Marguerite’s cookbook. However, I LOVED this cherry parfait pie. It was insanely rich, very sweet, and the perfect summer dessert.

Here is what Marguerite had to say:


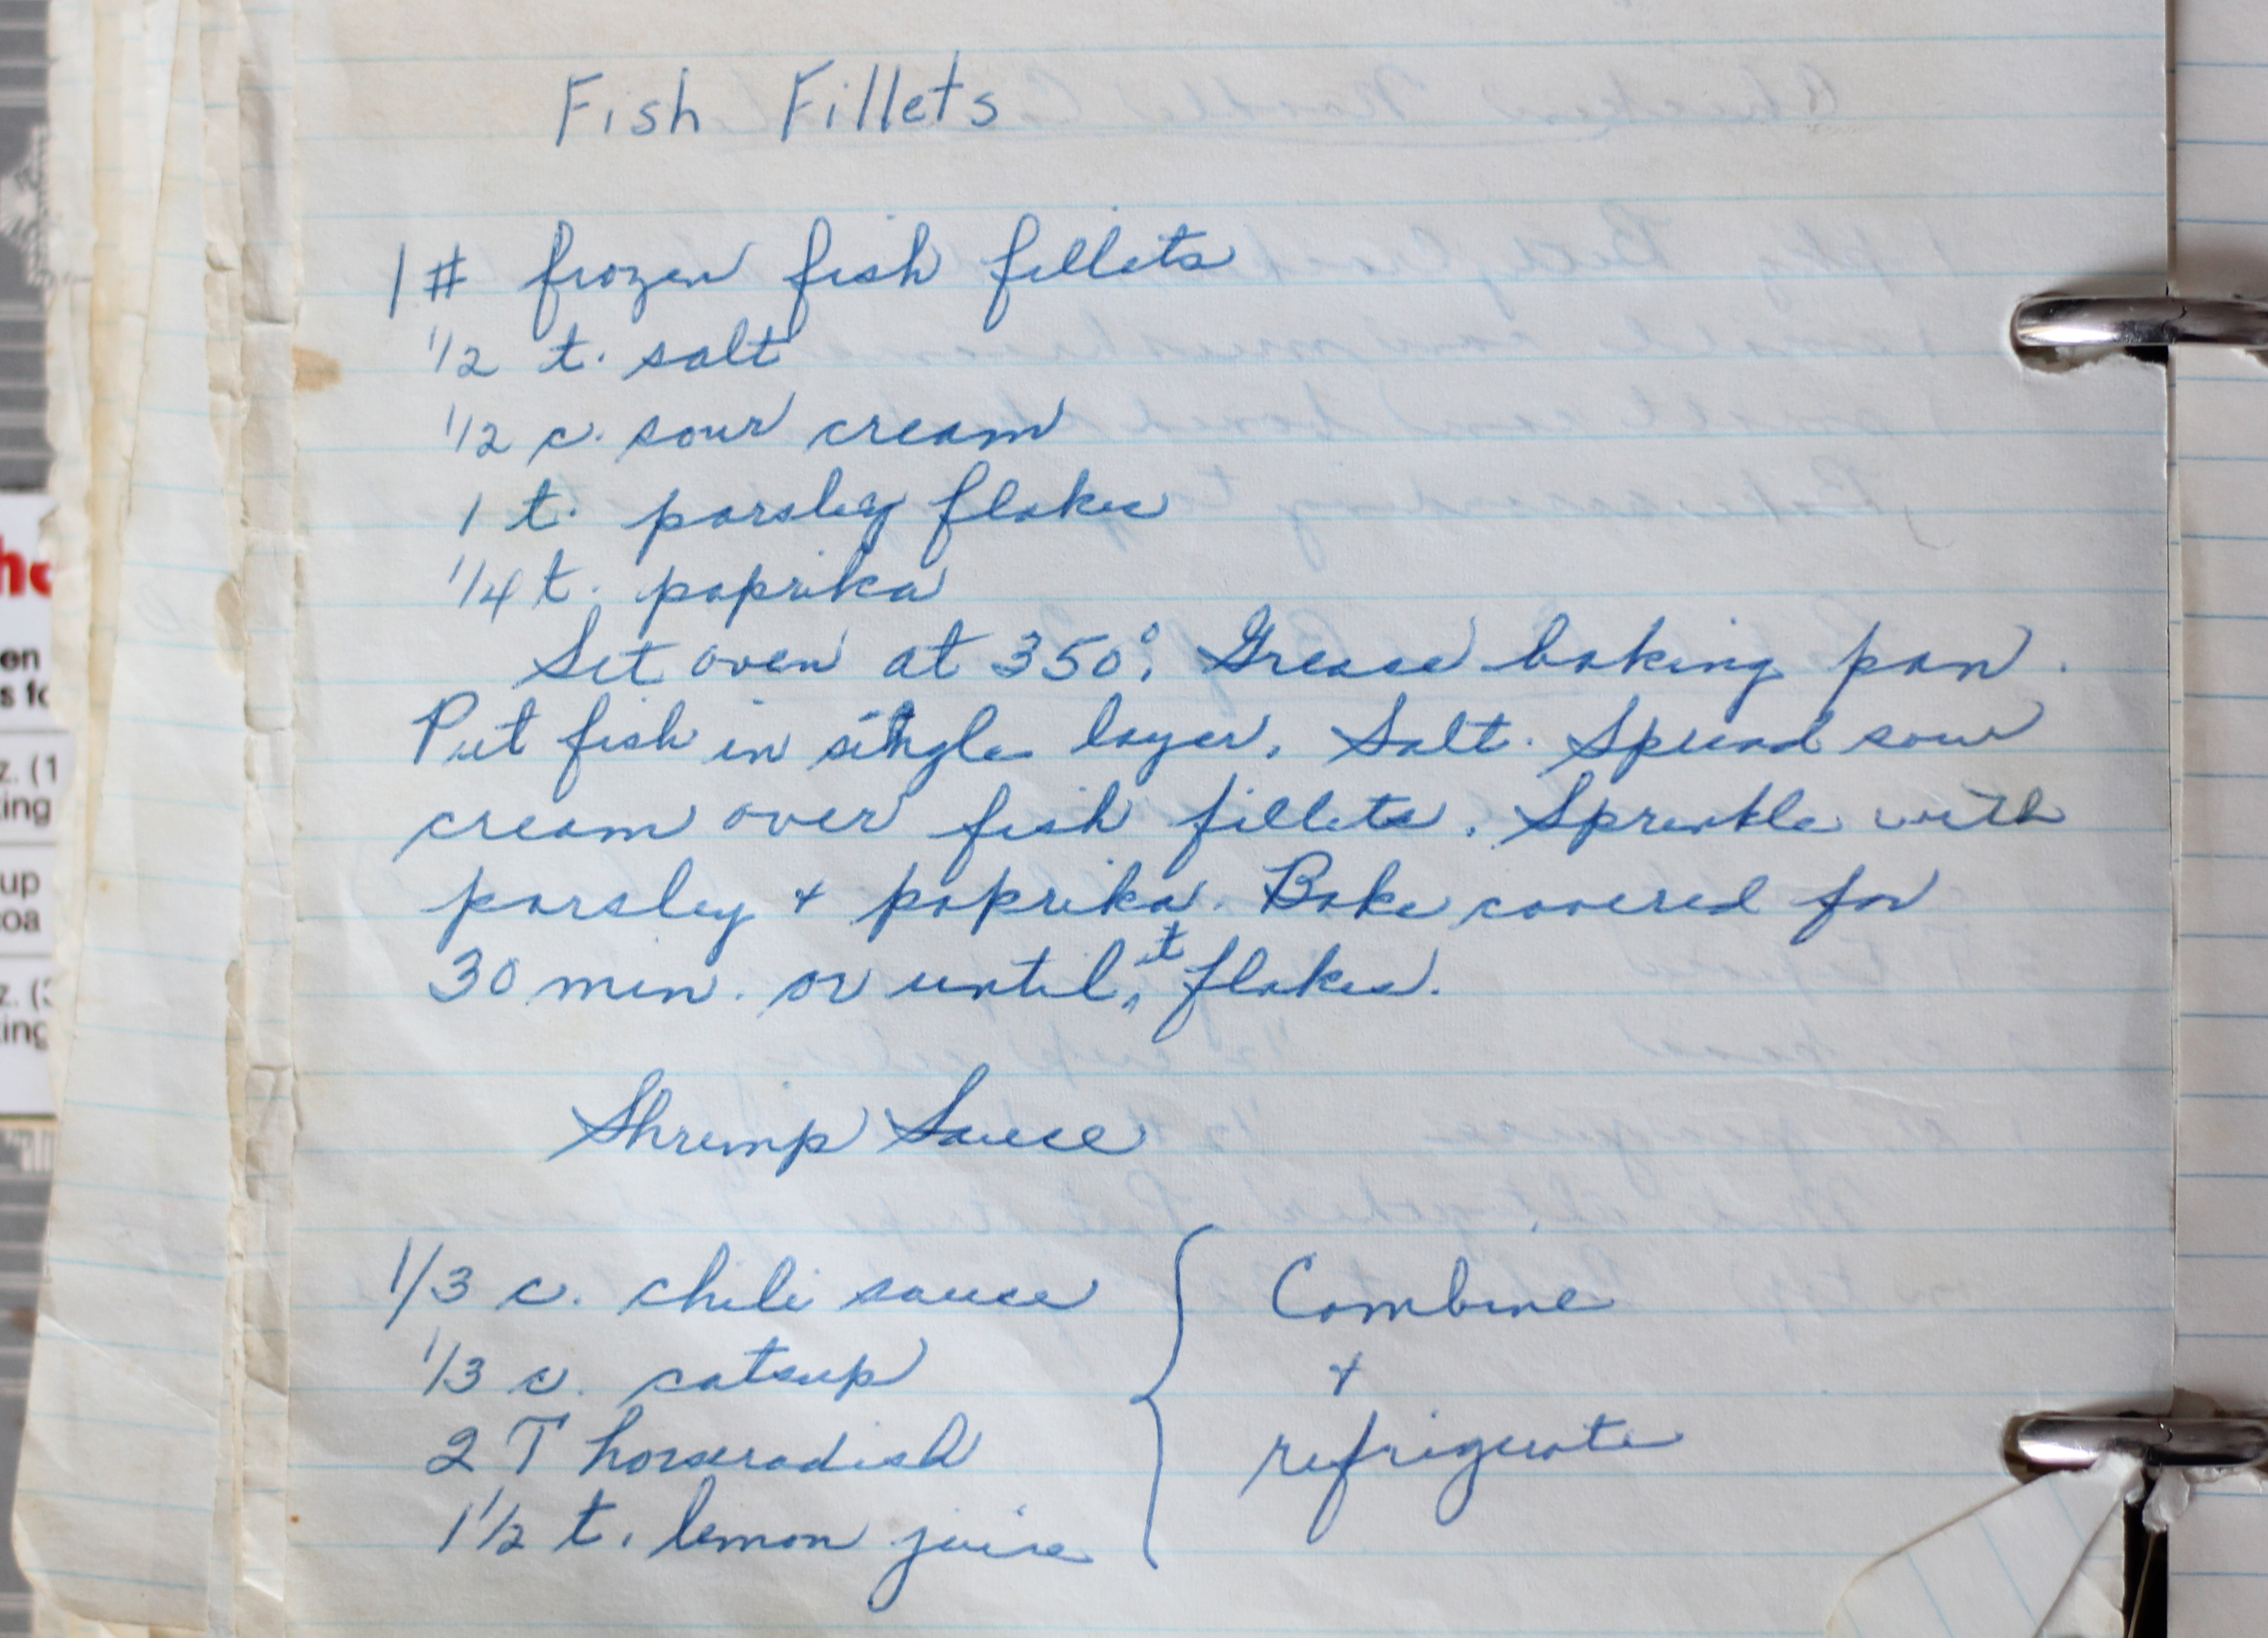
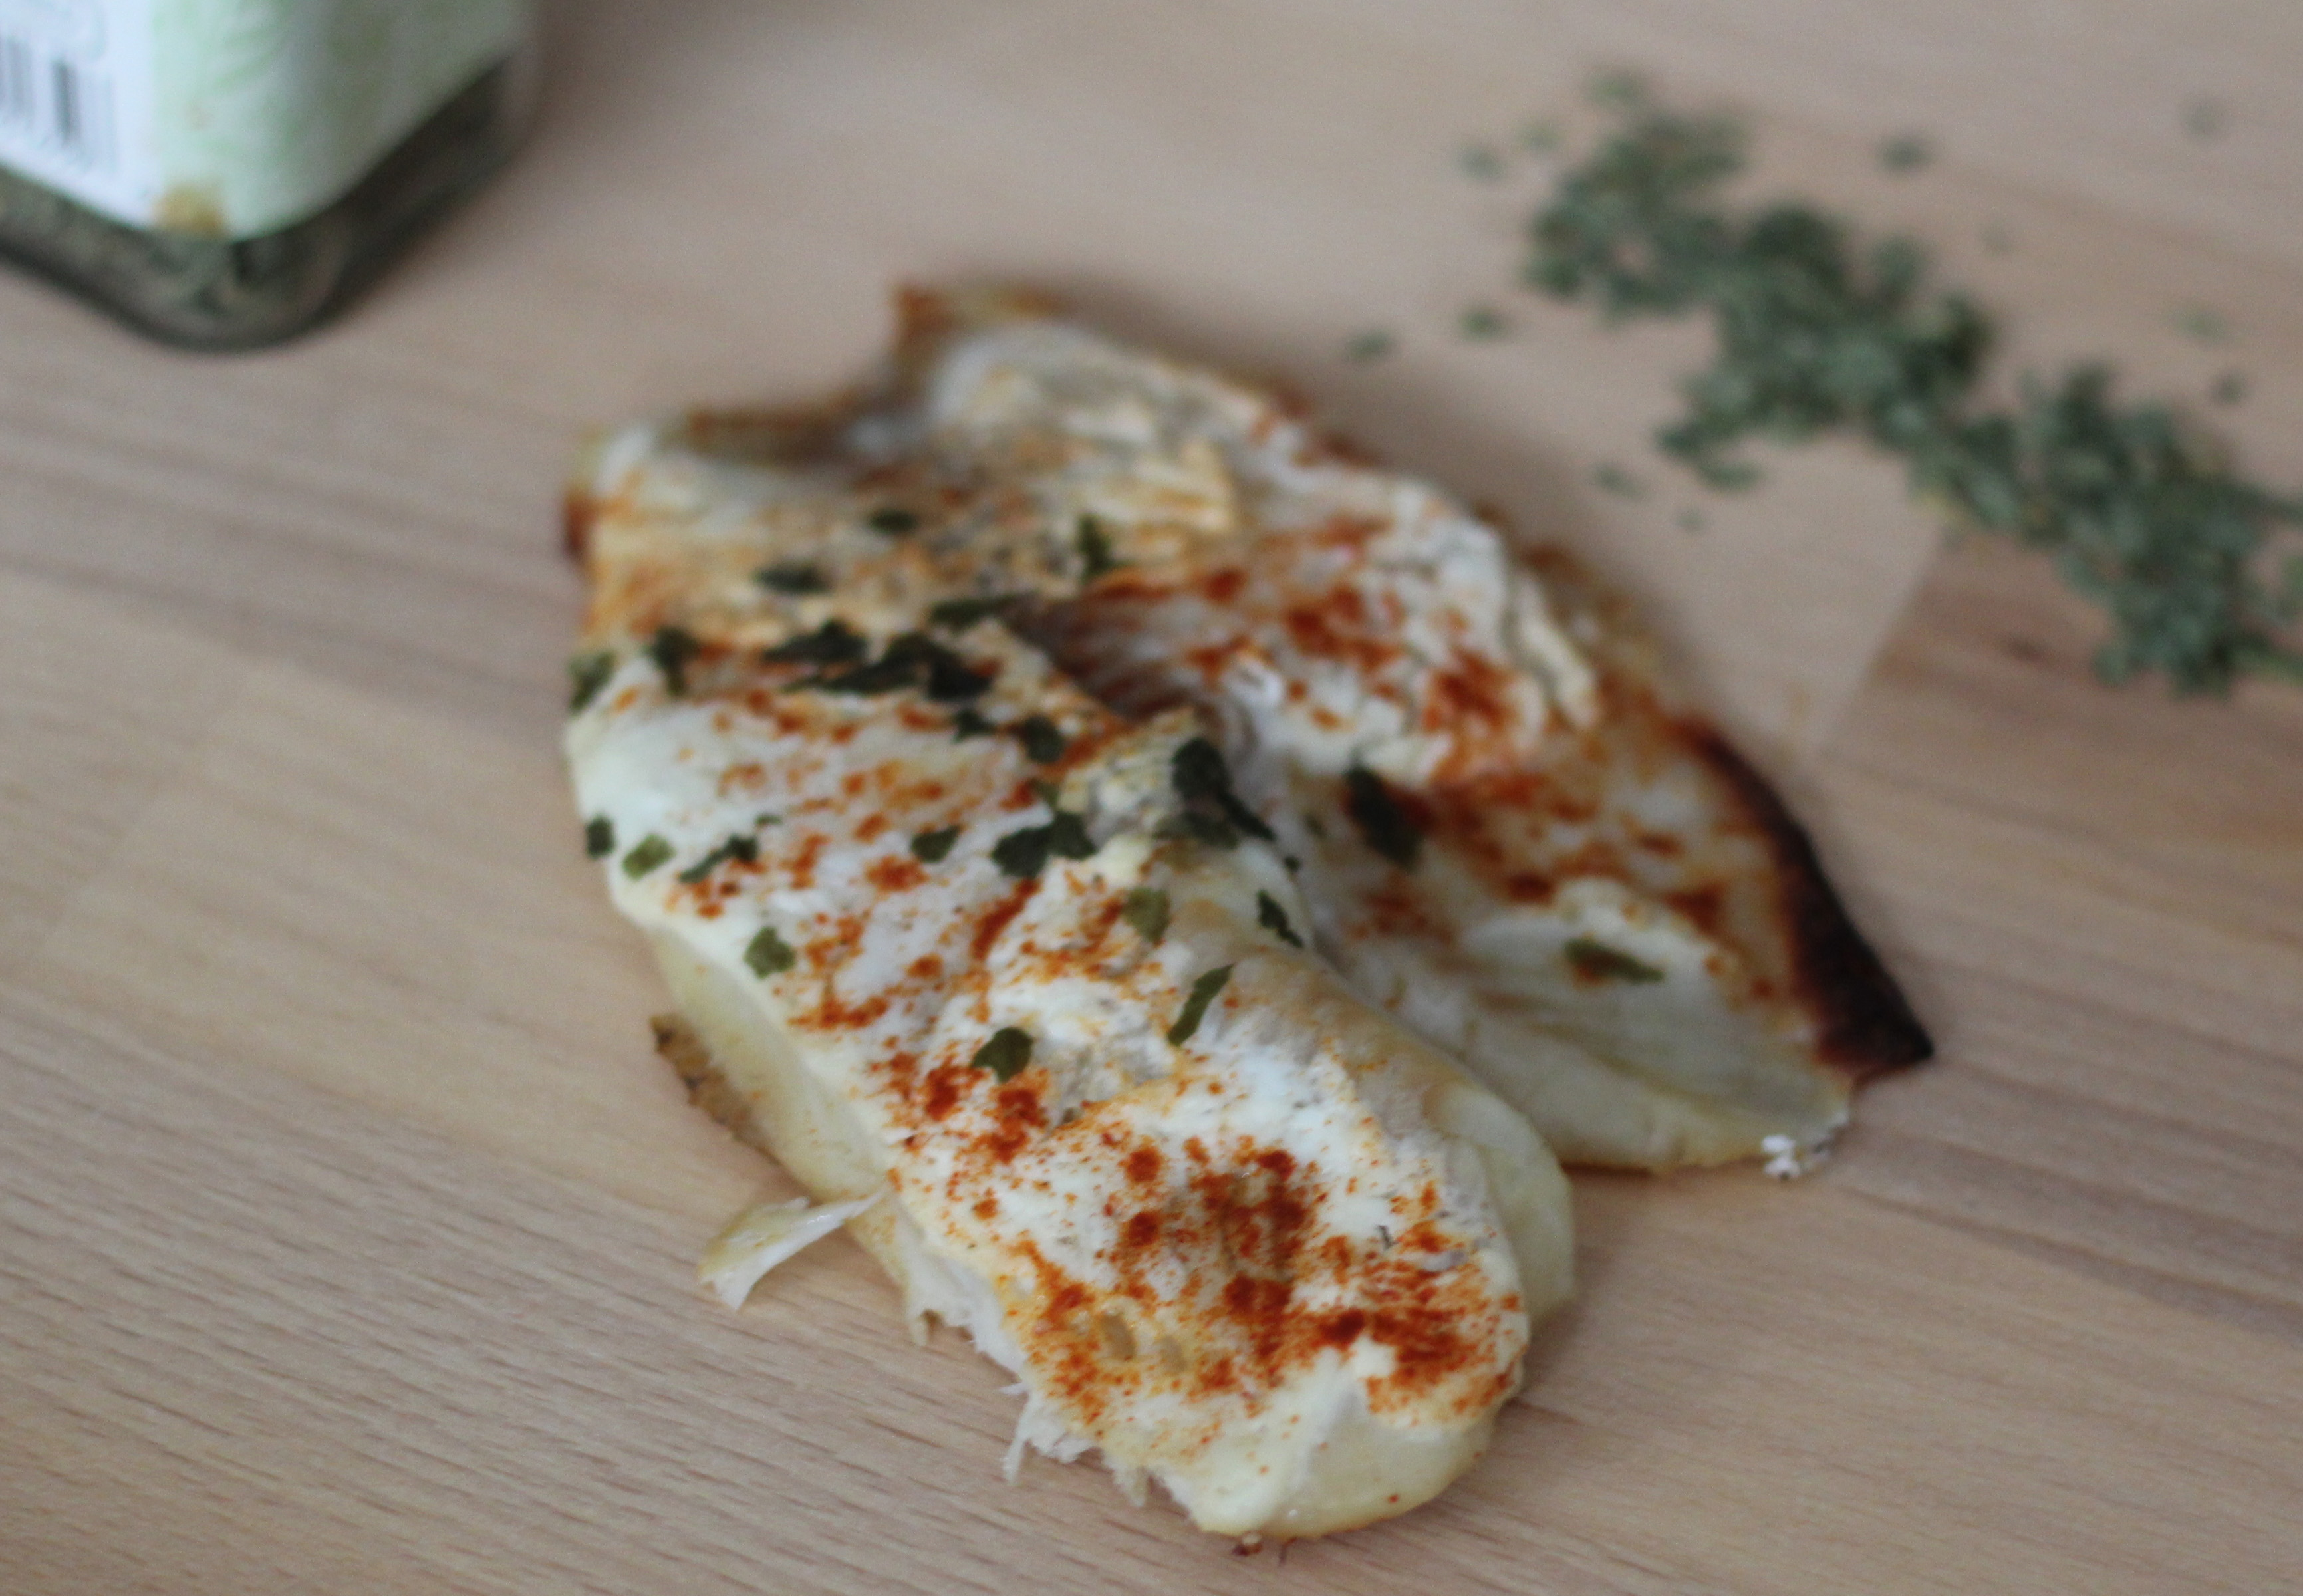
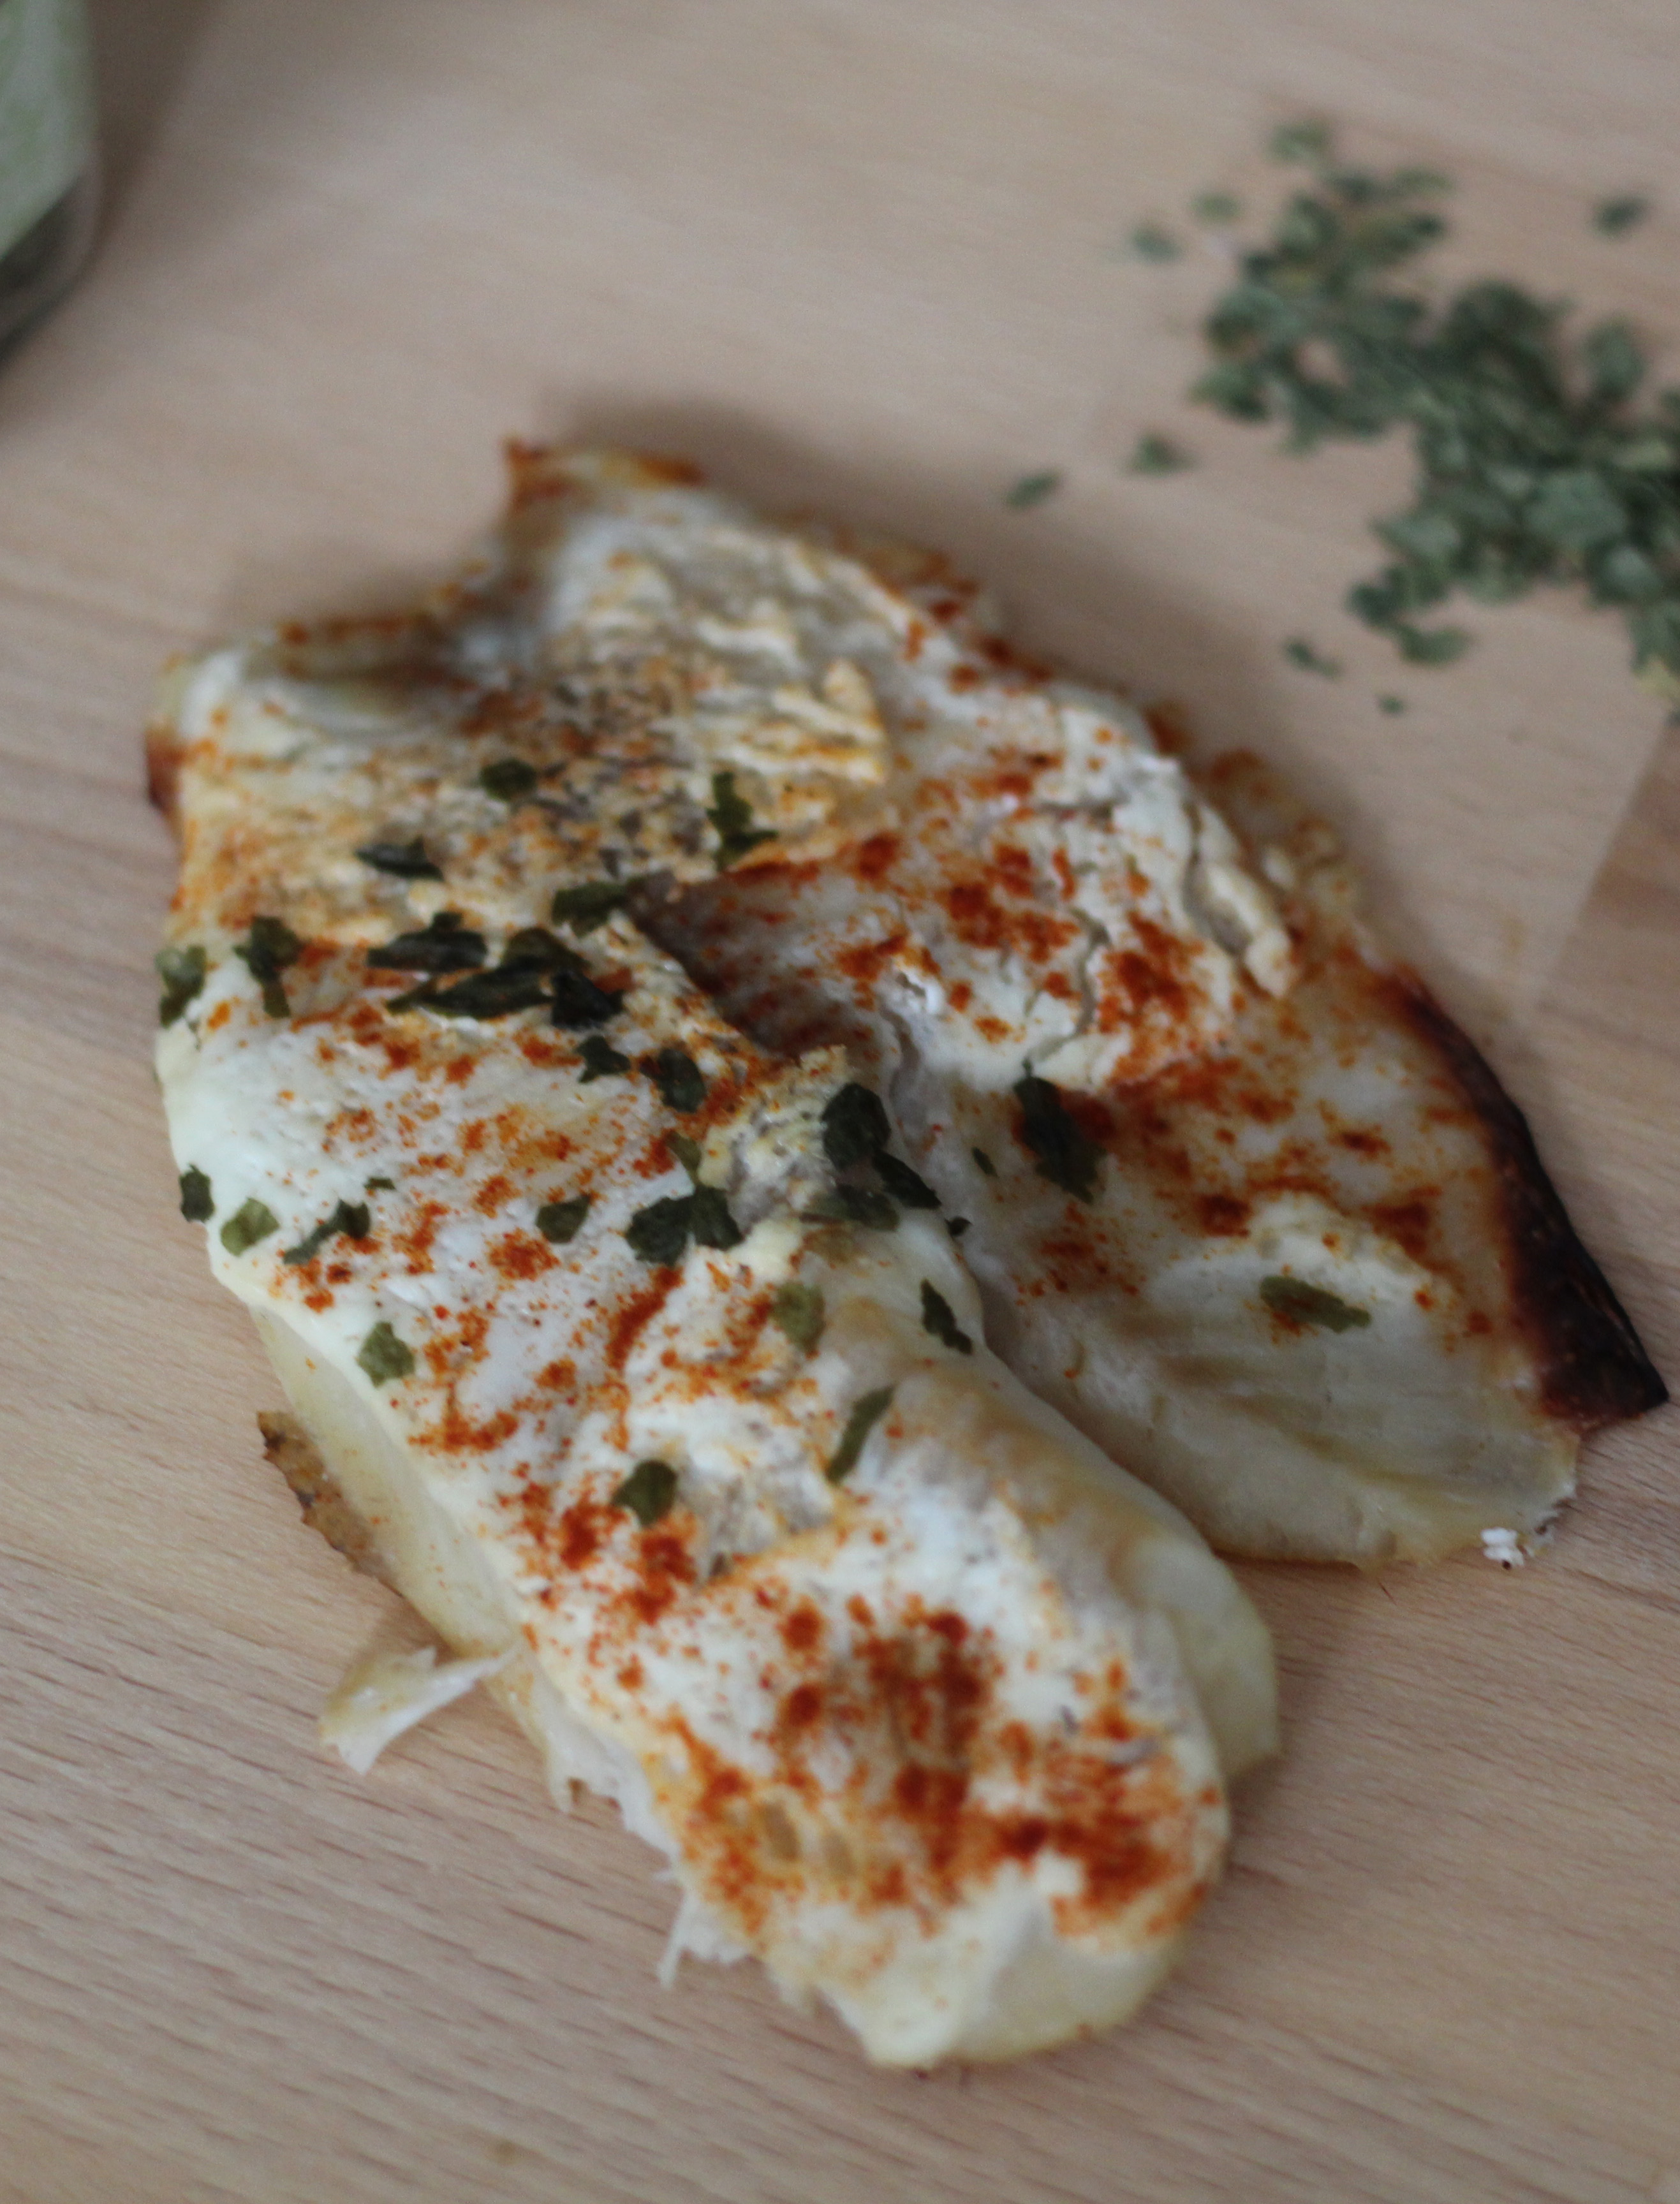
This easily legible and detailed recipe is a nice change from the current norm, due to the fact that it was written out by Marguerite’s aunts Stella and Florence. We love finding recipes in the book from Marguerite’s family and friends! Their pie recipe was pretty accurate and easy to execute, except we felt the pie needed a bit more time than just 20-25 minutes to set. Also, we chose to use a pre-made pie shell instead of making our own from scratch.

Cherry Parfait Pie

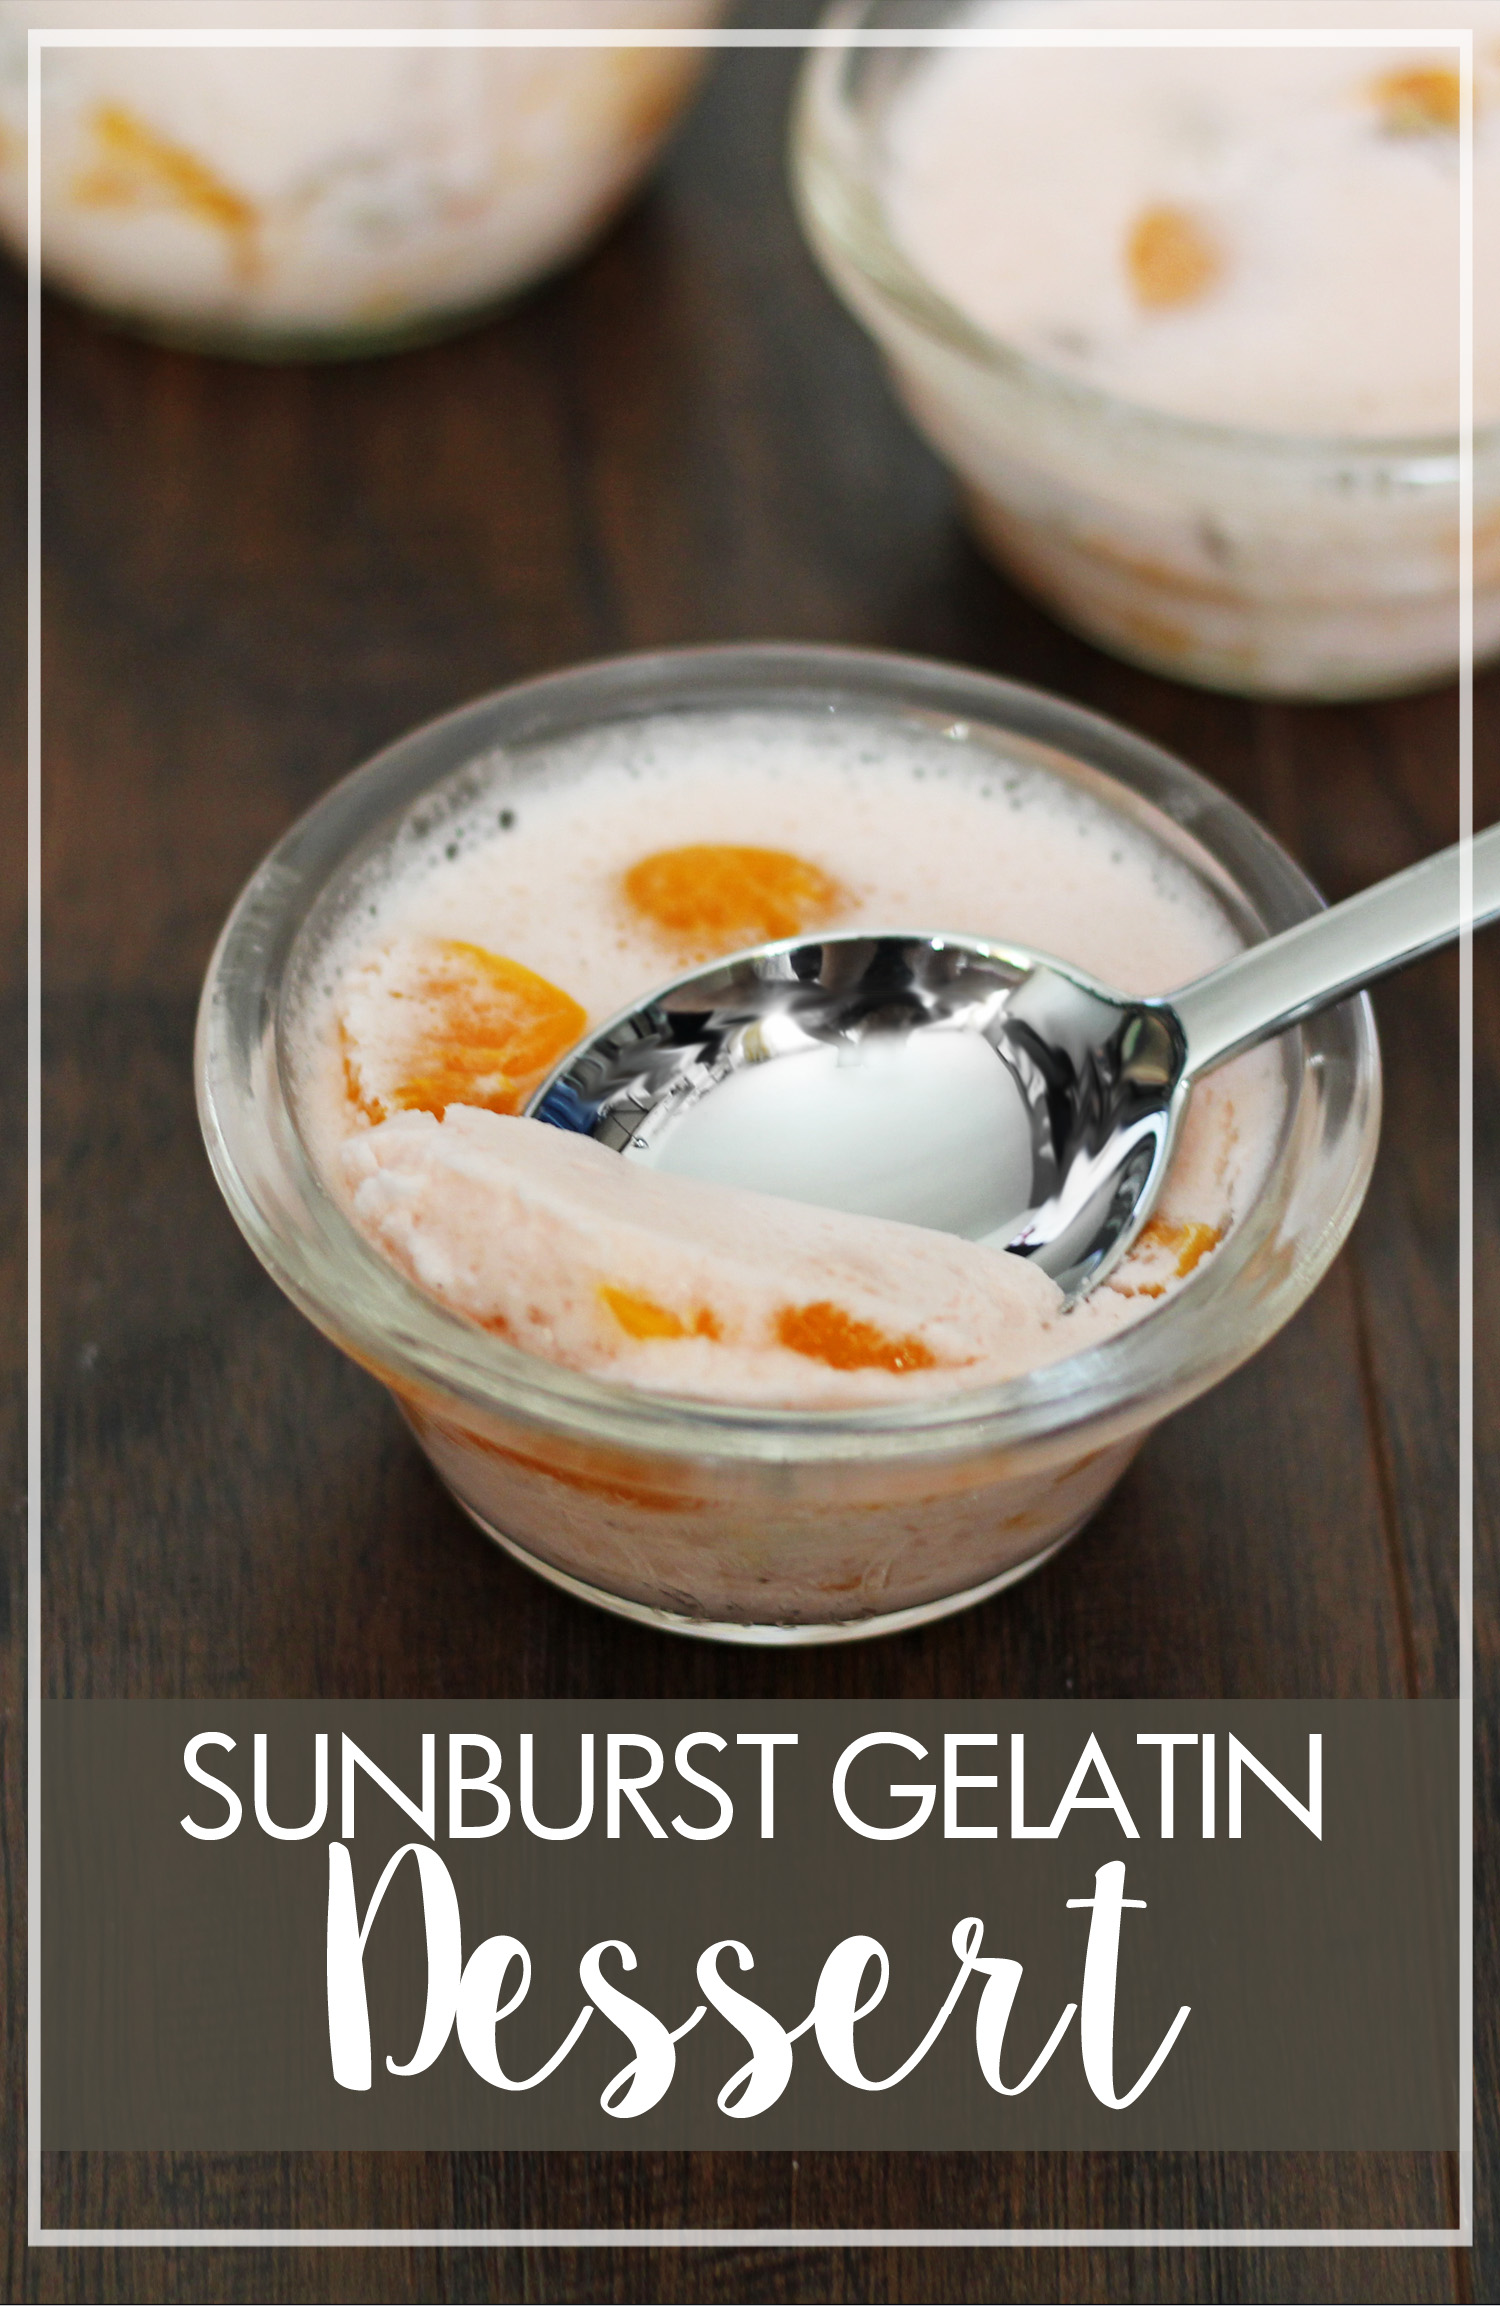
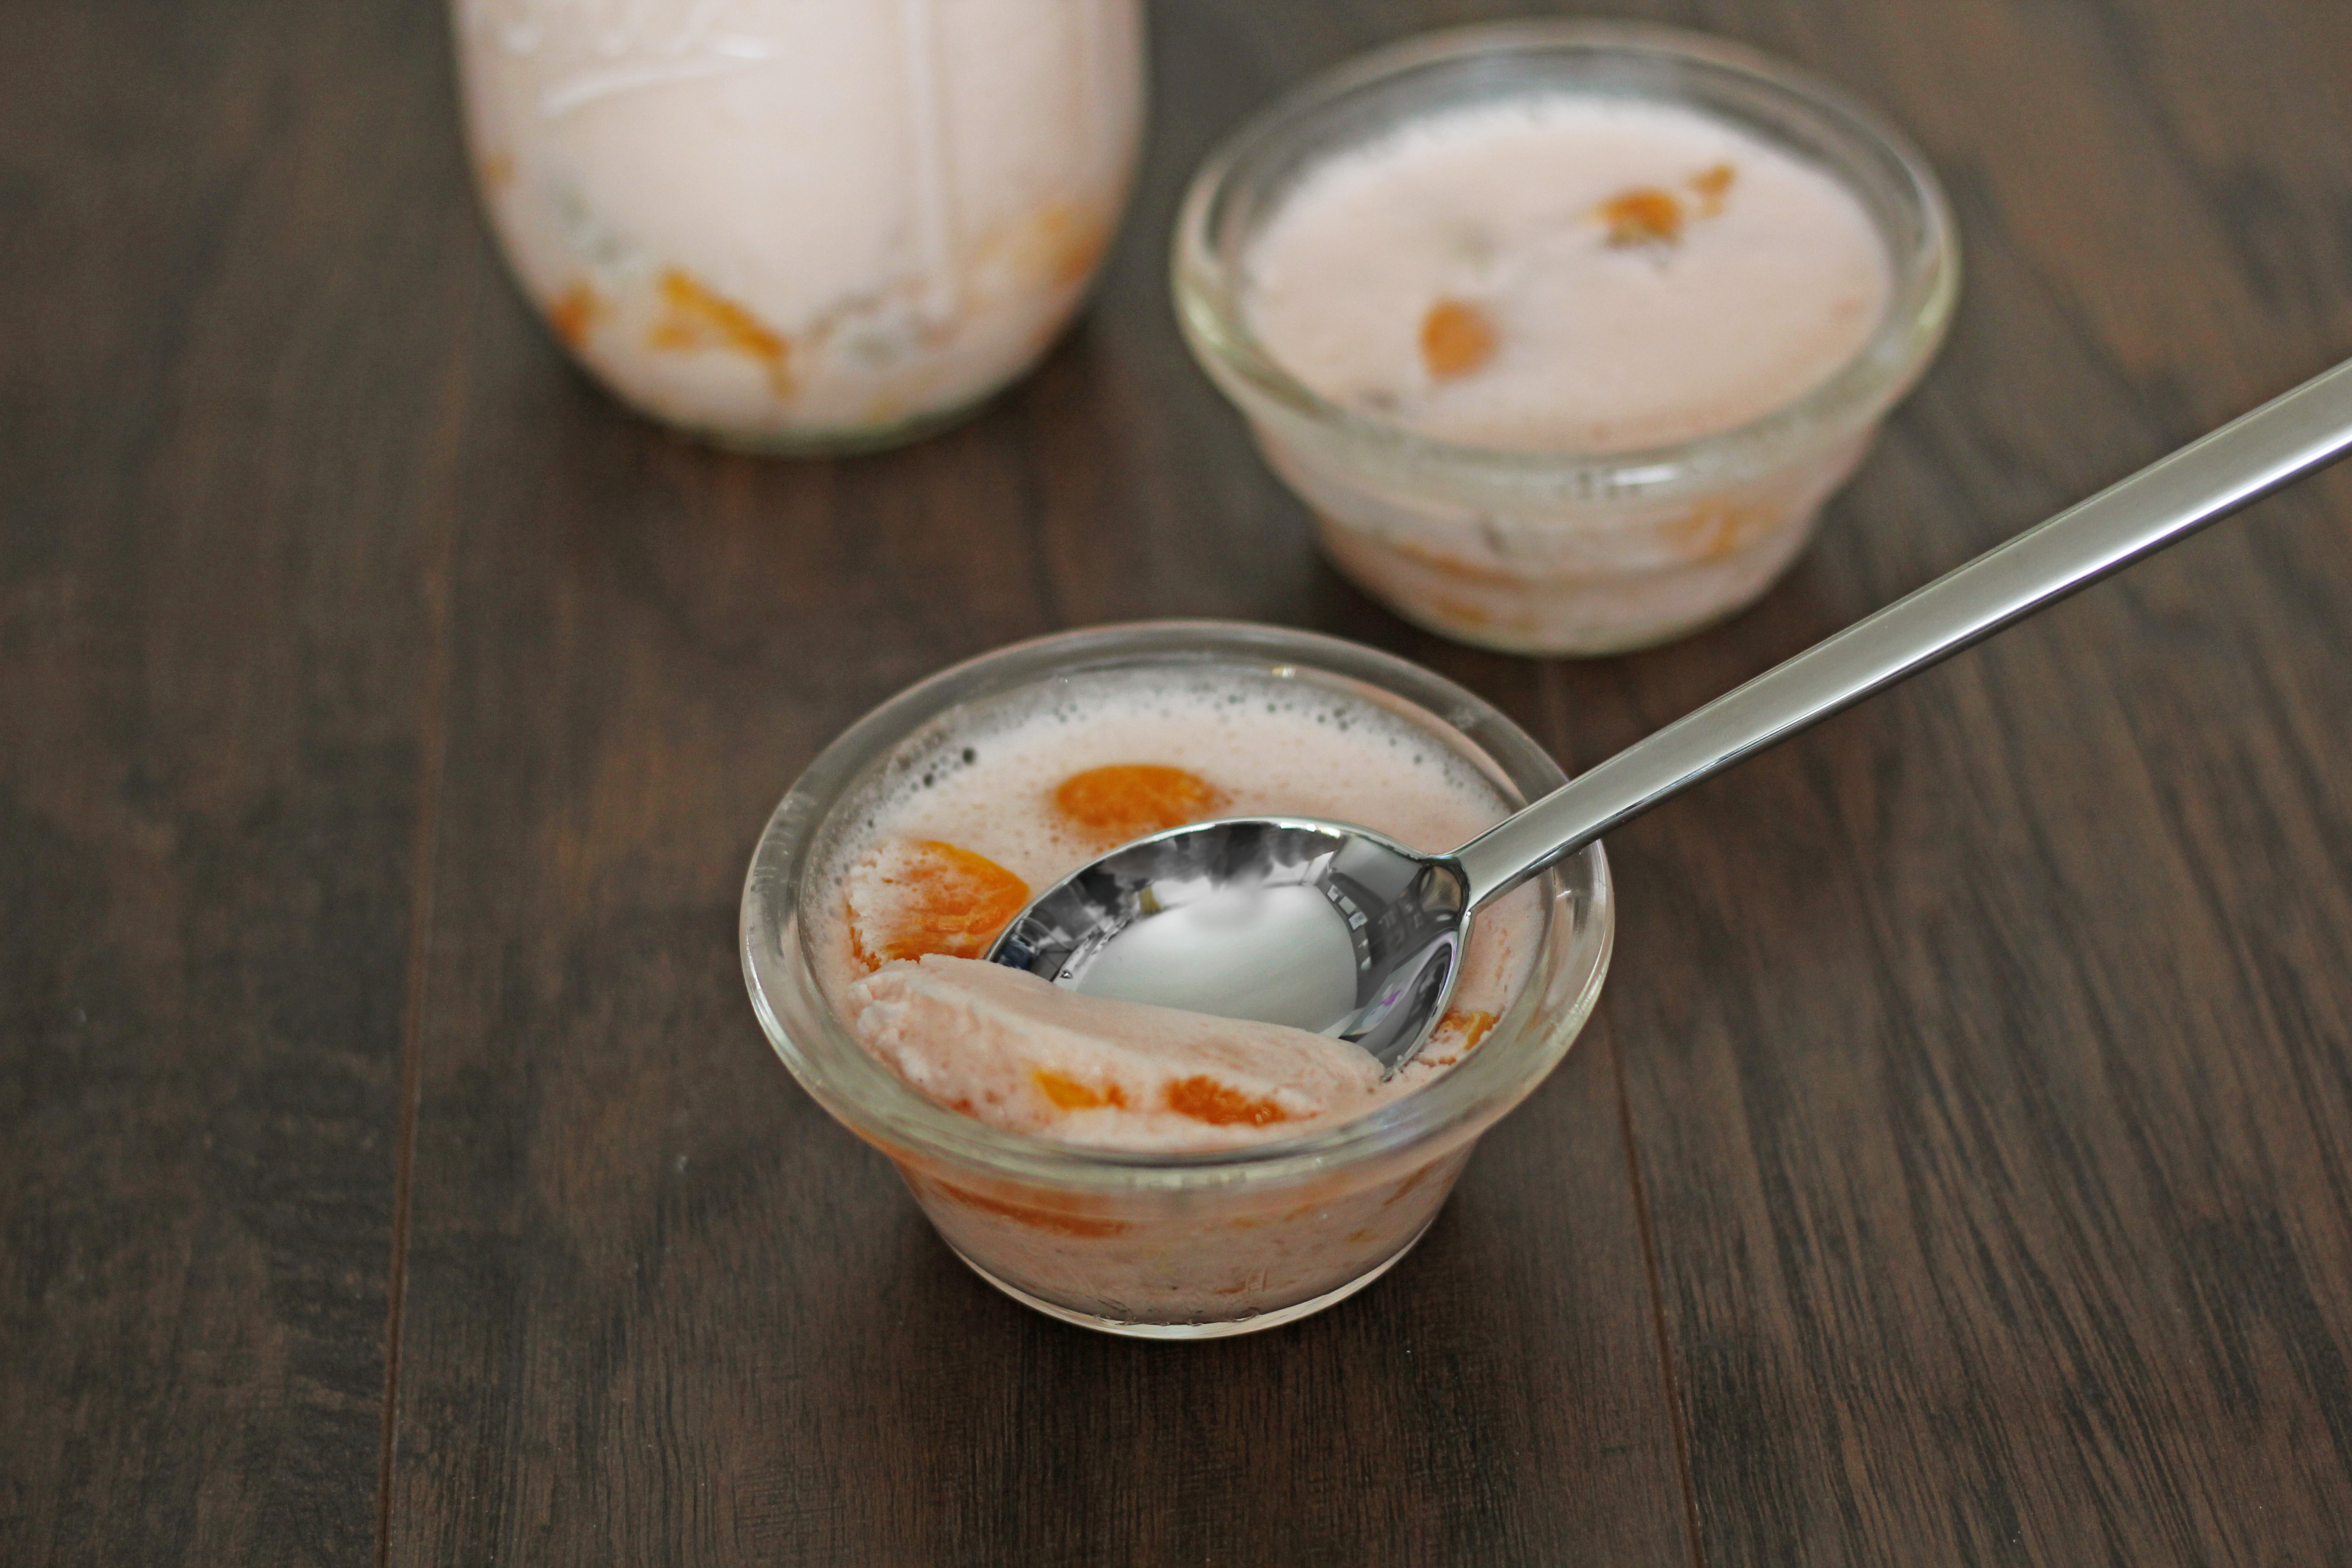
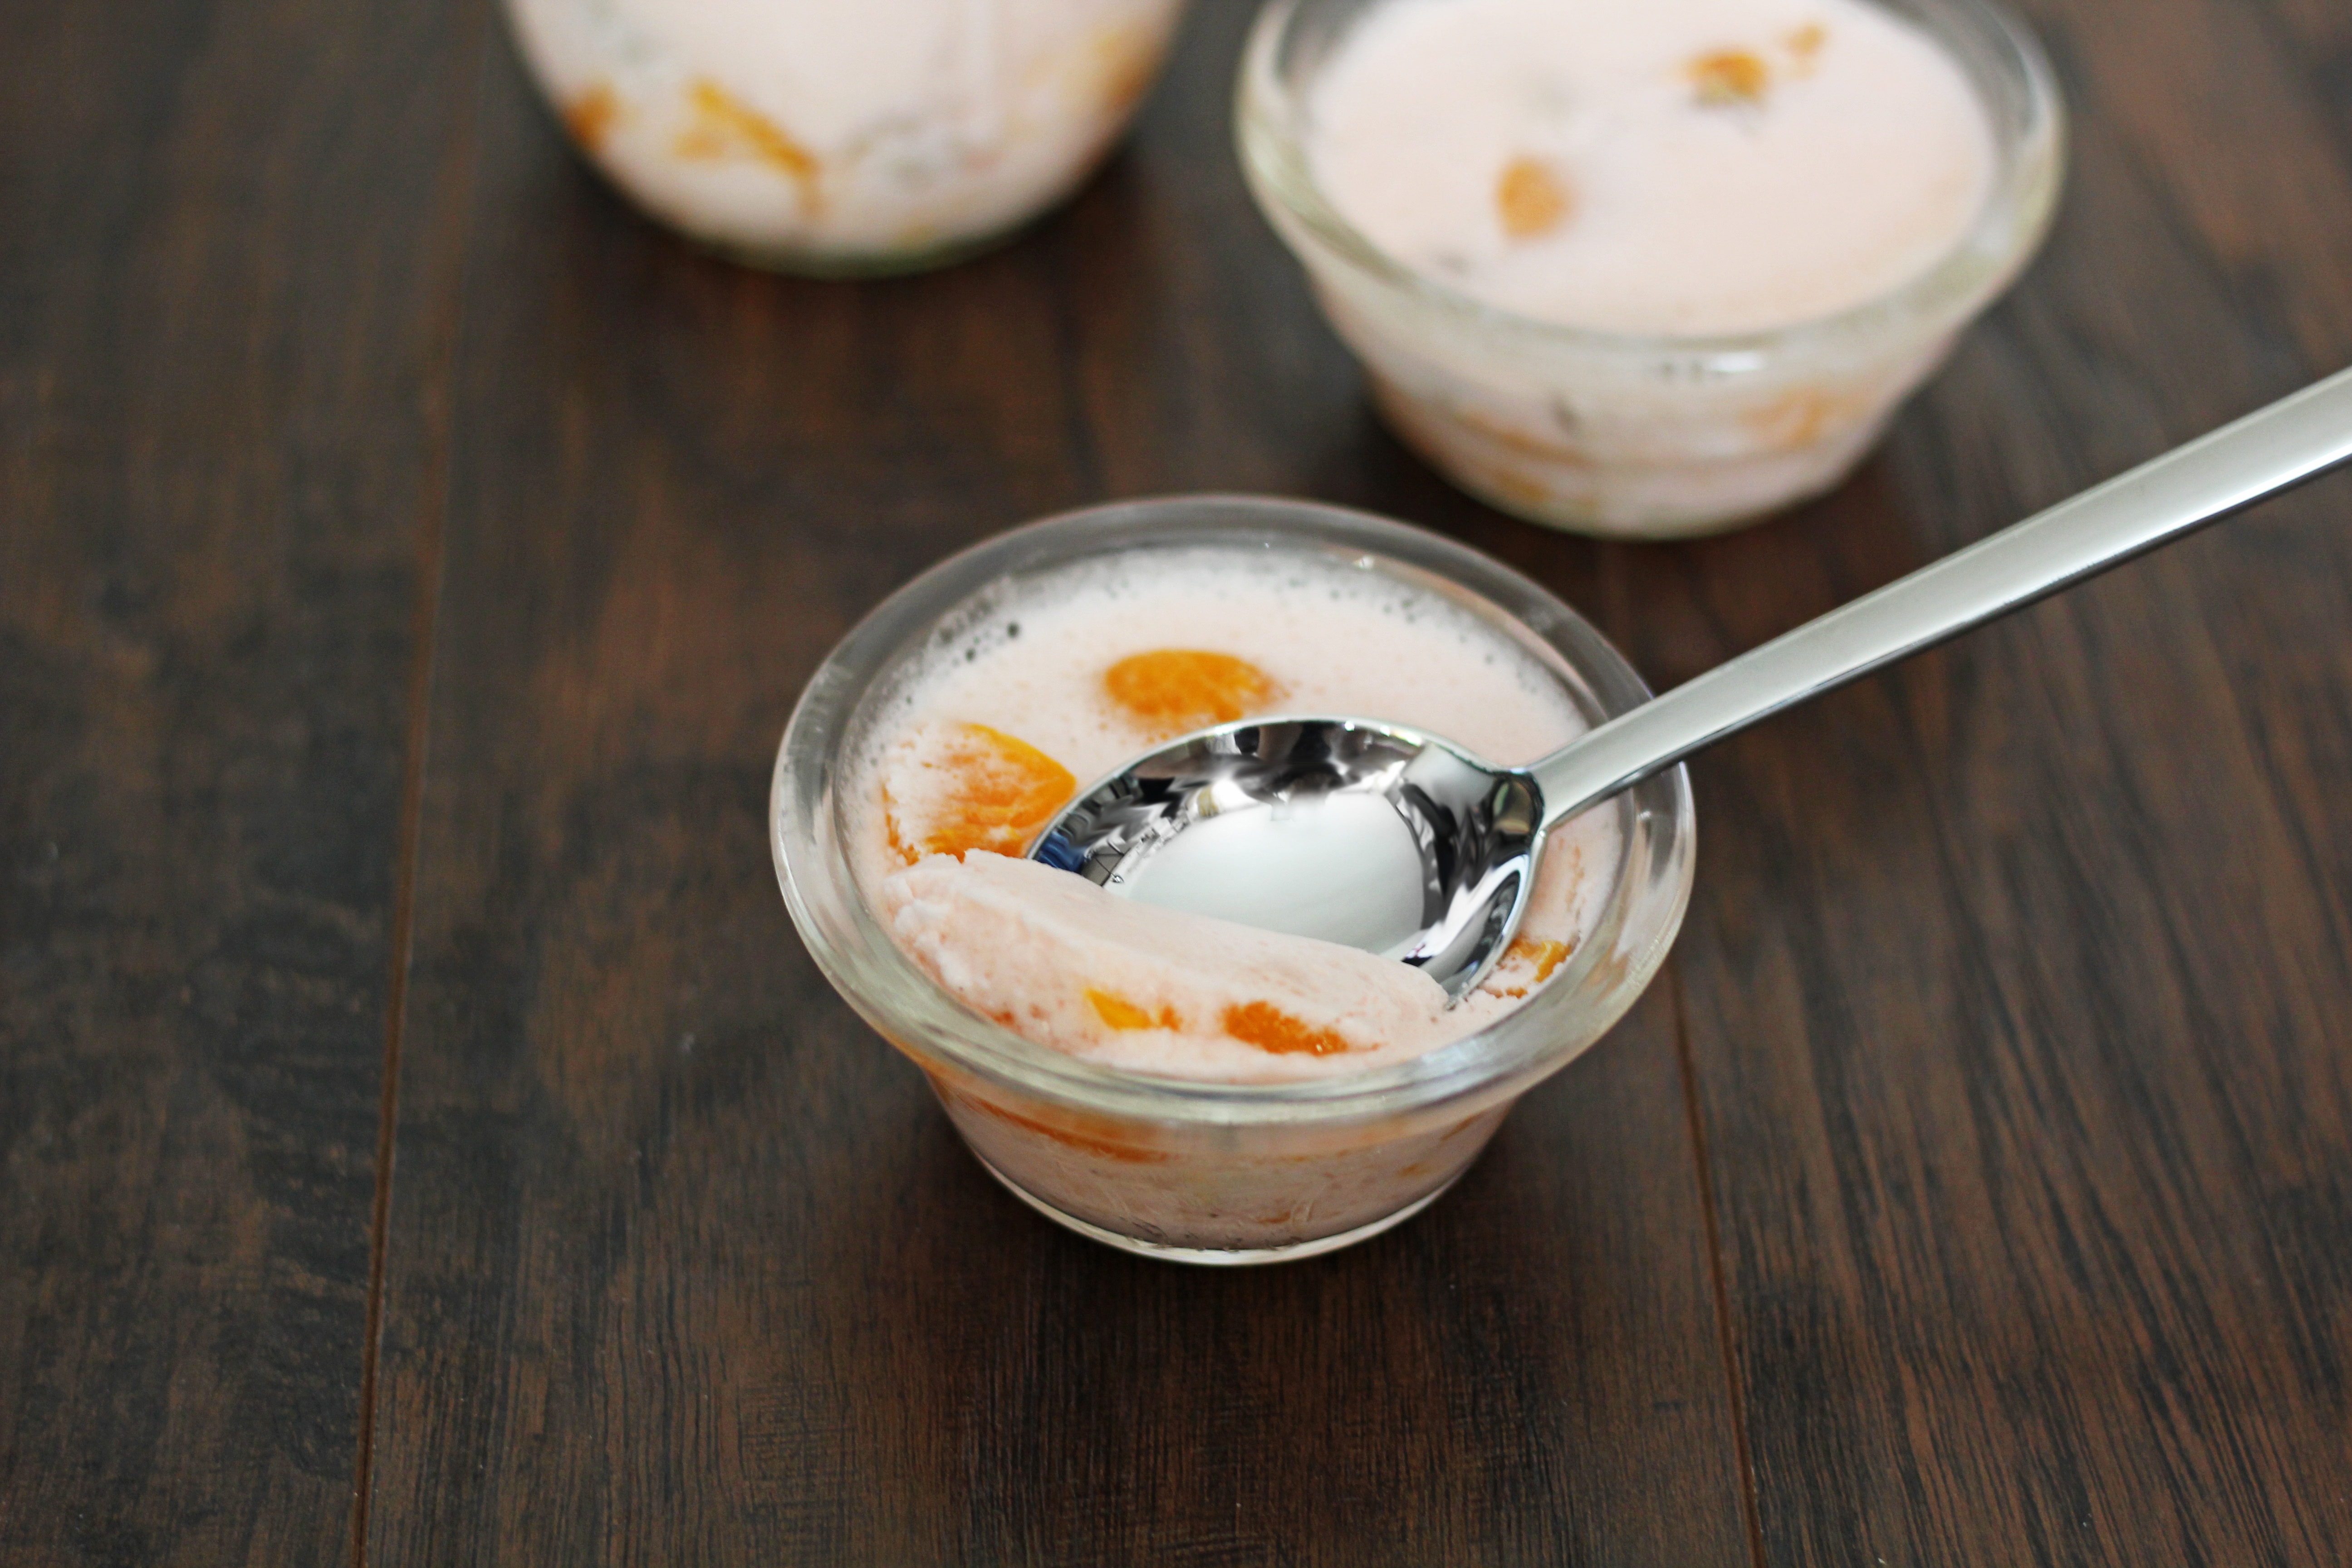
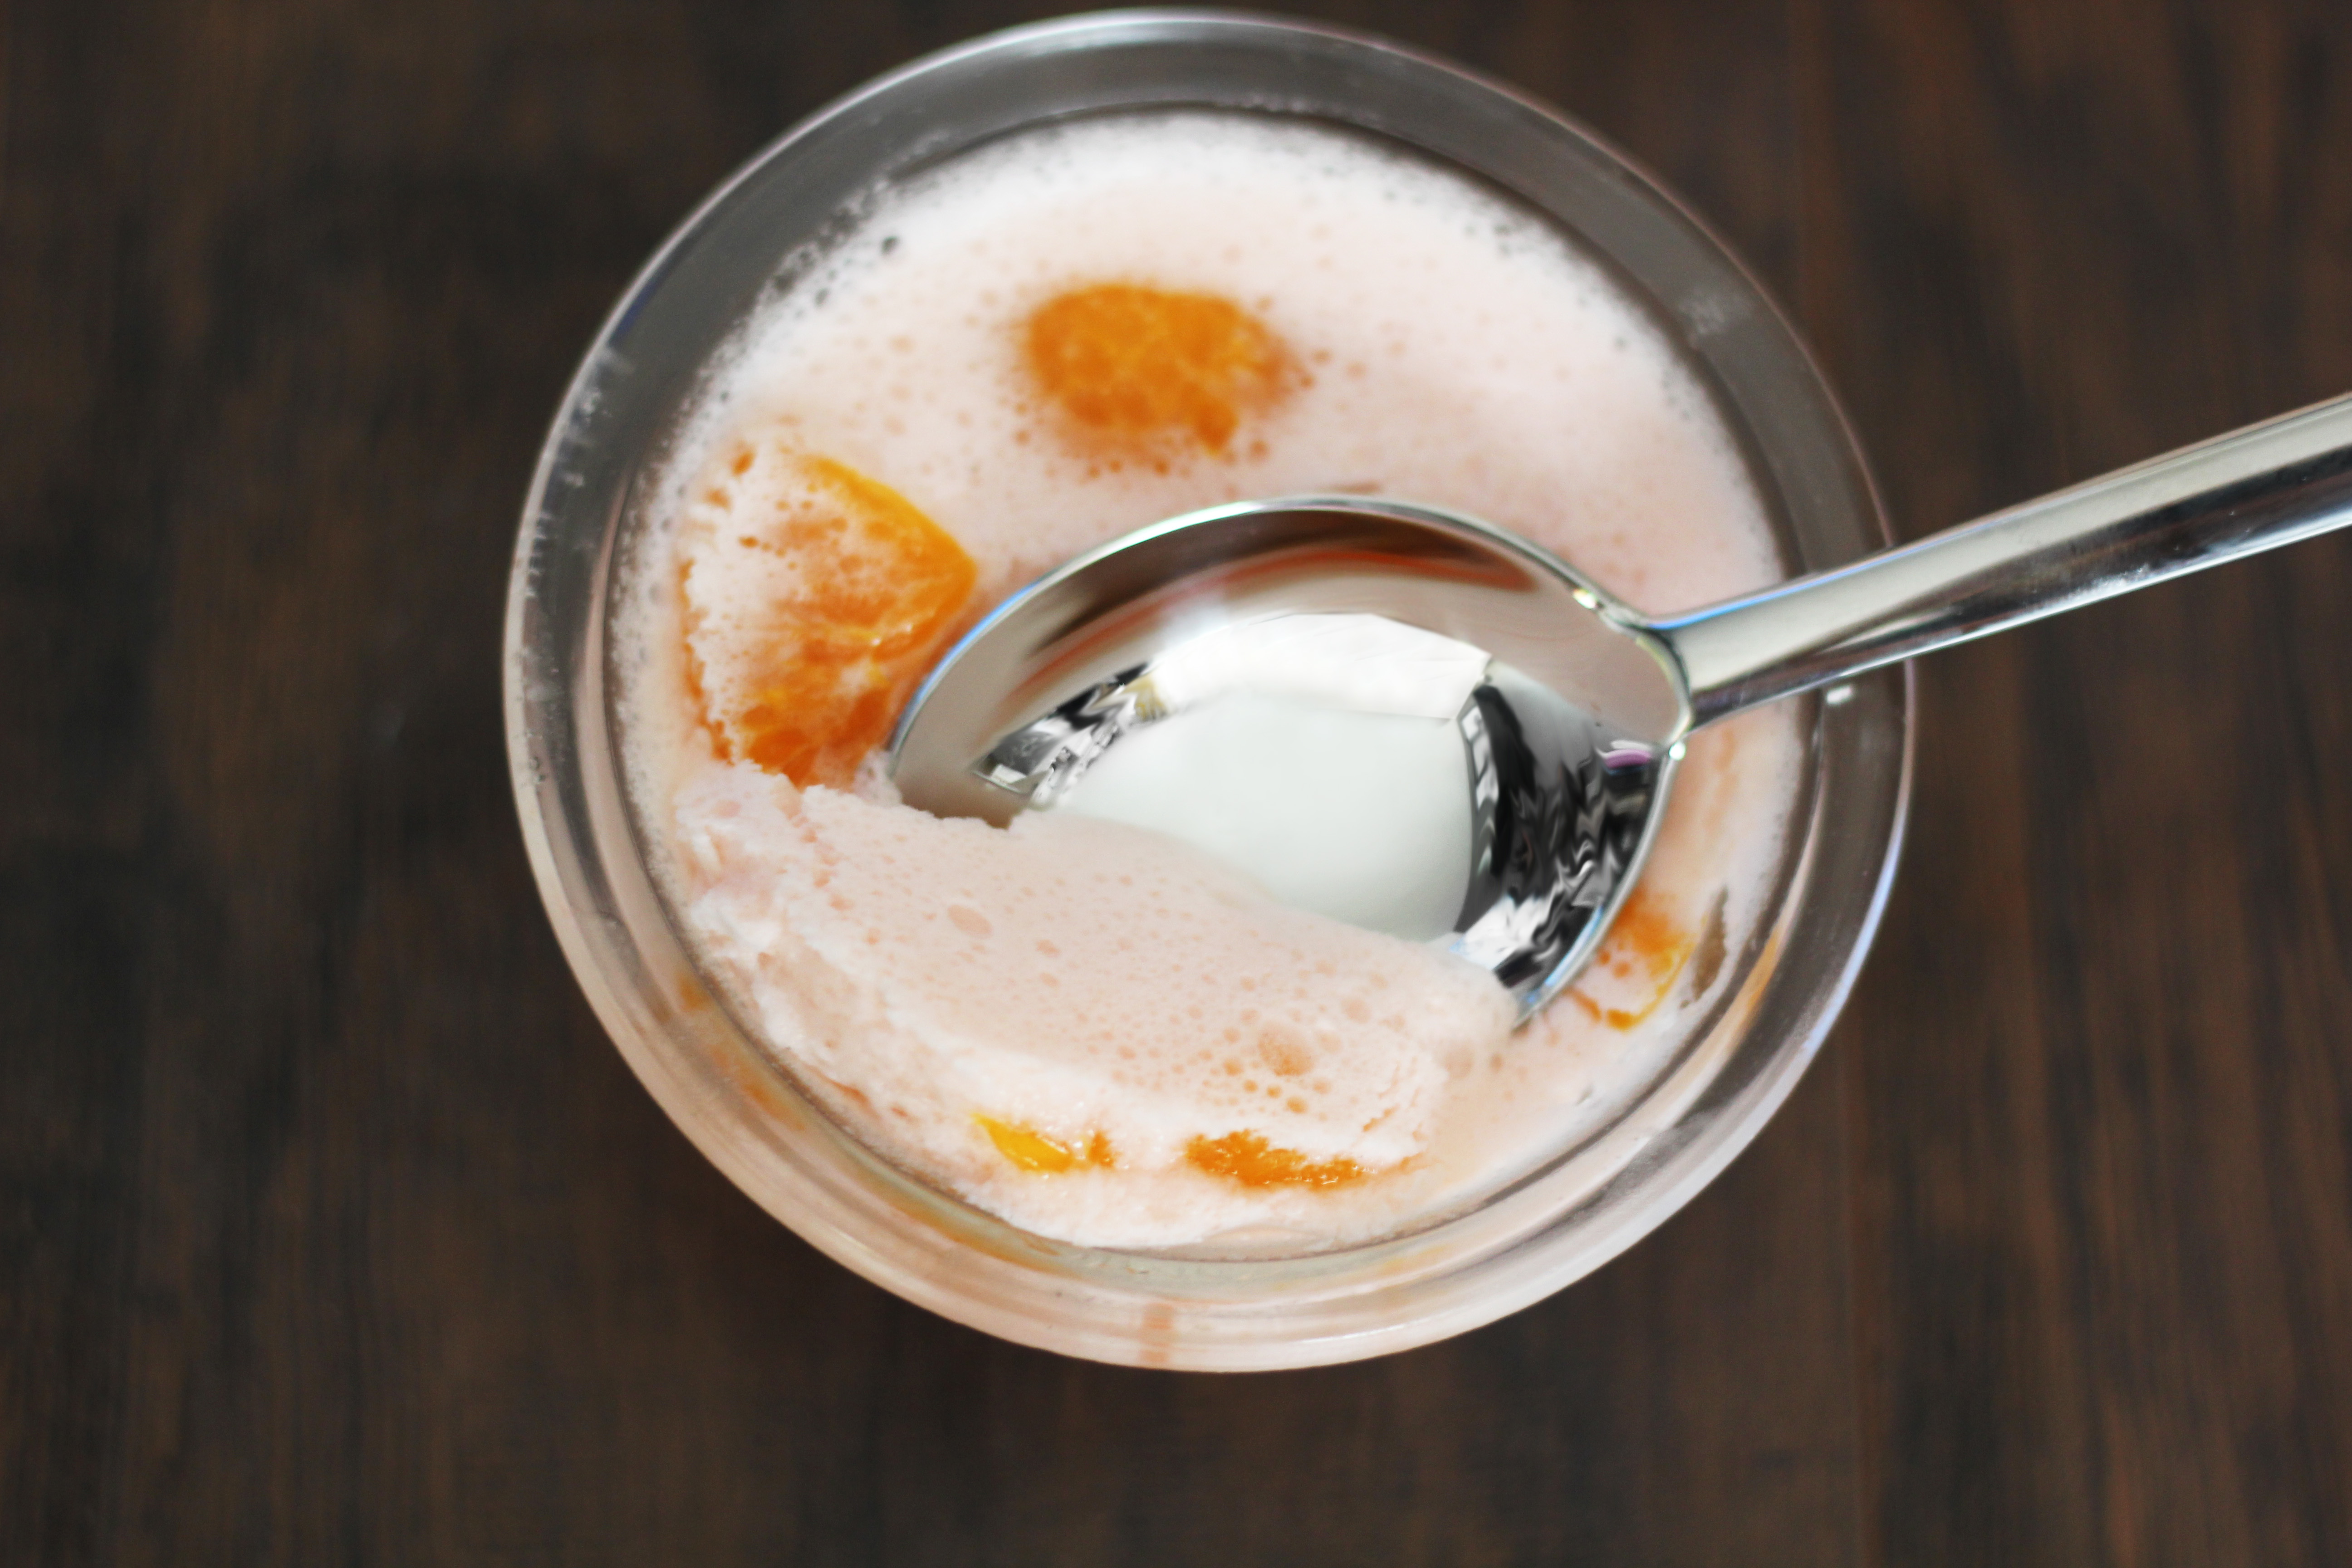
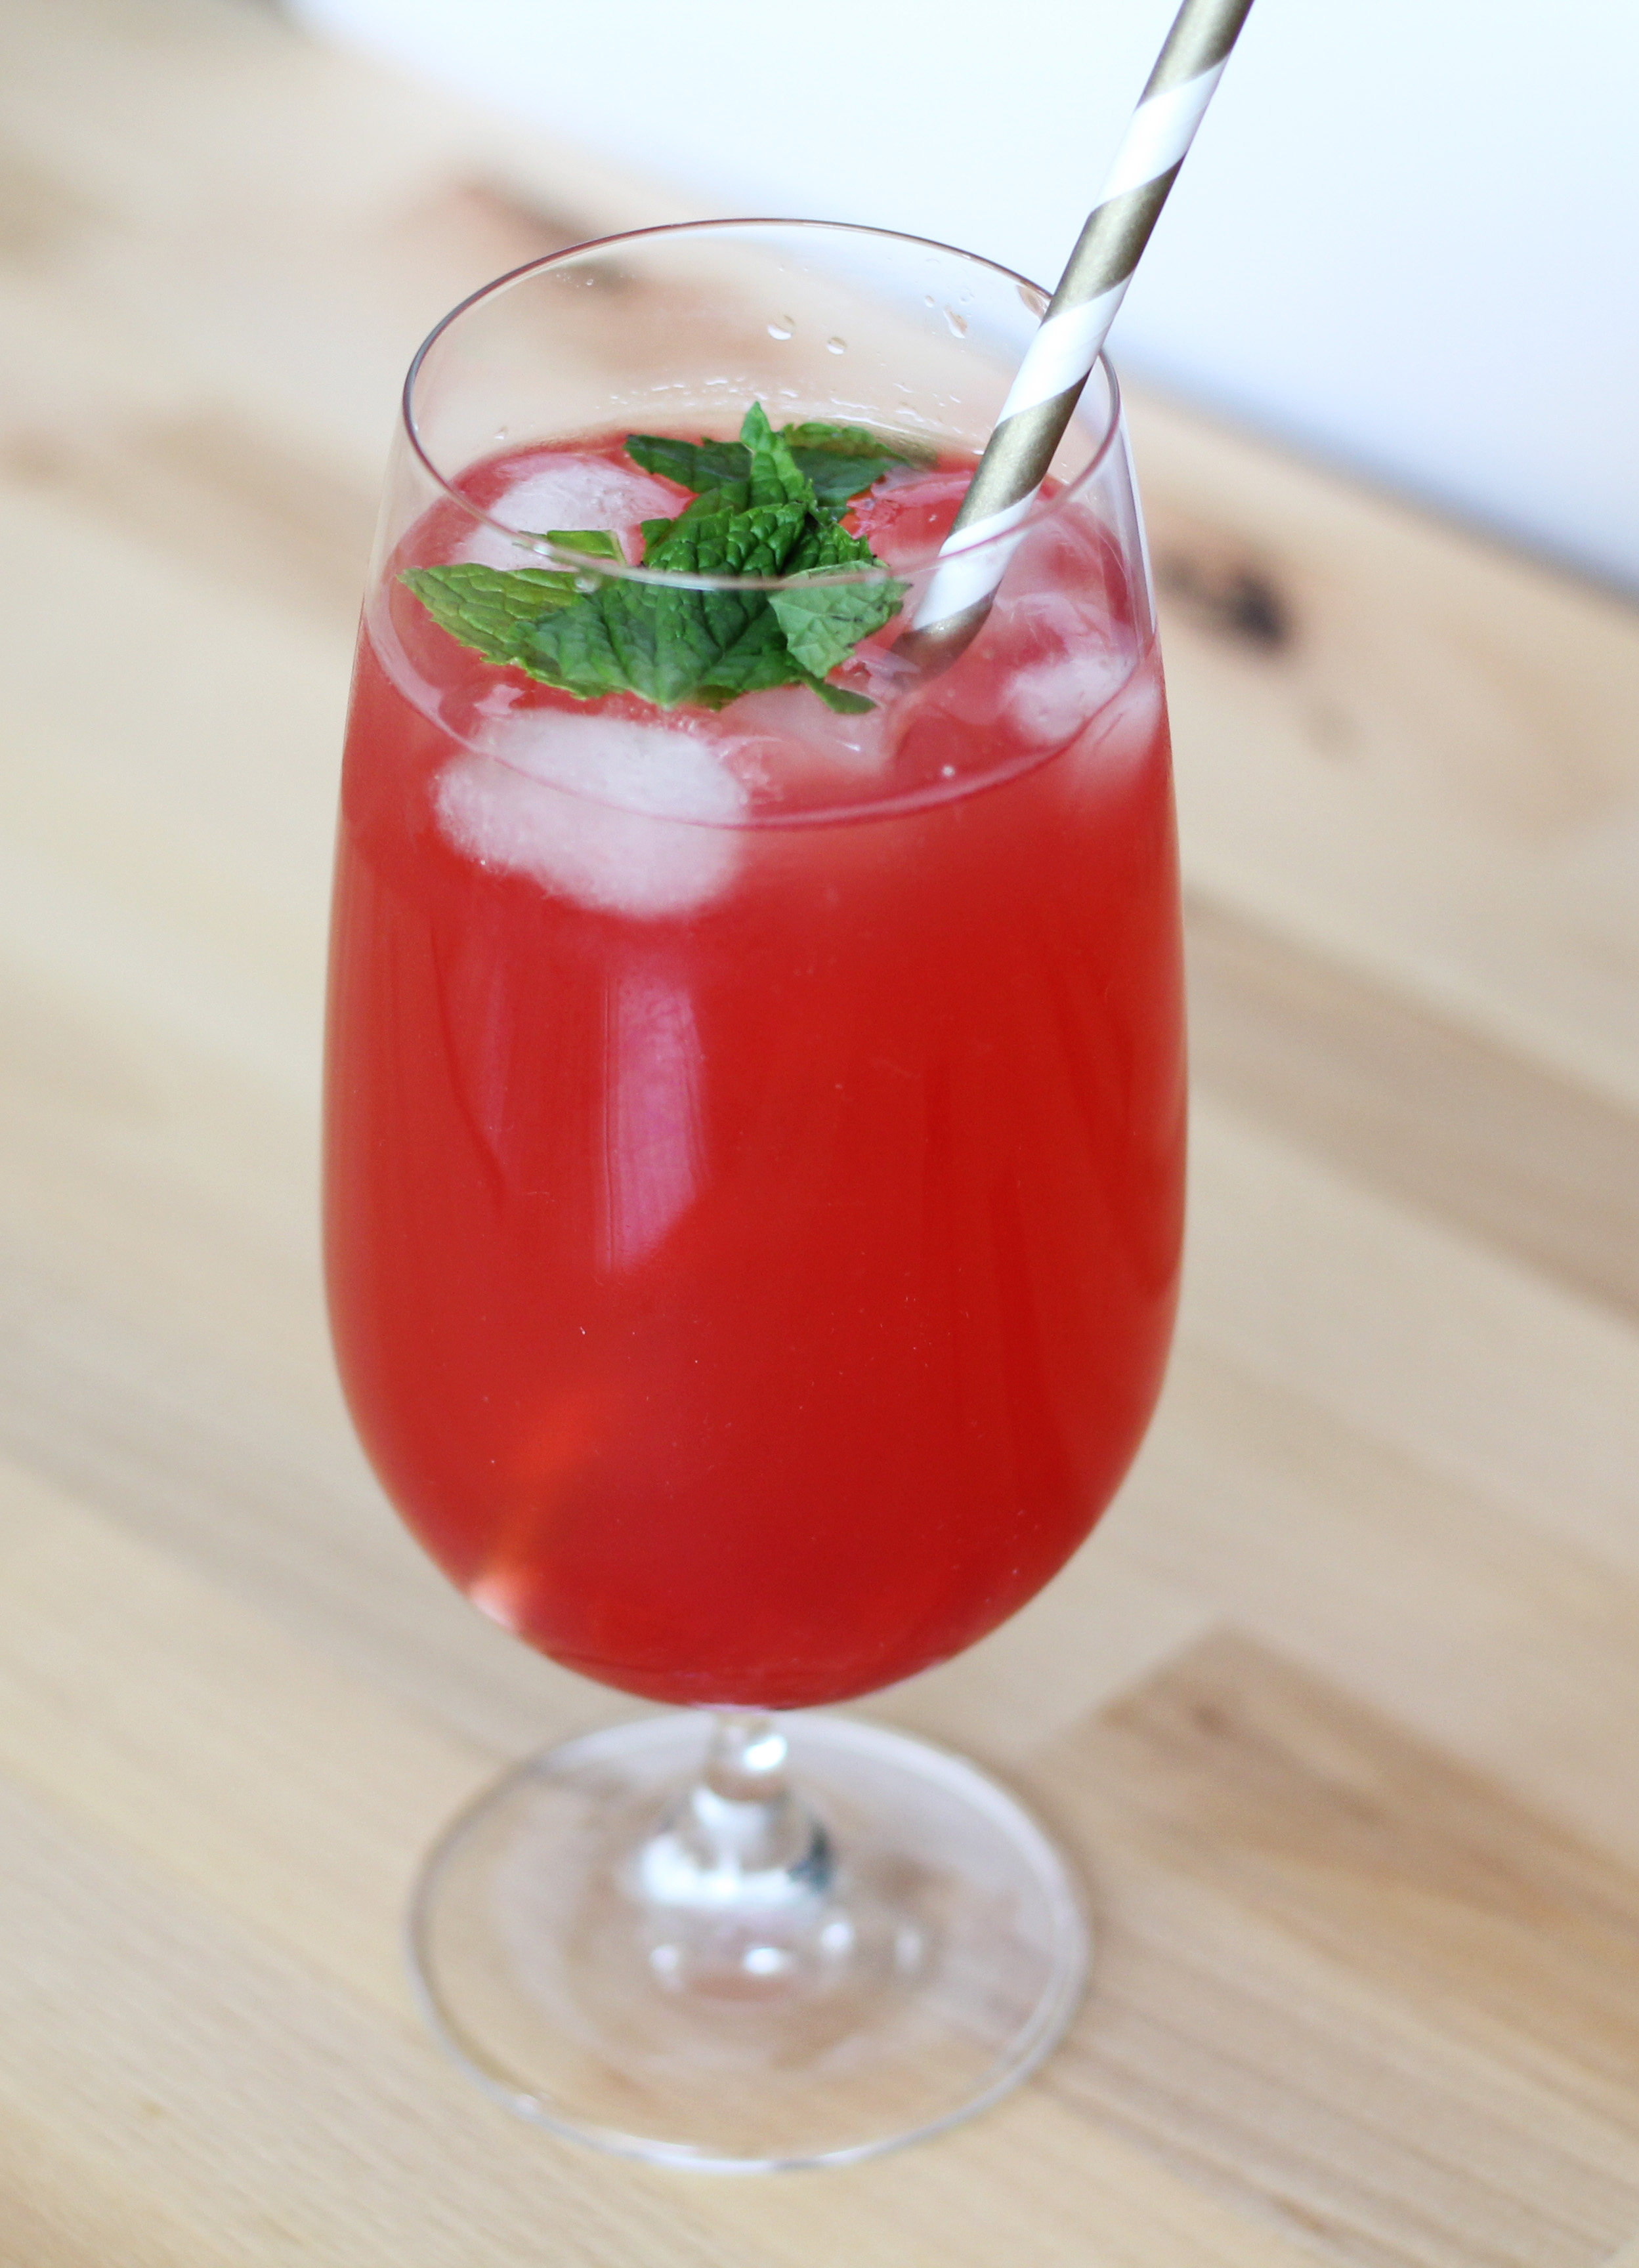
This cherry parfait pie recipe has similar ingredients as our Sunburst Gelatin Dessert (jello and ice cream), but it doesn’t parade around pretending to be a “salad.” This pie presents itself as a sweet and delicious dessert and it does not disappoint.

Cherry Parfait Pie 
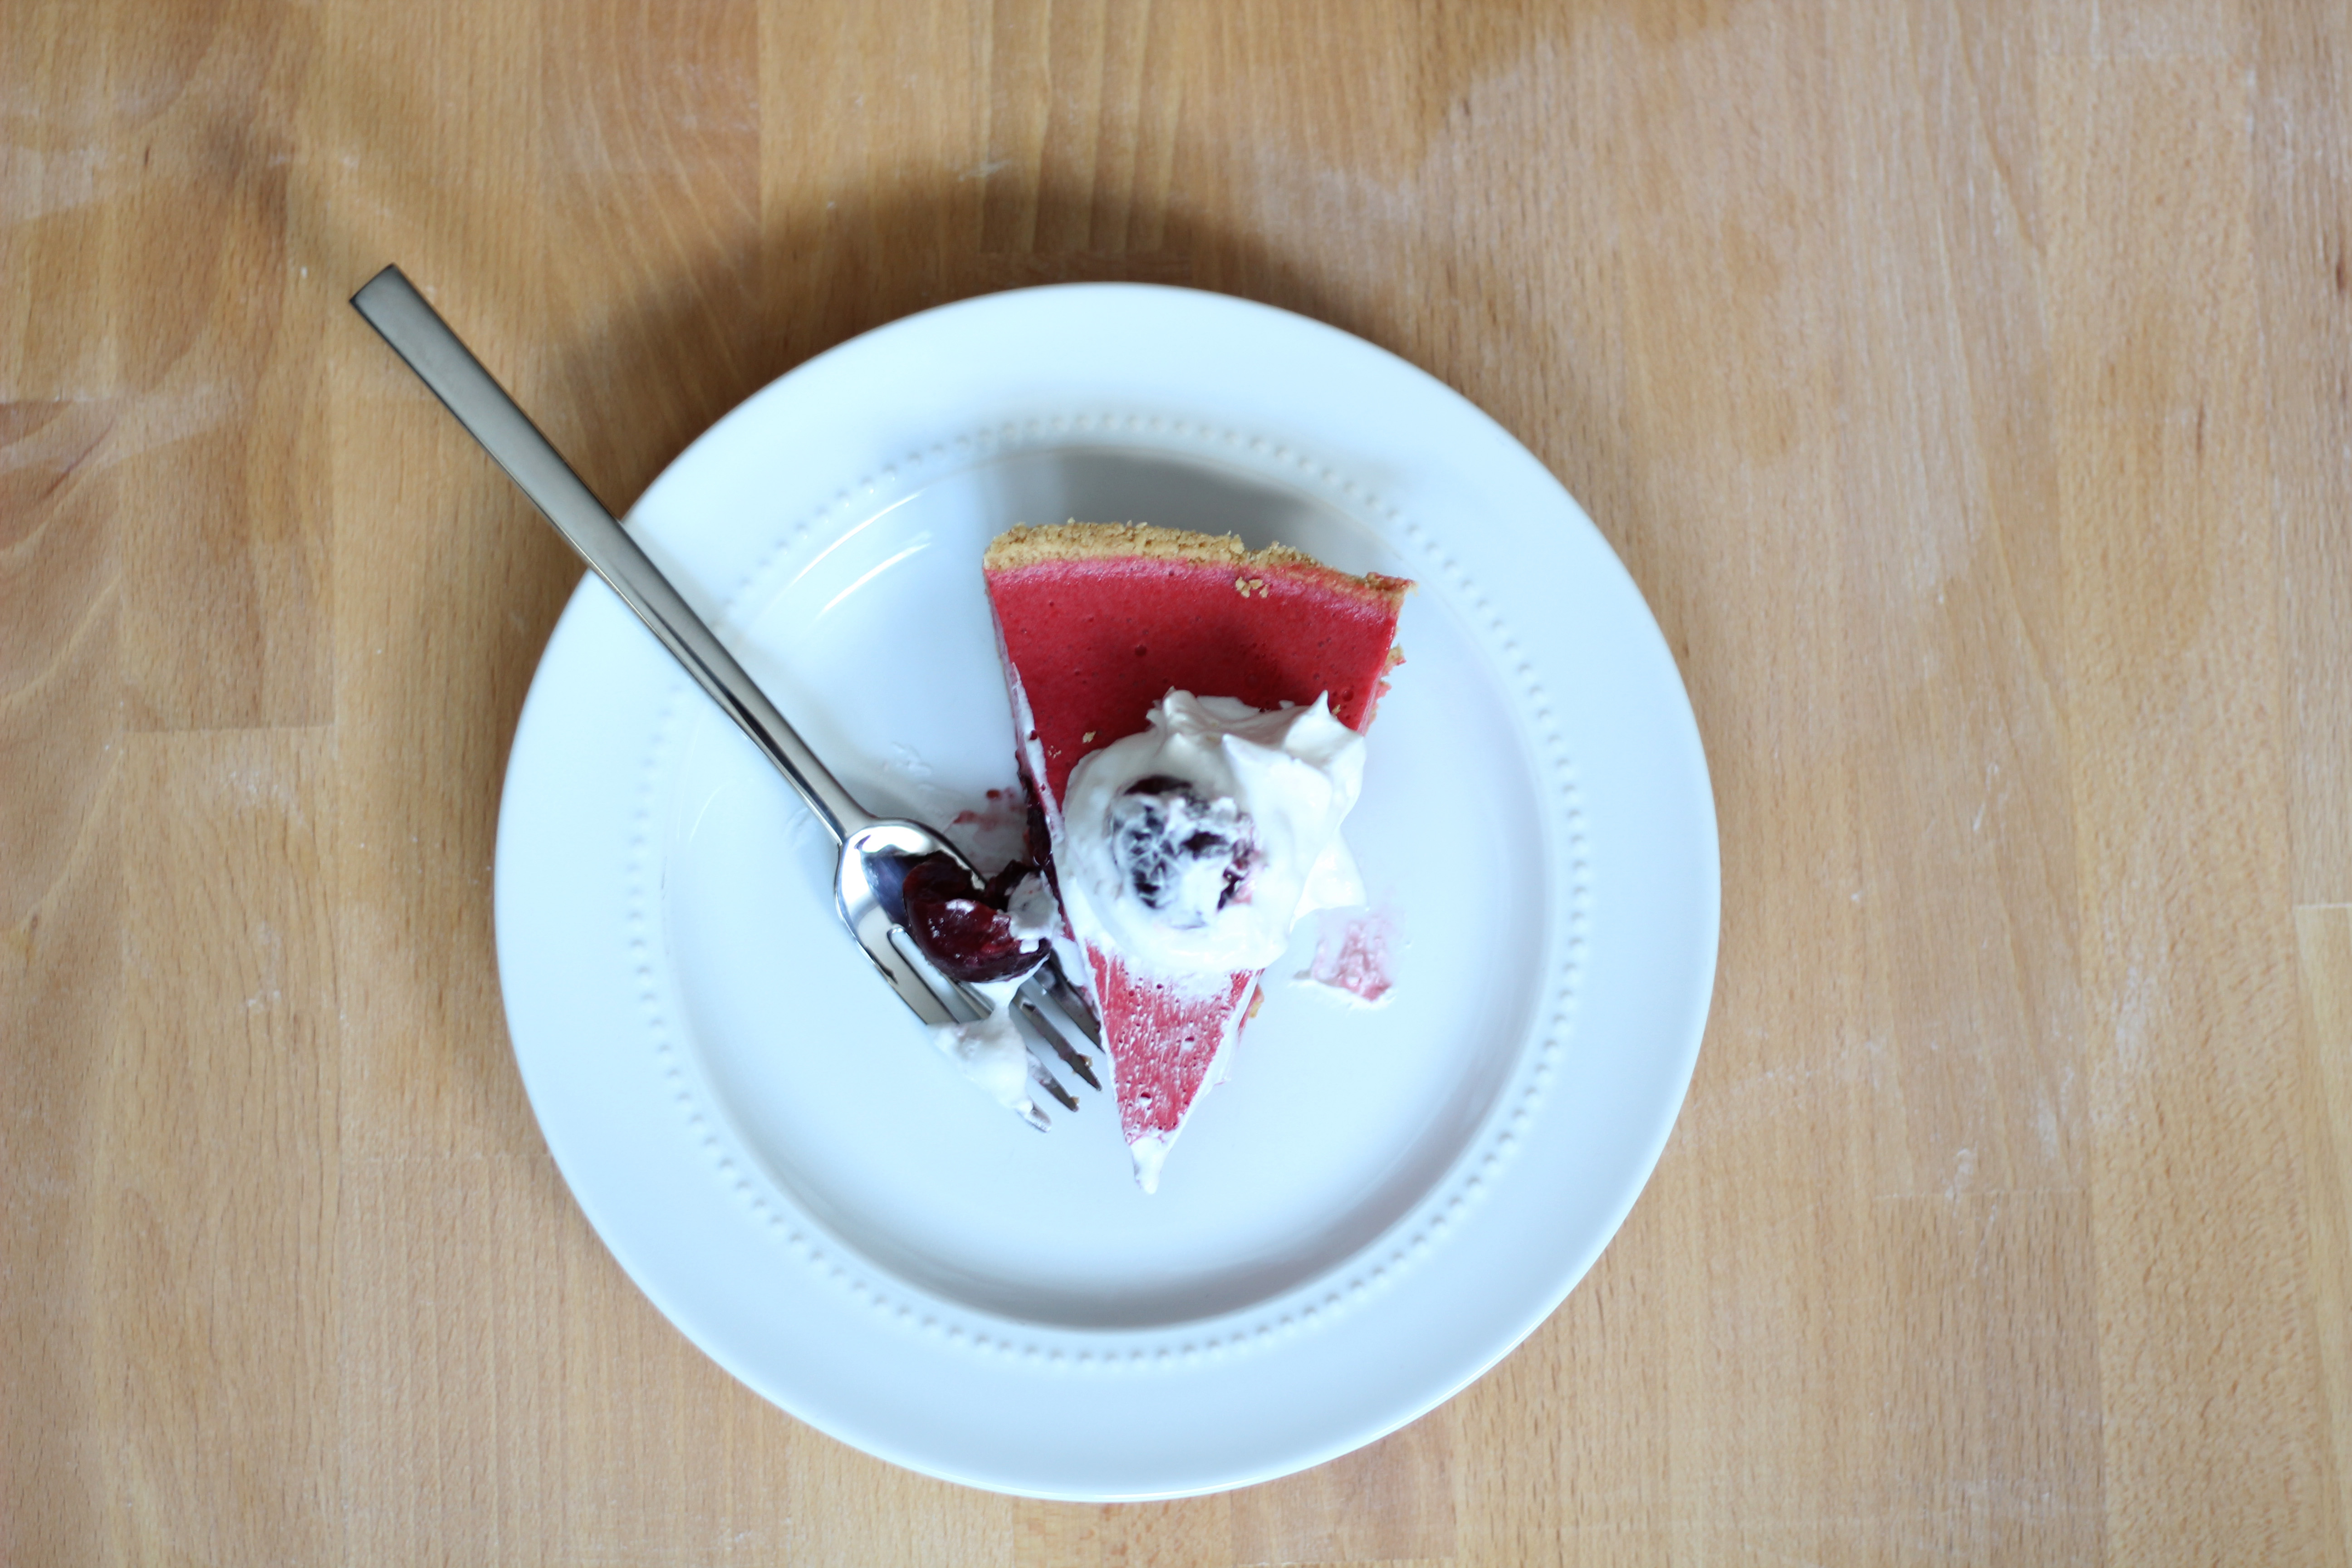
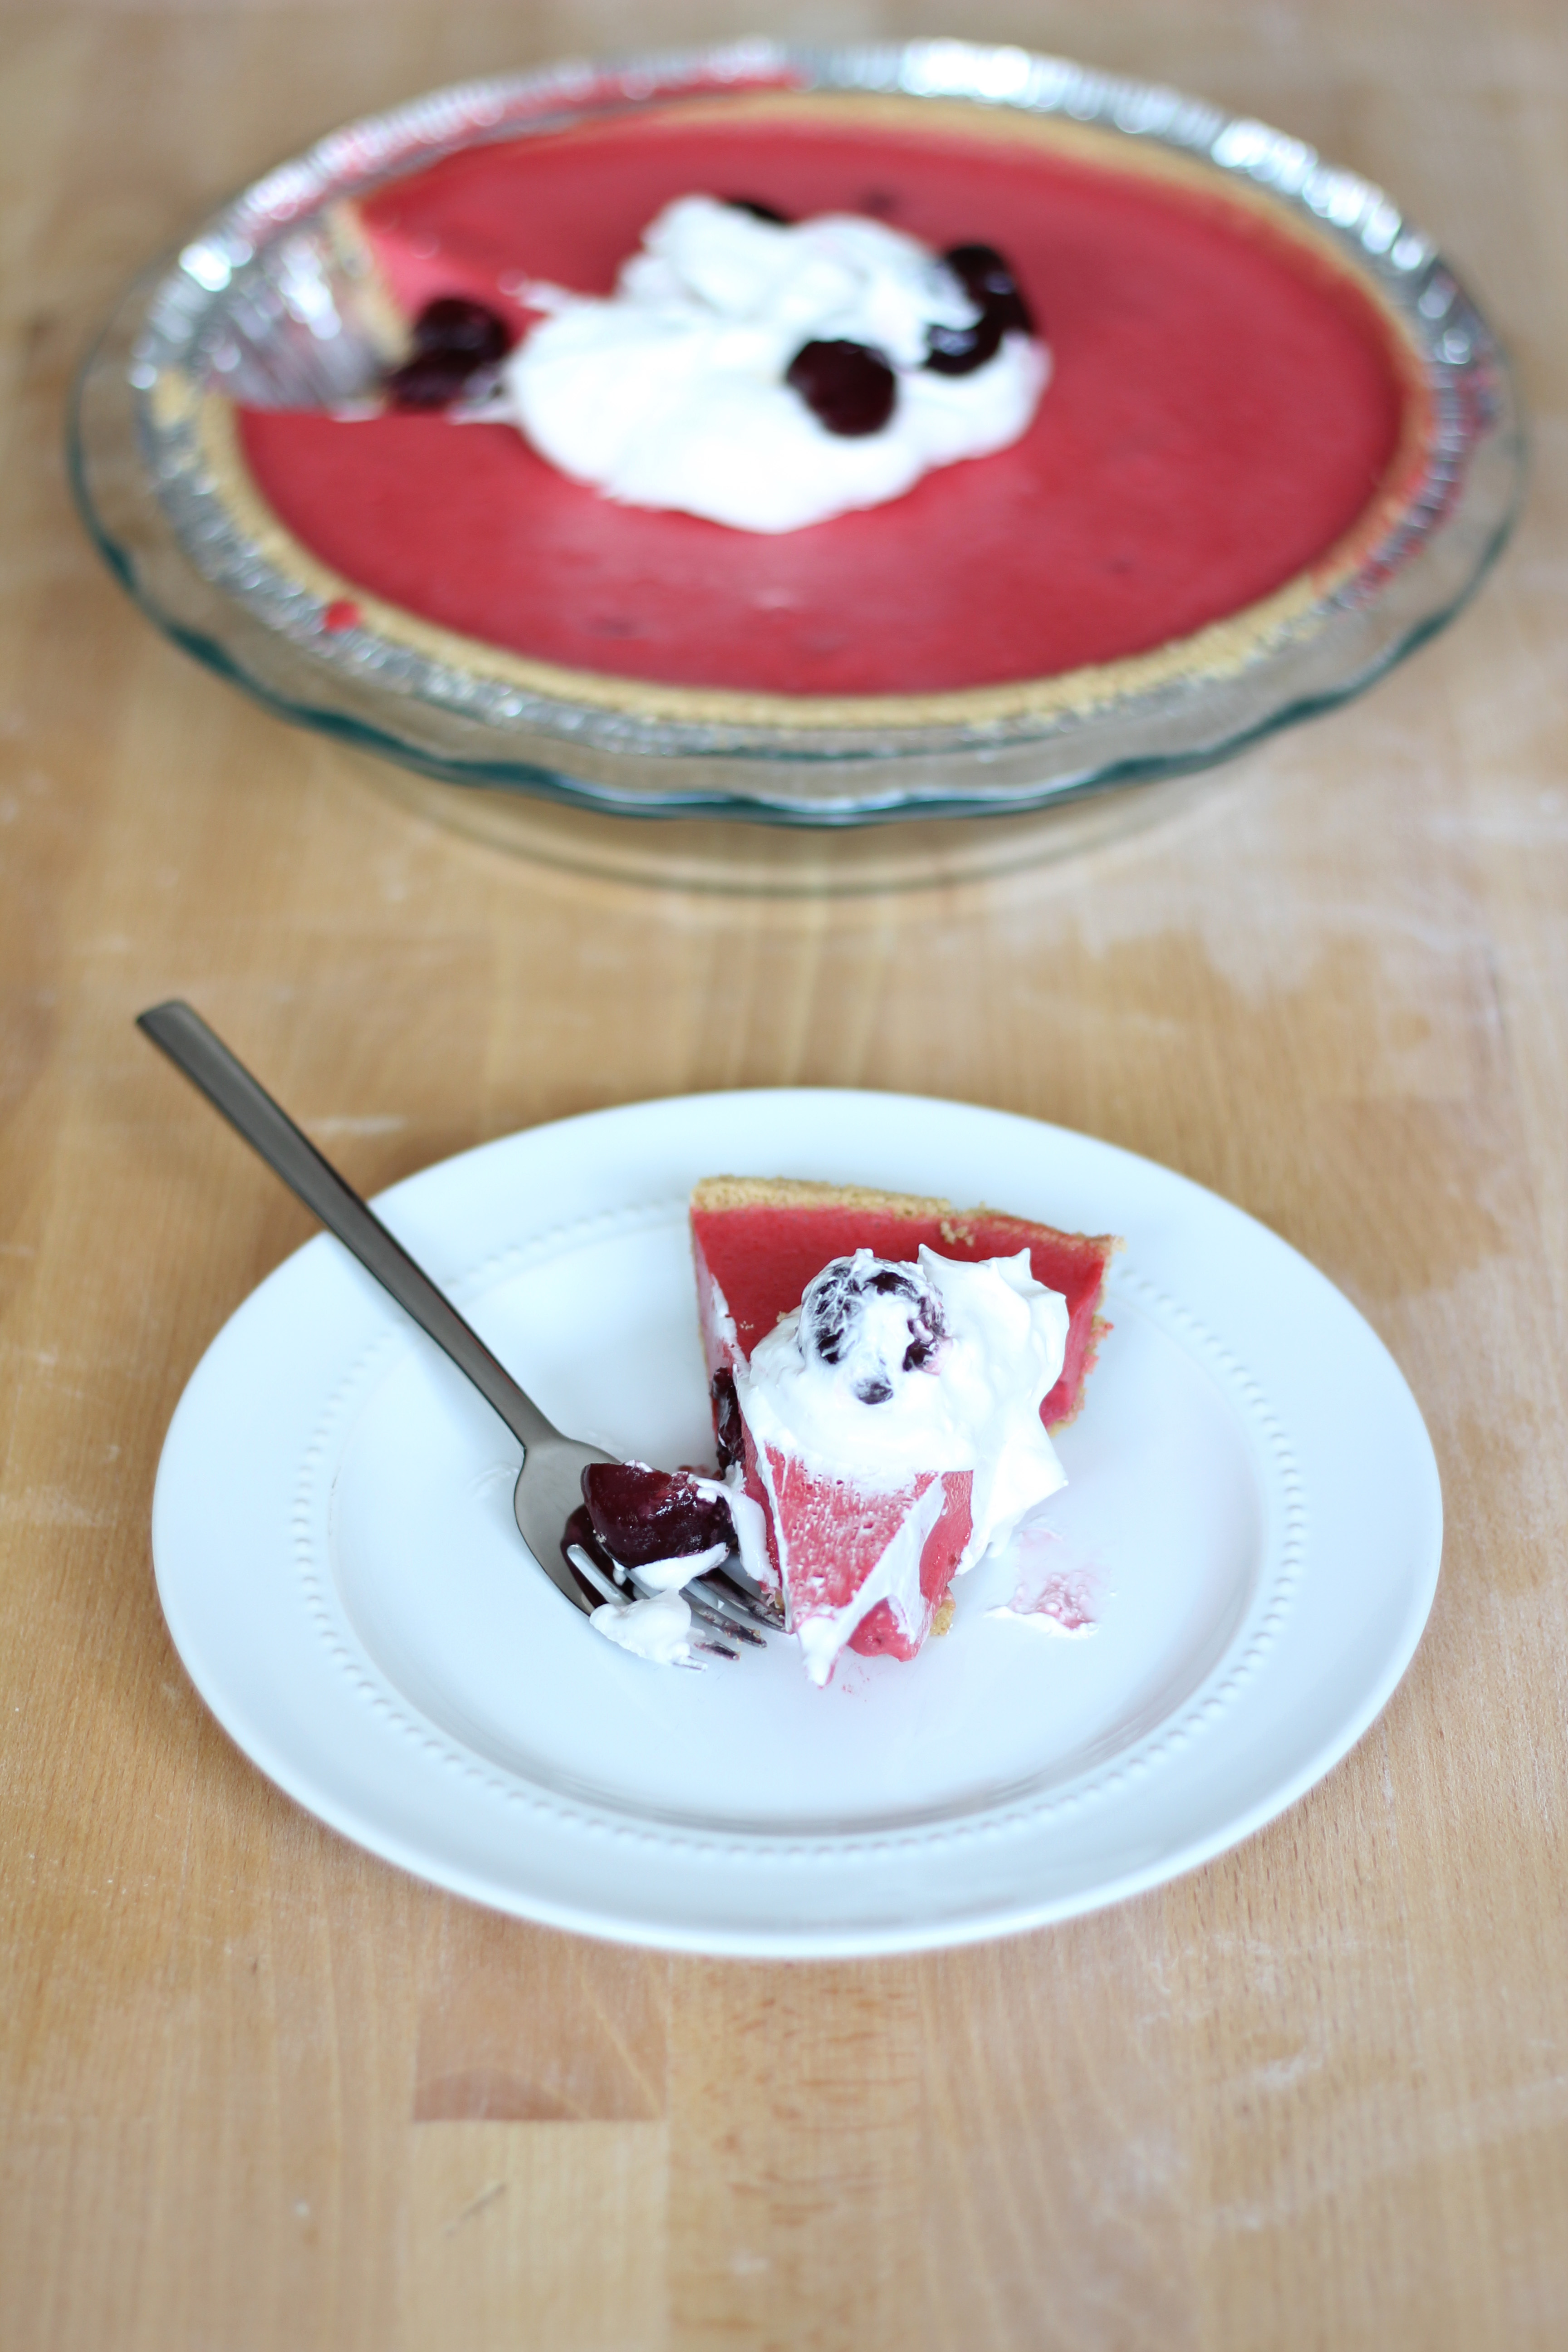
While I still feel this was a less than ideal use of all that ice cream ( I just really love ice cream,) it makes the cherry parfait pie a delicious mouss-ey consistency. This pie was so rich, I couldn’t even finish a whole piece! Aaron, however, couldn’t wait to get at this it. He ate a nice big piece and enjoyed every bit of it.

Cherry Parfait Pie

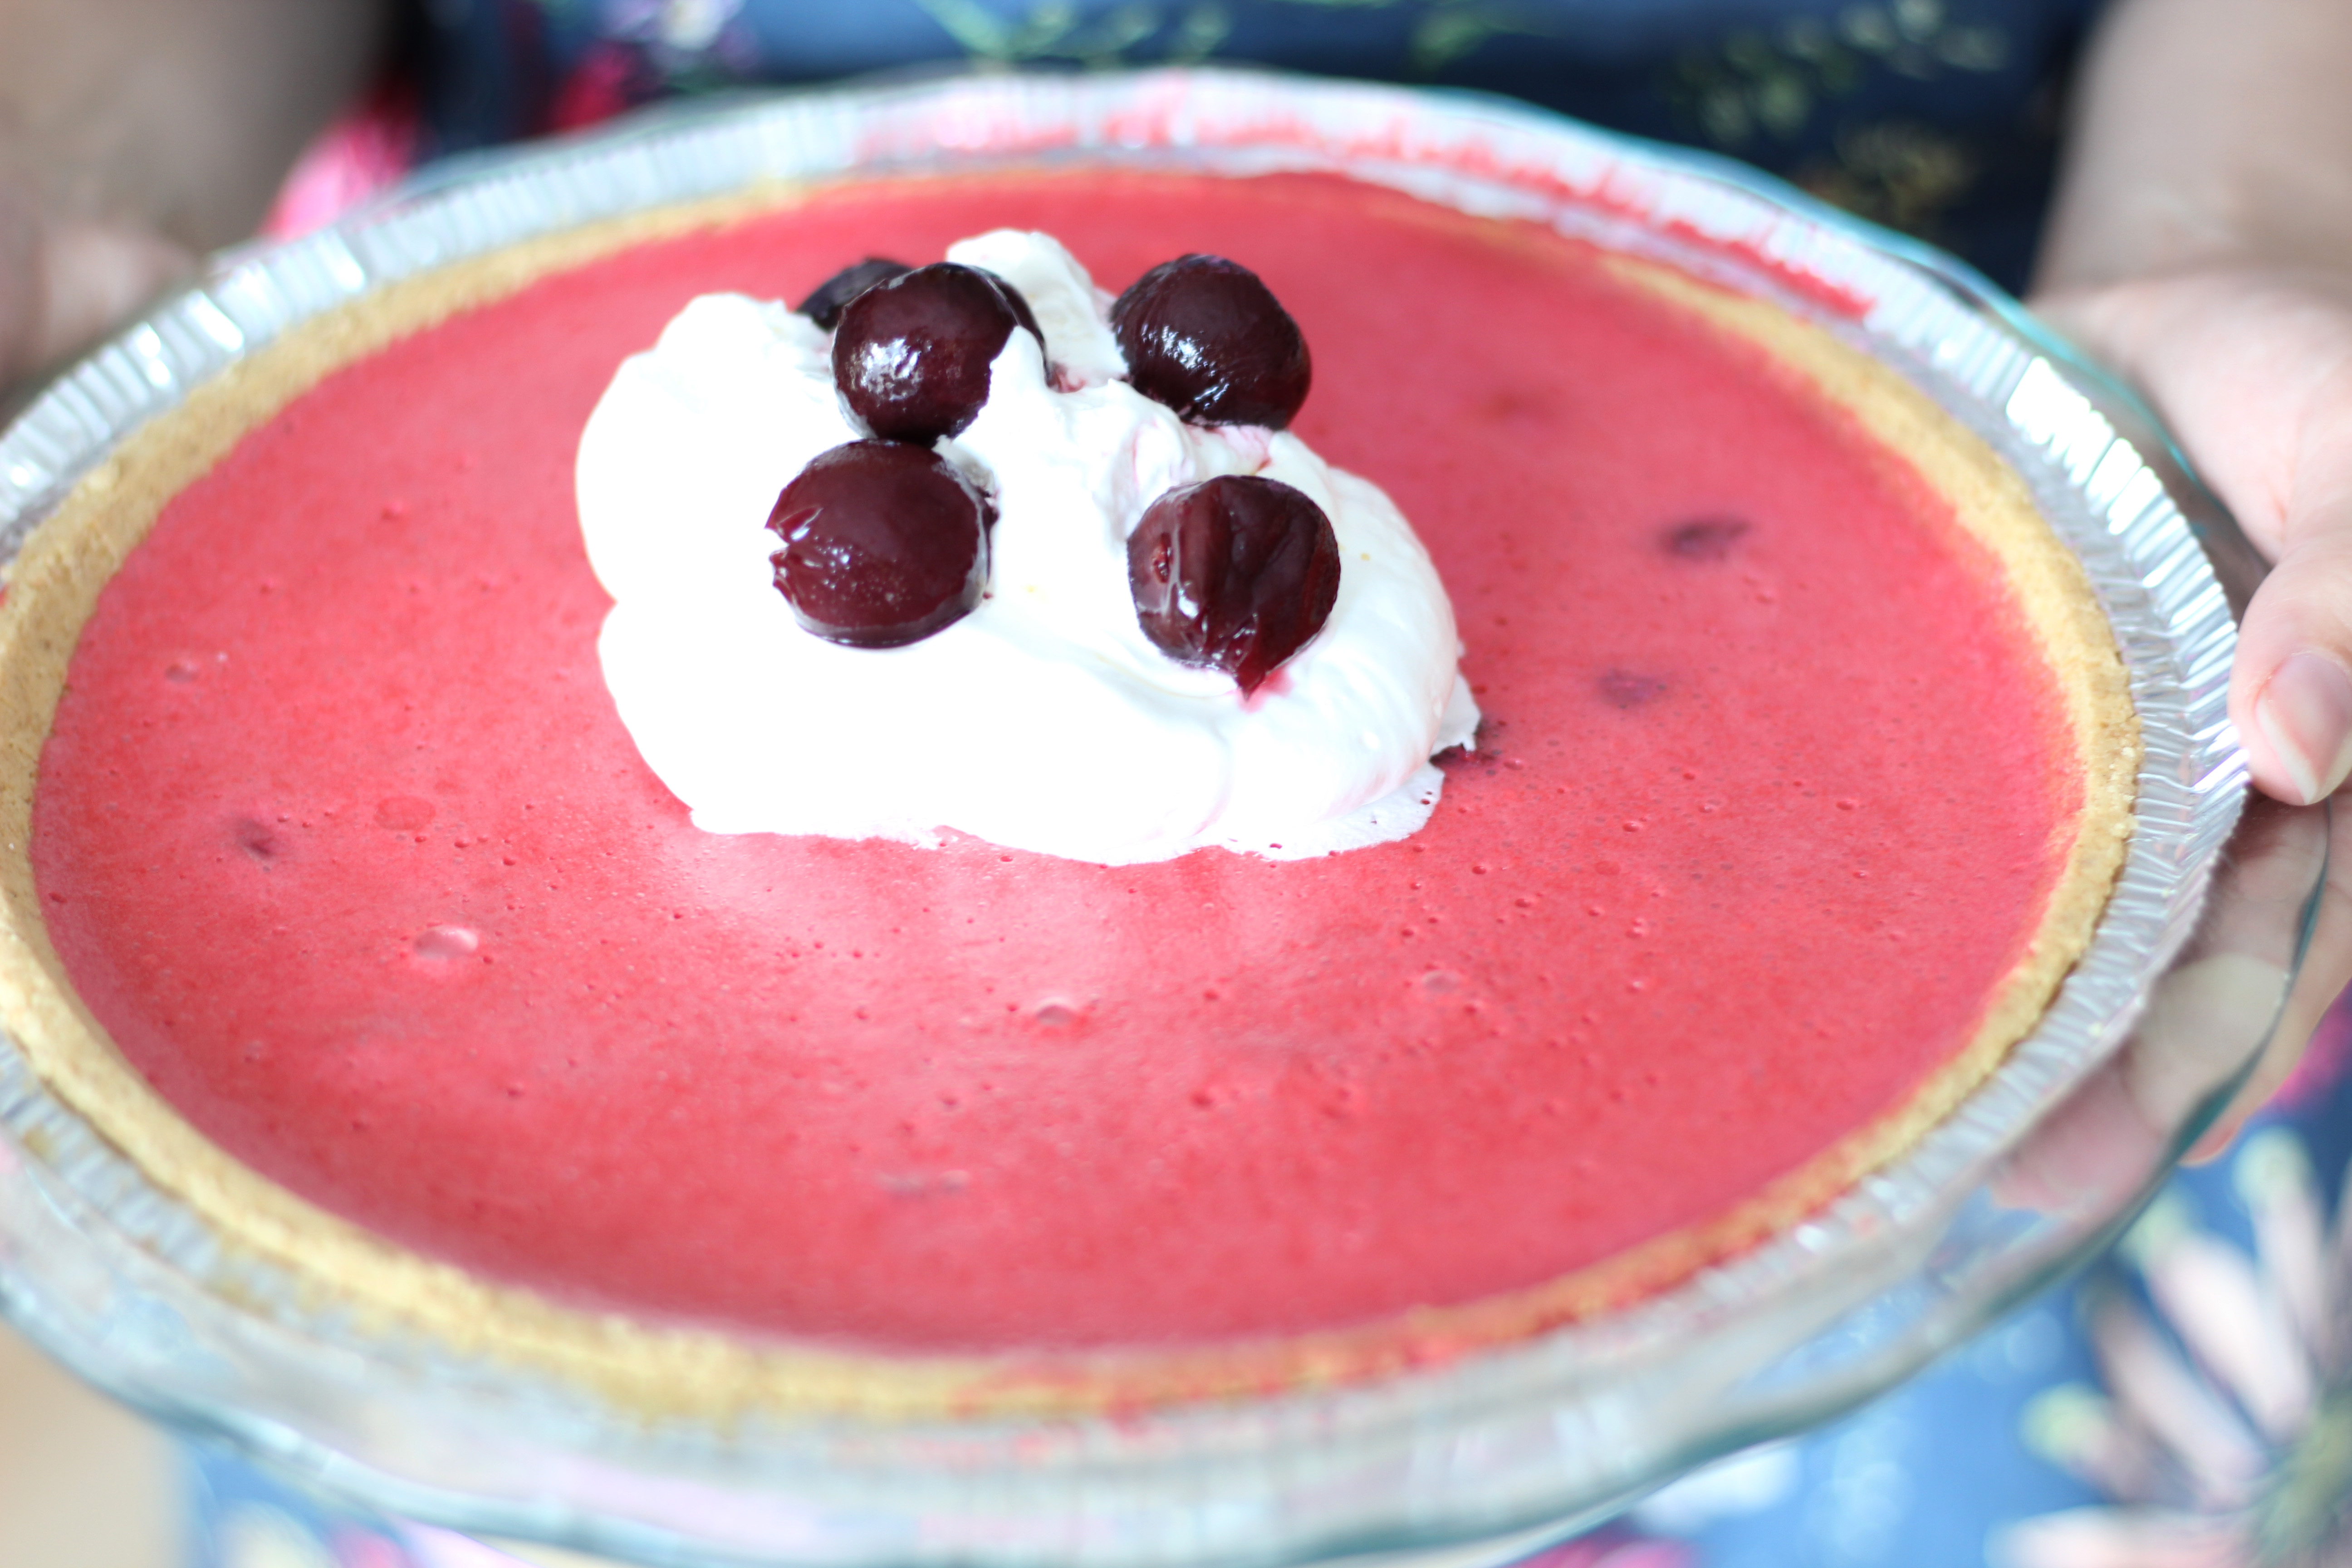
This type of pie was just the kind of dessert Marguerite would make for her “club” friends. It’s also a great summer pie since it’s light and airy. We hope you try out this cherry parfait pie when you need a dessert to beat that summer heat!

Cherry Parfait Pie

Cherry Parfait Pie
Print Recipe
  • CourseDesserts
Servings Prep Time
1 pie 20 minutes
Passive Time
2 hours
Servings Prep Time
1 pie 20 minutes
Passive Time
2 hours
Cherry Parfait Pie
Print Recipe
  • CourseDesserts
Servings Prep Time
1 pie 20 minutes
Passive Time
2 hours
Servings Prep Time
1 pie 20 minutes
Passive Time
2 hours
Ingredients
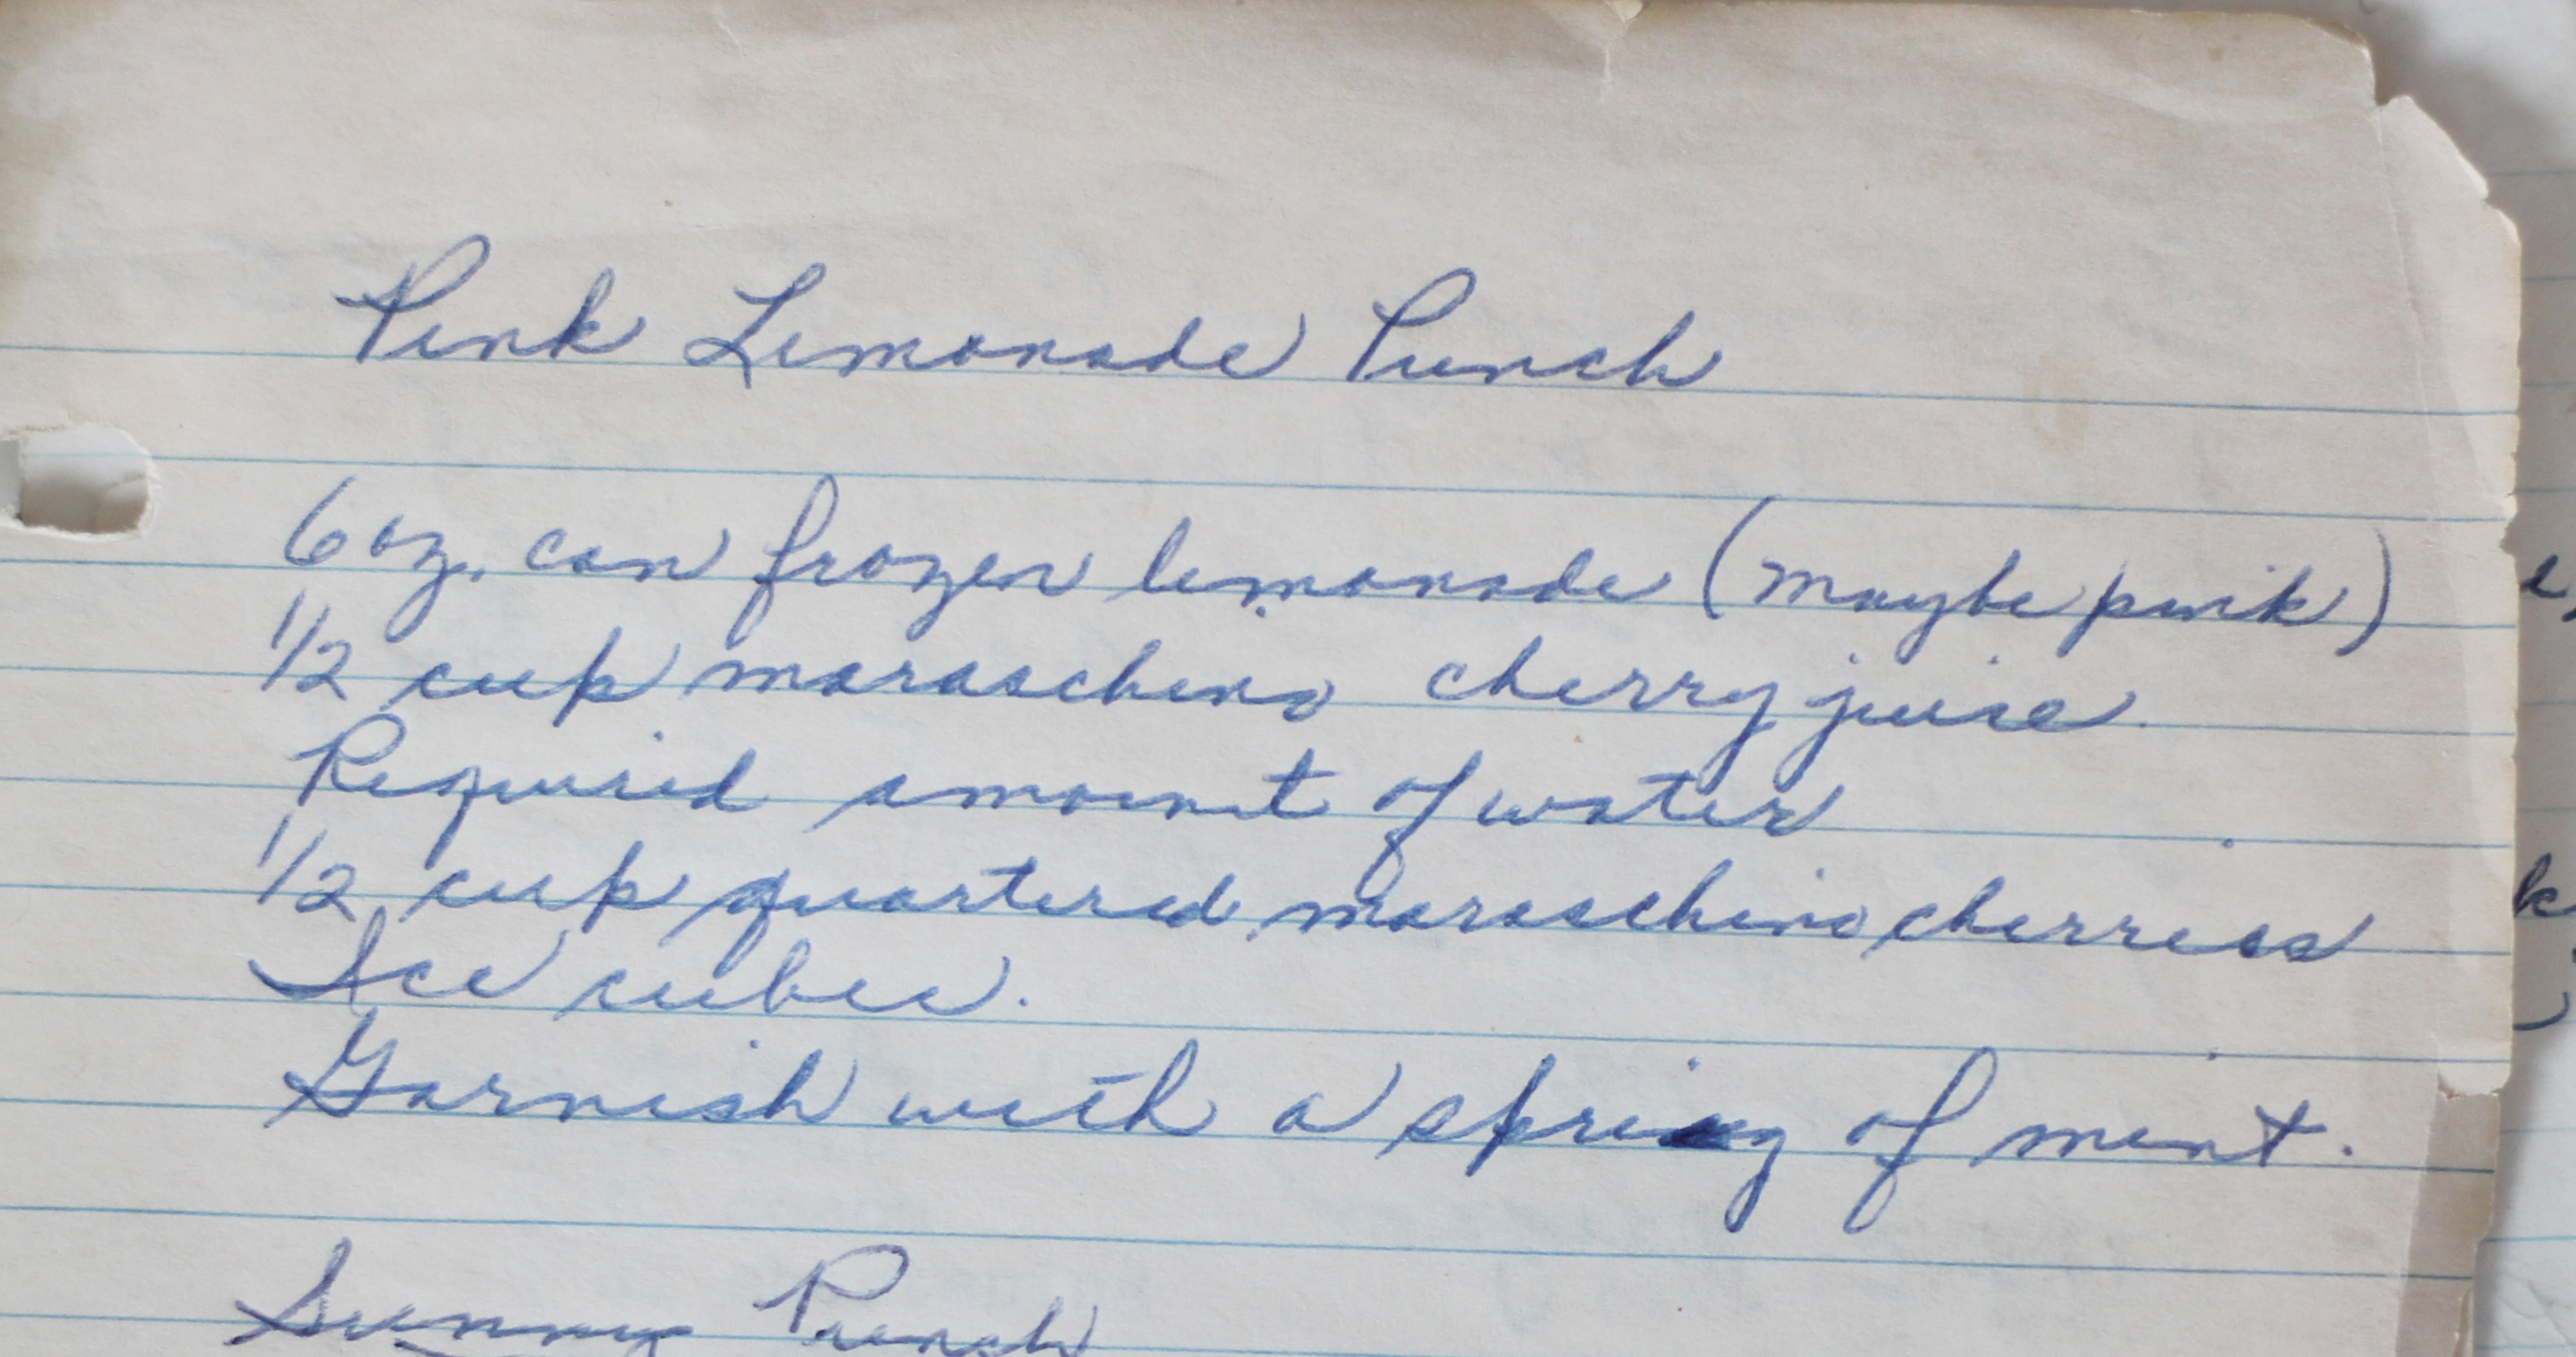
  • 1 3 oz package raspberry jello
  • 1 1/4 cups hot fruit juice + water
  • 1 1/2 cups drained pitted dark sweet cherries
  • 1 pt vanilla ice cream
  • 1 9" pie shell cooled
  • whipped cream
Servings: pie
Instructions
  1. Dissolve jello in hot liquid in a 2 quart saucepan. Use fruit juice drained from cherry can and add water to complete the 1/14 cups needed.
  2. Add ice cream by spoonfuls, stirring until melted.
  3. Chill until thickened, but not set (10-15 minutes.)
  4. Fold in cherries. Turn into pie shell.
  5. Chill until firm (60-90 minutes.)
  6. Garnish with whipped cream and fruit. You may have enough cherries from the one can to have a few left over to top your pie with.
Share this Recipe
 
Powered byWP Ultimate Recipe

July 9, 2016 by: Shannon and Aaron

Crab Meat Ramekins

crabmeatramekins

When we chose this recipe, we thought it would be fun to try something pretty different than the rest of the cookbook. When we actually made it, we found out something even cooler. This was one of Aaron’s mom’s favorite recipes. Marguerite made it a lot for her because she liked it. It was also another semi-diet recipe Marguerite had in her cookbook.

crabmeatramekins

When we chose it, neither of us knew what a ramekin was. We picked up a few from Sur la Table to make this recipe. I love the simplicity of the white ramekins. They are going to make great cookware for other recipes in the future I’m sure! But for now, back to the crab meat ramekins.

Here is what Marguerite had to say:

crabmeatramekinsrecipe

As you can see, there were NO instructions with this “recipe!” Upon consulting some other sources we figured out how we wanted to prepare the crab meat ramekins. We started by putting the ingredients in a saucepan to heat everything up. When doing that, Aaron thought that one 6 oz can of crab meat might not be enough. It turned out that the single can of crab meat was plenty.crabmeatramekins


We did have to change the amounts some in the recipe, specifically the bread and cheese for the top. In discussing the recipe with Aaron’s mom, she told him that she remembered the little brown ramekins that Marguerite used to make them in. She also commented that the tops of those were tapered and smaller than the rest of the ramekin. That made needing more bread and cheese to cover our ramekins make total sense!

crabmeatramekins

I prefer lobster, especially since I spent a summer in Maine, but thought these crab meat ramekins were delicious! (It may have been the cheese and bread.) All jokes aside, I did really enjoy this recipe, and so did Aaron. He did think that if we tried it again he may want to use lump crab instead. If you’re somewhere you can use fresh crab this summer, we hope you give that a try!

Crab Meat Ramekins
Print Recipe
  • CourseAppetizers and Sides
Servings Prep Time
4 ramekins 15 minutes
Cook Time
8-10 minutes
Servings Prep Time
4 ramekins 15 minutes
Cook Time
8-10 minutes
Crab Meat Ramekins
Print Recipe
  • CourseAppetizers and Sides
Servings Prep Time
4 ramekins 15 minutes
Cook Time
8-10 minutes
Servings Prep Time
4 ramekins 15 minutes
Cook Time
8-10 minutes
Ingredients
  • 1 can crab meat
  • 1 can cream of celery soup
  • 1 can mushrooms
  • 1/3 cup skim milk
  • lemon juice
  • 2 slices bread cubed
  • 1/2 cup shredded cheese
Servings: ramekins
Instructions
  1. Preheat oven to 375.
  2. Put the cream of celery soup and mushrooms in a medium saucepan over medium low heat.
  3. After a few minutes, whisk in the skim milk.
  4. Add the crab meat and lemon juice and mix ingredients together.
  5. Pour mixture into 7 oz. ramekins.
  6. Top with cubed bread and cheese.
  7. Place in oven for 8-10 minutes or until bread has browned and cheese has melted.
Share this Recipe
 
Powered byWP Ultimate Recipe

July 2, 2016 by: Shannon and Aaron

Fourth of July Thumbprint Cookies

Thumbprint Cookies

Happy Fourth of July Weekend! We hope you’re having a safe and fun one. We happen to be hanging out with our family in Pittsburgh all weekend and maybe sharing a few of these delicious thumbprint cookies with them. Or keeping them all to ourselves…

This recipe happened to be a Christmas staple of Marguerite’s, but there are only so many desserts we can share with you in December. So, we adapted the decor of these thumbprint cookies to be a little more seasonally appropriate.

Thumbprint Cookies Recipe

Aaron and I decided to make the thumbprint cookies with nuts on the outside like Marguerite described, as well as a way we were more familiar with: substituting the nuts for sprinkles (or “jimmies” as we Pittsburghers call them.)

Thumbprint Cookies Prep

We made these cookies twice, both times about 6 with nuts and 8 with sprinkles. The first time we made them, they were so dry! They crumbled in our hands and were not pleasant to eat. The second time, we cut back by about two tablespoons on flour and we used only softened butter instead of a butter/Crisco combo (noted below.) This would have been much better if one of us (we’re not sure whom) hadn’t bumped the oven during the thumbprinting step! Somehow it got turned up to 425 and our cookies had burned bottoms when we removed them. The third time is the charm I suppose?

Thumbprint Cookies with nuts

The nut version of the cookies were good. I’m not a huge fan of nuts, but the sugar off-set them nicely. I wish we had put an almond in the center of the nut cookies, but I was sort of on a roll with the piping bag…

Thumbprint Cookies

The sprinkle versions were amazing! Aaron, his cousin Kiersten, and myself all have fond memories of our childhood in a Pittsburgh grocery store called Giant Eagle. Whenever your parents dragged you in with them, you could always count on the friendly people behind the bakery and deli counters to give your adorable self a free slice of American cheese and a free thumbprint cookie, just for being a cute kid. This recipe definitely got me nostalgic for those days, especially with the substitution of sprinkles for nuts.

Thumbprint Cookies

Not only are thumbprint cookies a classic, but they’re so adaptable for any time of the year. Halloween? Black and orange sprinkles! Valentines day? Pink and red icing! The possibilities are endless.

Thumbprint Cookies

Tell us, are you making anything fun for the holiday weekend?

Fourth of July Thumbprint Cookies
Print Recipe
  • CourseDesserts
Servings Prep Time
1-2 dozen 15 minutes
Cook Time
10-12 minutes
Servings Prep Time
1-2 dozen 15 minutes
Cook Time
10-12 minutes
Fourth of July Thumbprint Cookies
Print Recipe
  • CourseDesserts
Servings Prep Time
1-2 dozen 15 minutes
Cook Time
10-12 minutes
Servings Prep Time
1-2 dozen 15 minutes
Cook Time
10-12 minutes
Ingredients
  • 1/2 cup butter softened
  • 1/4 cup brown sugar
  • 1/2 tsp vanilla
  • 1 cup flour use less if cookies seem dry
  • 1/4 tsp salt
  • 1 egg yolk
  • 1 egg white
  • 3/4 cup chopped nuts or sprinkles
Servings: dozen
Instructions
  1. Mix butter, brown sugar, vanilla, and egg yolk thoroughly.
  2. Sift flour and salt together and stir in. Stir in a little at a time to ensure cookies don't get too dry.
  3. Roll into one inch balls.
  4. Dip in slightly beaten egg white. Roll in finely chopped nuts.
  5. Place about one inch apart on an ungreased cookie sheet. Bake at 375 for five minutes. Remove from oven.
  6. Quickly place thumb gently on top of each cookie. Return to oven and bake 5-8 more minutes. Cool.
  7. Place in thumbprints a bit of candied fruit, jelly, or tinted powdered sugar icing.
Share this Recipe
 
Powered byWP Ultimate Recipe

June 25, 2016 by: Shannon and Aaron

Swiss Steak

Swiss Steak

This recipe is the first of extra special recipes in Marguerite’s Cookbook where the recipe will call for a certain piece of cooking equipment and we will be privileged enough to use Marguerite’s personal cookware that was handed down to us! The cast iron skillet used in this recipe was a fixture in Marguerite’s kitchen for decades, and now can be one in ours as well.

Swiss Steak

As you will see in Marguerite’s instructions, this was another diet recipe. She even lists the calories per serving, although I have no idea if any of it is true! Here is what Marguerite had to say:

Swiss Steak Recipe

Looking through this recipe, there were a few things new to us again. While we were used to trimming fat off of meat before cooking it, neither of us had then cooked the fat down and used it as a greasing agent and to brown the meat a bit before cooking! Also, Marguerite’s shortened form of directions for herself added to the confusion at the start. This swiss steak looked delicious from the beginning and we were looking forward to it even more because it was a departure from our normal cuisine of pastas and baked chicken.

Swiss Steak

See, doesn’t that look great? Aaron was sure to heed Marguerite’s warning and went back to the stove many times during the two hours the steak cooked to make sure too much liquid didn’t evaporate. That didn’t even seem to remotely resemble an issue. We do think even though we only cooked it for two hours, it turned out a little dry. As Aaron has heard and learned from his family, every stove and oven cooks the same recipe differently! We used rather thin steaks though. Our tiny, old apartment stove doesn’t help, either.

Swiss Steak

If you couldn’t already tell, we both really enjoyed this swiss steak recipe. Even with the extra step of cooking down the fat from the meat, this is a simple recipe that I really think Aaron and I will want to use again and again!

Swiss Steak
Print Recipe
  • CourseMain Dish
Servings Prep Time
4 10 minutes
Cook Time
2 hours
Servings Prep Time
4 10 minutes
Cook Time
2 hours
Swiss Steak
Print Recipe
  • CourseMain Dish
Servings Prep Time
4 10 minutes
Cook Time
2 hours
Servings Prep Time
4 10 minutes
Cook Time
2 hours
Ingredients
  • 1 1/2 lbs steak
  • salt and pepper
  • 1 lb can of tomatoes
  • 1 medium onion sliced
  • 1/2 cup celery chopped
  • 1/4 tsp garlic salt
  • 3/4 tsp salt
  • pepper
Servings:
Instructions
  1. Remove fat. Cook fat in heavy skillet. Discard chunks.
  2. Season steak in a little salt and pepper. Brown lightly in fat. Pour off fat.
  3. Add remaining ingredients.
  4. Cover and cook over low heat 2 to 2 1/2 hours or until fork tender. Add water during cooking if too much liquid evaporates.
Share this Recipe
 
Powered byWP Ultimate Recipe

June 18, 2016 by: Shannon and Aaron

Sunburst Gelatin Dessert

Gelatin Dessert

In Marguerite’s cookbook, this Sunburst Gelatin Dessert is titled “Sunburst Salad.” In fact, there are a lot of recipes titled “salad” in her cookbook, none of which ever include anything close to lettuce. I’d say 99% of the recipes with the word “salad” in the title involve gelatin and a trove of other bad-for-your-waistline-good-for-your-soul ingredients. After flipping through the book many times, only one salad actually involving lettuce was found.

That being said, this “salad” was delicious.

Here is what Marguerite had to say:Sunburst Recipe

An entire pint of ice cream that I didn’t get to eat on it’s own is a tragedy, but this gelatin dessert was so delicious, so I’ll cope. The fruit made it feel healthy and the ice cream gave the gelatin a very mousse-y texture. Very summery, very yum.

Sunburst Gelatin Dessert

According to Aaron’s mother (Marguerite’s daughter), this was a popular bridge club snack. Aaron remembers seeing this and similar desserts at many family affairs as well. According to him, she would make this gelatin dessert for the adults and then make plain Jello for the kids. Because a 7 year old Aaron only wanted plain cherry Jello and LEGOs. Actually, that’s all 28 year old Aaron wants…

Gelatin Dessert

We couldn’t find any apricot gelatin, so we subbed peach flavored instead. Aaron’s not a fan of peach, but he didn’t really mind it with all the other fun stuff thrown in.

This was one of those recipes that had a lot of variations in her book, many of which we’ll be trying some other time on this blog. By “variations” I mean “other salads.” It also was something I could actually see us making and enjoying on a regular basis and would be a great thing to bring to a party. Seriously, I’m shocked none of our friends invite us over just to make them all the delicious things we share on this blog.

Sunburst Gelatin

Sunburst Gelatin Dessert
Print Recipe
  • CourseDesserts
Servings Prep Time
6-8 10 minutes
Passive Time
2 hours
Servings Prep Time
6-8 10 minutes
Passive Time
2 hours
Sunburst Gelatin Dessert
Print Recipe
  • CourseDesserts
Servings Prep Time
6-8 10 minutes
Passive Time
2 hours
Servings Prep Time
6-8 10 minutes
Passive Time
2 hours
Ingredients
  • 3 oz package apricot gelatin
  • 1 No. 2 can apricot halves roughly 16oz
  • 1 can mandarin oranges small
  • 1 pt vanilla ice cream
  • 1/4 cup chopped nuts
Servings:
Instructions
  1. Use apricot juice and orange juice to make 1 cup of juice.
  2. Dissolve gelatin in 1 cup of boiling water.
  3. Quarter the apricots. Then add apricots, oranges, nuts, and fruit juice.
  4. Fold in ice cream.
  5. Pour in mold (or individual cups) and refrigerate until firm.
Share this Recipe
 
Powered byWP Ultimate Recipe

June 11, 2016 by: Shannon and Aaron

Fish Fillet Recipe

Fish Fillet Header

Here’s an interesting fact about Marguerite that we recently learned—she was not a huge fan of seafood!  We learned from Aaron’s mother that Marguerite only made fish recipes on Friday’s during lent, and made seafood recipes to appeal to her other family members, such as Aaron’s mom, Mercedes.  She was devoutly Catholic, so Fish Fridays were important to her. After we learned this fact, we flipped through the book and realized just how few seafood recipes there are! We will feature a favorite seafood recipe of Mercedes’ in a few weeks, but for now, on to this fish fillet recipe.


Here’s what Marguerite had to say:

Fish Fillets

Aaron typically takes notes while making recipes to denote what time we started and any other pertinent information to refresh our memories when it comes time to write our posts.  This fish recipe was so simple, he completely forgot to write a single thing down!

Fish Fillets

This fish fillet recipe was a little too basic. So much so, that I felt it was nothing special when it came time to try it.  I have since discovered that I don’t care for most mild fish and so far prefer salmon over most all others I’ve tried. It was “meh” enough that I almost wanted to put it on the dud list and not even write about it.

I don’t think Aaron would run out and buy tilapia (like we chose this time) in bulk to make this dish for himself every day, but he did like it more than I.  He enjoys the flavor and consistency that ingredients like sour cream give to a dish, and was very excited to be able to use one of our new found favorite spices, paprika, again.

Fish Fillets

This fish fillet recipe isn’t as healthy as a fillet with lemon juice, salt, and pepper, but it is just as quick and easy to prepare!  So if you want to try a new recipe that won’t take a lot of time, give this a try!

Fish Fillets
Print Recipe
  • CourseMain Dish
Servings Prep Time
4 5 minutes
Cook Time
30 minutes
Servings Prep Time
4 5 minutes
Cook Time
30 minutes
Fish Fillets
Print Recipe
  • CourseMain Dish
Servings Prep Time
4 5 minutes
Cook Time
30 minutes
Servings Prep Time
4 5 minutes
Cook Time
30 minutes
Ingredients
  • 1 lb fish fillets
  • 1/2 tsp salt
  • 1/2 cup sour cream
  • 1 tsp parsley flakes
  • 1/4 tsp paprkia
Servings:
Instructions
  1. Preheat oven to 350 degrees.
  2. Grease baking pan and arrange fish in single layer, salt.
  3. Spread sour cream over fish fillets.
  4. Sprinkle parsley and paprkia.
  5. Bake covered for 30 minutes or until it flakes.
Share this Recipe
 
Powered byWP Ultimate Recipe

June 4, 2016 by: Shannon and Aaron

Pink Lemonade Punch

Pink Lemonade Punch header

Summer! A cool glass of lemonade when the sun is hot is such an under-appreciated past time. I am a huge fan of lemonade, so when I came across this Pink Lemonade Punch recipe in Marguerite’s cookbook, I wanted to try it right away.

Here is what Marguerite had to say:

Pink Lemonade Punch Recipe

There are a few interesting things going on in this recipe. First of all, the difficult part was quartering an entire jar of maraschino cherries. That was the part Aaron didn’t enjoy, mostly because he was the one to do it. Secondly, Marguerite noting to prepare the lemonade “as instructed” was odd. Aaron was very used to Marguerite using condensed soups but never adding the water, especially for her casseroles. That fact made Marguerite’s instructions clear to him when it came time to make the pink lemonade punch.

Pink Lemonade Punch

The background on this recipe is pretty cool. Marguerite was into simple drinks for herself and her family most of time, so this was more of a special occasion drink. She was in something called “bridge club”, where groups of four people would get together and play bridge. Quite a few of Marguerite’s recipes were cute and small for serving during bridge club. Bridge club was both an evening or afternoon activity, making this pink lemonade punch either a refreshing warm afternoon beverage or a fun addition to an evening meal.

Pink Lemonade Punch

I really enjoyed this refreshing lemonade, especially since we’ve had some nice warm days here. However, I was not crazy about having chunks of maraschino cherry in my drink. I did like the flavor they added. Next time, I’ll just use the juice and maybe leave the cherry bits out of my glass.

Aaron drinking Pink Lemonade Punch

Aaron has quite a sweet tooth (because he is so sweet.) For that reason, he doesn’t like the tartness of plain lemonade, but does enjoy flavored lemonades. This pink lemonade punch was no exception. We both found this lemonade refreshing, and I think if we want to take the time and effort this summer to prepare ourselves a fancy drink to cool off, this pink lemonade punch will do the trick!

He’s almost as sweet at the Pink Lemonade Punch he’s enjoying. Almost.

Pink Lemonade Punch
Print Recipe
  • CourseDrinks
Servings Prep Time
1 gallon 15 minutes
Servings Prep Time
1 gallon 15 minutes
Pink Lemonade Punch
Print Recipe
  • CourseDrinks
Servings Prep Time
1 gallon 15 minutes
Servings Prep Time
1 gallon 15 minutes
Ingredients
  • 6 oz can of frozen pink lemonade
  • 1/2 cup maraschino cherry juice
  • 1/2 cup maraschino cherries quartered
  • required amount of water
  • ice cubes
  • mint
Servings: gallon
Instructions
  1. Quarter the maraschino cherries. Save the juice from the container for the recipe.
  2. Prepare the frozen pink lemonade as per the instructions.
  3. Add the maraschino cherries and juice.
  4. Add ice cubes and garnish glasses of lemonade with a sprig of mint.
Share this Recipe
 
Powered byWP Ultimate Recipe

May 28, 2016 by: Shannon and Aaron

Brown Rice Casserole

BrownRiceHeader

It’s time for another installment in “Marguerite’s Casseroles!” But seriously, this cookbook is chock full of them. This, recipe, which we are calling brown rice casserole, is another one. I was hoping this was going to turn out more like fried rice, but that was not the case.

Here’s what Marguerite had to say (including her recipe title):

Brown Rice Casserole Recipe

Preparation for this dish was really simple. We bought a can of water chestnuts that was already sliced to save time. This was a very simple recipe, with only a few ingredients. As Aaron and I were making this recipe, I started realizing it was probably not something I was going to enjoy.

Brown Rice Casserole

I do like water chestnuts, and rice, but honestly that’s where my enjoyment of this dish ended. They can’t all be winners, huh? We did run in to one issue when gathering the ingredients for this recipe. Due to shopping at a small grocery store, and due to lack of planning, we could only find french onion soup, and not plain onion soup. Aaron decided that if anything, it would improve the recipe.

Brown Rice Casserole

While the brown rice casserole was not the most delicious recipe in our opinion, it did at least turn out well. Aaron didn’t love this recipe either. He liked the mushrooms in the brown rice casserole more than the water chestnuts. We make a great pair! If you want to try a simple rice with some interesting flavor, give this brown rice casserole a try. We’re still not sure why she called it an “Oriental Rice.”

Brown Rice Casserole

Brown Rice Casserole
Print Recipe
  • CourseAppetizers and Sides
Servings
4-6
Cook Time
1 hour 10 minutes
Servings
4-6
Cook Time
1 hour 10 minutes
Brown Rice Casserole
Print Recipe
  • CourseAppetizers and Sides
Servings
4-6
Cook Time
1 hour 10 minutes
Servings
4-6
Cook Time
1 hour 10 minutes
Ingredients
  • 1 stick butter
  • 1 cup rice uncooked
  • 1 can water chestnuts sliced thin
  • 1 4 oz can button mushrooms
  • 1 can onion soup
  • 3/4 cup water chestnut and mushroom liquid
Servings:
Instructions
  1. Melt butter. Add rice, chestnuts, and mushrooms. Cook 10 minutes.
  2. Add soup and liquid.
  3. Pour in casserole dish. Cover and bake for one hour at 300 degrees.
Share this Recipe
 
Powered byWP Ultimate Recipe

May 14, 2016 by: Shannon and Aaron

Homemade Meatballs

Homemade Meatballs

As you may recall, my Italian heritage requires me to love all things pasta related, that includes spaghetti and meatballs. These homemade meatballs were very easy and I liked how plain they were (a real “shock” to those of you that know me personally.) But honestly, the nice plain flavor is not too overpowering, making these a great candidate for being added to any pasta dish, sauce, and the like.

Homemade Meatballs

Here is what Marguerite had to say:

Homemade Meatballs Recipe

You may have noticed, Marguerite’s original recipe called for a quarter pound of veal. We decided we did not want to go through the hassle of finding or paying for veal. As you may recall, we had issues with this earlier. Also, while some may think veal has a discernibly better flavor, both Aaron and I felt it was not necessary to include in this recipe. Veal-Schmeal! We just edited the amounts of each remaining meat to keep a decent ratio of beef to pork, as well as making sure to keep the total amount of ground meat to one pound. Make sense? If not just read the recipe below.

Homemade Meatballs

Marguerite’s recipe says that this amount of ingredients will make 16 meatballs. Our cooking of this recipe did not yield that many, however, we made some of ours way too large! Most of the ones in these photographs are an average size, but we (Aaron) did make a few monster meatballs that ended up larger than desired.

Homemade Meatballs

As mentioned above, they were a little plain. Not something I would serve on their own as an appetizer, but something to add to some pasta and sauce. Perhaps with her meatless spaghetti sauce, which we previously made? We will have to try them together sometime and get back to you.

The meatballs also reminded me of my mother’s meatloaf, and some insight into this recipe from Aaron’s mom proved that to be a valid thought. She told us that her dad, and Marguerite’s husband, Jim, liked meatloaf. The ingredients in this recipe were incredibly similar to the meatloaf that Marguerite would make for Jim, particularly the three different kinds of meat.

Homemade Meatballs

Aaron liked making these meatballs because they reminded him of making homemade meatballs with his mom. She had a different meatball recipe of her own, and if you want to hear about that recipe in the future, you should subscribe to our monthly newsletter! In contrast to these homemade meatballs, it’s very much an “eat on their own as an appetizer” recipe. Aaron thought these meatballs were yummy, but he is getting increasingly tired of all the finely chopped onion in these recipes, particularly because the Marguerite he remembered couldn’t stomach onions anymore and didn’t but them in anything she was planning on eating! I also make him do all the onion chopping…


Homemade Meatballs
Print Recipe
  • CourseAppetizers and Sides
Servings Prep Time
16 Meatballs 30 minutes
Cook Time
25 minutes
Servings Prep Time
16 Meatballs 30 minutes
Cook Time
25 minutes
Homemade Meatballs
Print Recipe
  • CourseAppetizers and Sides
Servings Prep Time
16 Meatballs 30 minutes
Cook Time
25 minutes
Servings Prep Time
16 Meatballs 30 minutes
Cook Time
25 minutes
Ingredients
  • 5/8 lbs ground beef
  • 3/8 lbs ground pork
  • 1 cup bread crumbs
  • 1 egg
  • 1 tbsp dried parsley
  • 1 medium onion chopped fine
  • 1/4 cup Parmesan cheese
  • salt and pepper to taste
Servings: Meatballs
Instructions
  1. Combine all ingredients and mix thoroughly. Form into balls.
  2. TIP: If meatballs tend to stick to hands as they are formed, add more breadcrumbs.
  3. Place in a shallow baking dish. Bake for 20-25 minutes at 350 degrees.
Share this Recipe
 
Powered byWP Ultimate Recipe

May 7, 2016 by: Shannon and Aaron

Oven French Fries

Oven French Fries Header

I don’t know about you, but one side dish Aaron and I could eat always and forever are french fries. From fast food to handmade, french fries are a delicious way to prepare potatoes. In case you haven’t noticed a trend on this blog, we’re potato obsessed. These oven french fries combined flavors we never would have paired together and resulted in my favorite recipe so far (I’m pretty sure Aaron’s too.) They would also go great with the Pittsburgh Ham Barbecue Sandwiches that we made last week!


It’s also another “guest” post. Marguerite noted below that she got this recipe from Madaline, who was a long time friend of her’s. Here’s what she had to say:

Oven French Fries Recipe

One thing we have found in cooking through Marguerite’s cookbook, is that both Aaron and I like paprika much more than either of us realized. It has been one of the main spices we’ve used in quite a number of dishes, and it is something we both really enjoy. Now salt is really what makes any french fries, good, am I right? But the addition of the paprika and the parmesan cheese really create a much more exciting set of flavors for these oven french fries. Also, butter. ‘Nough said.

Oven French Fries

The thing Aaron enjoyed about making these fries is that it didn’t require any special equipment, or having cooking grease to fry them in. And, to be honest, I think he really liked the idea of being able to make the fries any shape and size he wanted.

Oven French Fries

In the end, both that unique, “homemade” fry look, and the delicious flavors I mentioned before, made these oven french fries a huge success with both of us. We have already made them several times, and plan on making them any time we need to finish off a bag of potatoes! Not so good for our waistlines, but who cares?

Oven French Fries Recipe

Oven French Fries
Print Recipe
  • CourseAppetizers and Sides
Servings Prep Time
2 15 minutes
Cook Time
25 minutes
Servings Prep Time
2 15 minutes
Cook Time
25 minutes
Oven French Fries
Print Recipe
  • CourseAppetizers and Sides
Servings Prep Time
2 15 minutes
Cook Time
25 minutes
Servings Prep Time
2 15 minutes
Cook Time
25 minutes
Ingredients
  • 4 Potatoes
  • butter
  • salt
  • pepper
  • paprika
  • Parmesan cheese
Servings:
Instructions
  1. Slice raw potatoes 1/8" thick.
  2. Melt butter and dip each potato slice. Shake excess off and place on a cookie sheet.
  3. Sprinkle with salt, pepper, paprika, and parmesan cheese.
  4. Bake in oven for 20-30 minutes (or until tender) at 375 degrees.
Share this Recipe
 
Powered byWP Ultimate Recipe
  • « Previous Page
  • 1
  • 2
  • 3
  • 4
  • 5
  • 6
  • Next Page »

Hey There!

We're Aaron and Shannon, the cooks behind Marguerite’s Cookbook. We are a husband and wife cooking/blogging team who love food, fun, and family.

Give us a follow

Twitter

Sign up for our monthly newsletter and receive exclusive content from us in your inbox once a month.

  • Policies
  • Contact

© 2025 · Fun Genesis WordPress Theme by, Pretty Darn Cute Design